Imagine stepping into a kaleidoscope of creativity where bold colors and statement styles come together to form a symphony of self-expression. At the forefront of this artistic revolution are vibrant pink summer nails, not just mere decorations but declarations of personal style that leave a lasting impression on all who see them.
From understated elegance to eye-catching patterns, we’ll delve into the transformative power of every brushstroke, revealing how these tiny transformations can radiate confidence and creativity throughout an individual’s presence. Join us as we embark on this visual journey, where every pink-hued nail serves as a whispered tale of artistic flair.
Playful Pink Swirls and Stars

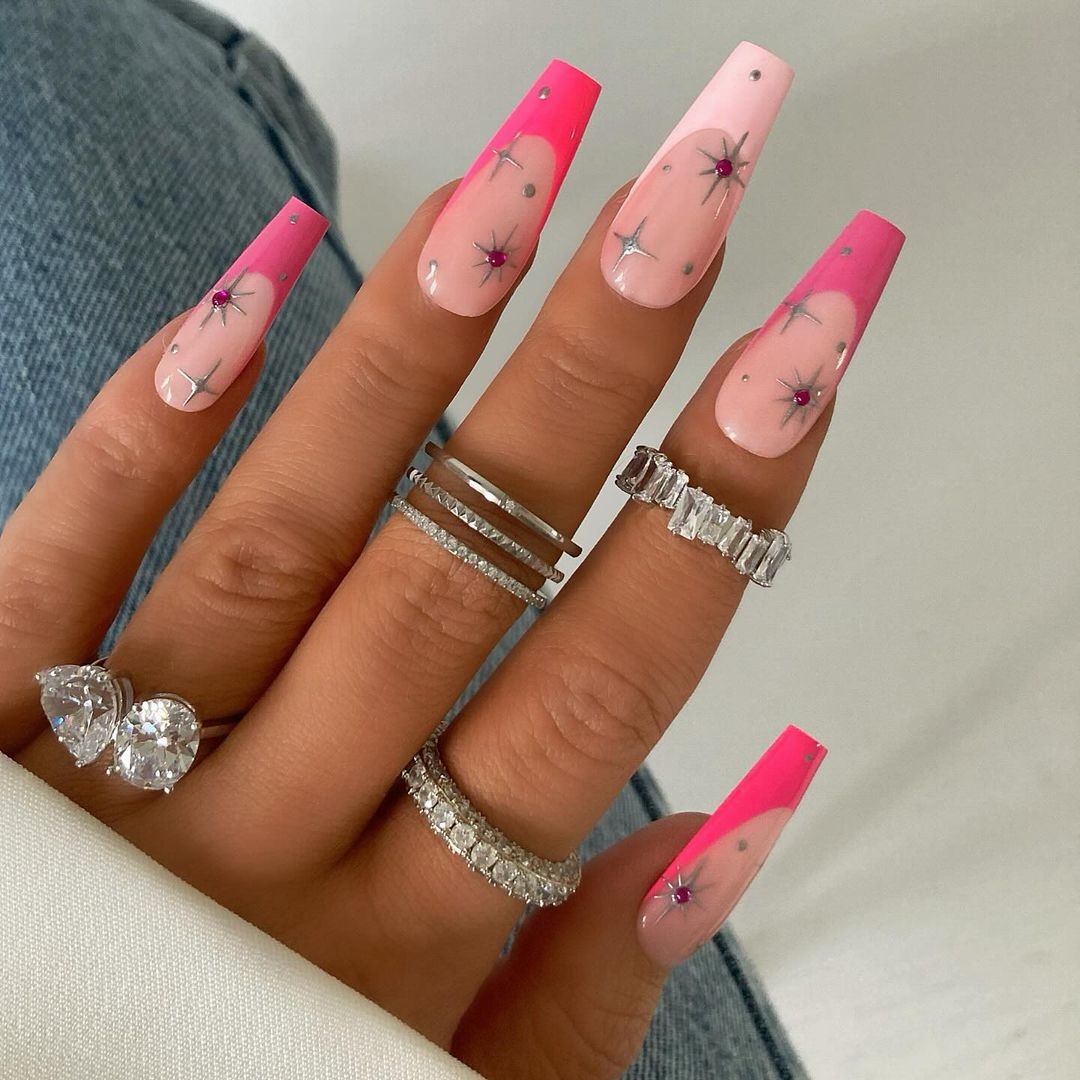
In the midst of a vibrant summer, pink nails aren’t just a statement piece – they’re an invitation to let your creativity run wild. The whimsical designs on this canvas of nails transport us to a fantastical realm where swirls and celestial bodies converge. The short length of these pink beauties proves that simplicity can be just as stunning as complexity.
This art form is reminiscent of an impromptu painting session in a lush meadow or a sleepover’s quiet moments, where the only sound is the soft rustling of grass. It’s no surprise then that these designs feature playful swirls, hearts, and stars. The photo credit goes to @noellefuyunails. From a professional standpoint, this masterpiece is a testament to the artist’s keen understanding of color theory – the use of light base allows magenta to pop, while the glossy top coat deepens the colors.
It’s as if expert lighting has been applied to an already stunning canvas. To recreate this look at home, you’ll need:* Base coat (OPI)* Baby pink polish (Essie: Muchi, Muchi)* Magenta polish (OPI Red)* White polish for details (Sally Hansen: White On)* Top coat (Seche Vite Dry Fast)* Nail guide stickersThe DIY guide follows:Start with a clean and buffed nail. Apply the base coat, allowing it to dry before moving on. Paint the baby pink polish as the background once the base coat is dry.
For magenta details, use a thin brush and start from the center, working your way out in shapes or lines. Finish with top coat for a glossy finish. This took an eternity because I insisted on waiting for each layer to dry before applying the next to avoid any smudges!
Glossy Pink Elegance
The ‘Summer Nails’ feature gleaming pink hues in perfect harmony, showcasing an epitome of refined elegance. The almond-shaped nails, inspired by the latest gel manicure trends, seamlessly blend sophistication with a touch of whimsy. The smooth, luscious finish is undeniably alluring, making it a stunning choice for both holiday and everyday wear. The credit for this captivating look goes to @_. daliainzunza99.
To replicate this beauty, start by preparing your nails with a base coat (CND Stickey) that ensures the gel polish lasts without chipping. Then, apply two coats of Pink Smoothie gel polish, curing each layer under an LED lamp to achieve optimal depth and shine. Finally, top it off with a no-wipe gel top coat (Gelish: Top It Off) to preserve the glossy finish and prevent lint or dust particles from dulling the effect.
As someone who’s had their fair share of mani-pedis, I’m impressed by the seamless execution of this look – a testament to the skill behind the brush. With minimal effort, you can achieve this stunning summer-inspired nail art that’s sure to turn heads.
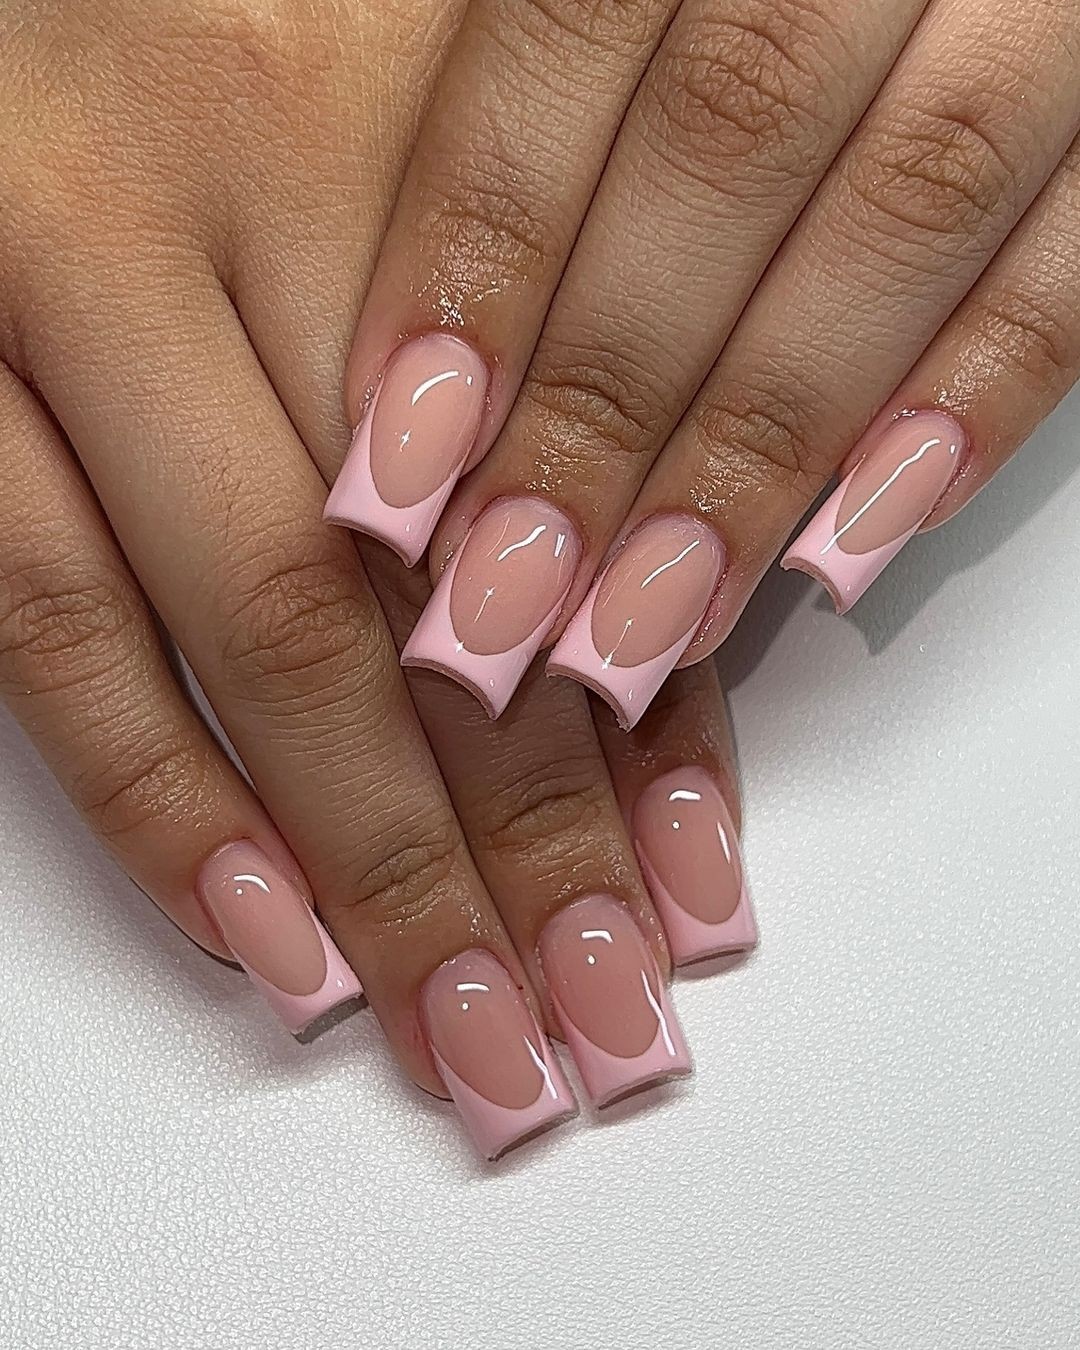
Pink Outline Chic
On a canvas of short square nails, bold strokes of bright pink meet subtle nuances of nude in a graphic edge that screams trendy and neon. This striking design celebrates the season’s most popular nail style – a simple yet eye-catching fusion of minimalist and statement-making flair. The contrast between the soft, understated base and the electric pink outline is a manicurist’s dream come true, blending subtlety with boldness in perfect harmony.
To recreate this look, start by applying your base coat (Orly Bonder). Once dry, apply a thin layer of nude polish (Essie: Ballet Slippers) to set the tone. Next, use neon tape or a thin brush dipped in pink (China Glaze: Shocking Pink) to create the bold outline. A steady hand and keen vision are essential for achieving this look – take your time and focus on precision. Finally, seal everything with top coat (OPI: Rapidry) to ensure long-lasting wear.
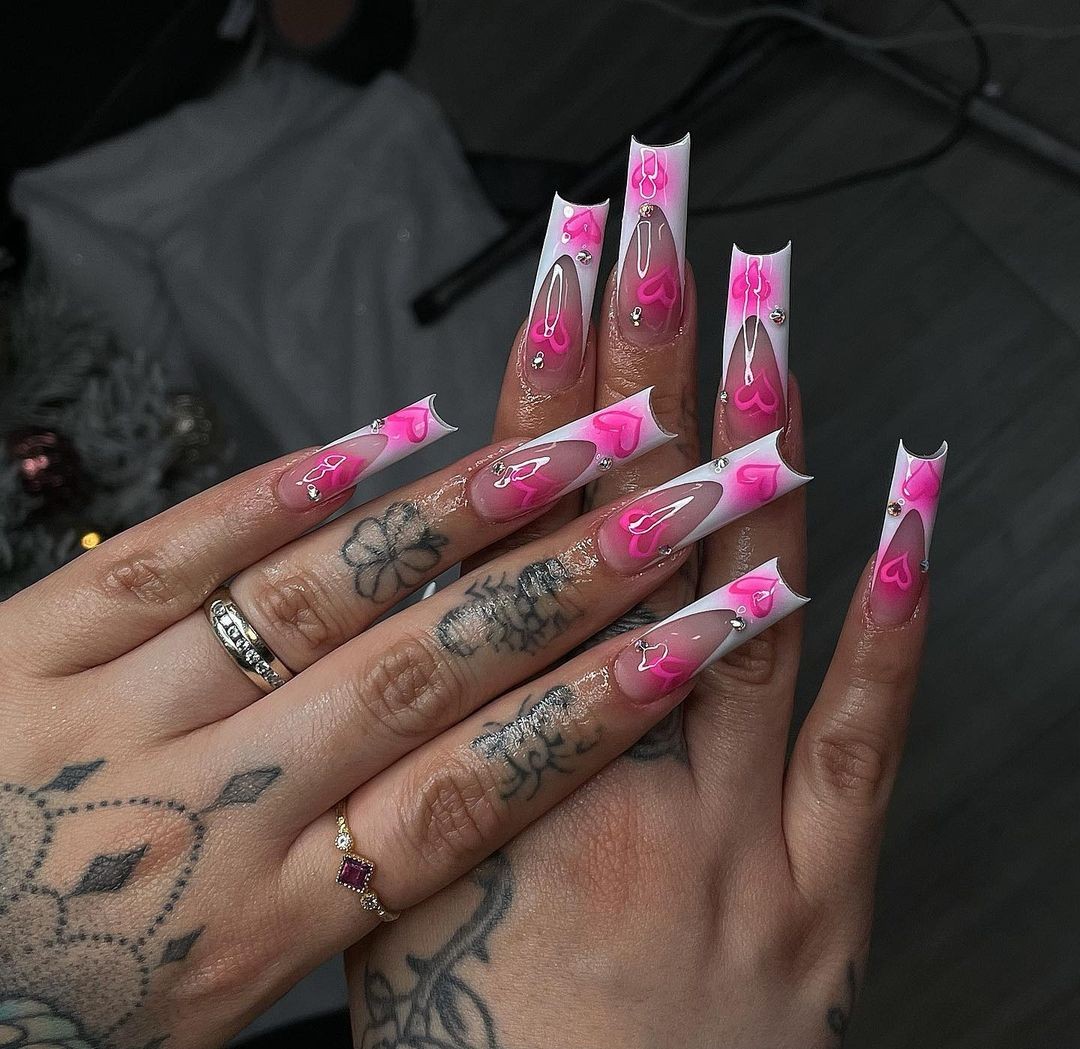
Flaming Hearts and Chic French Tips
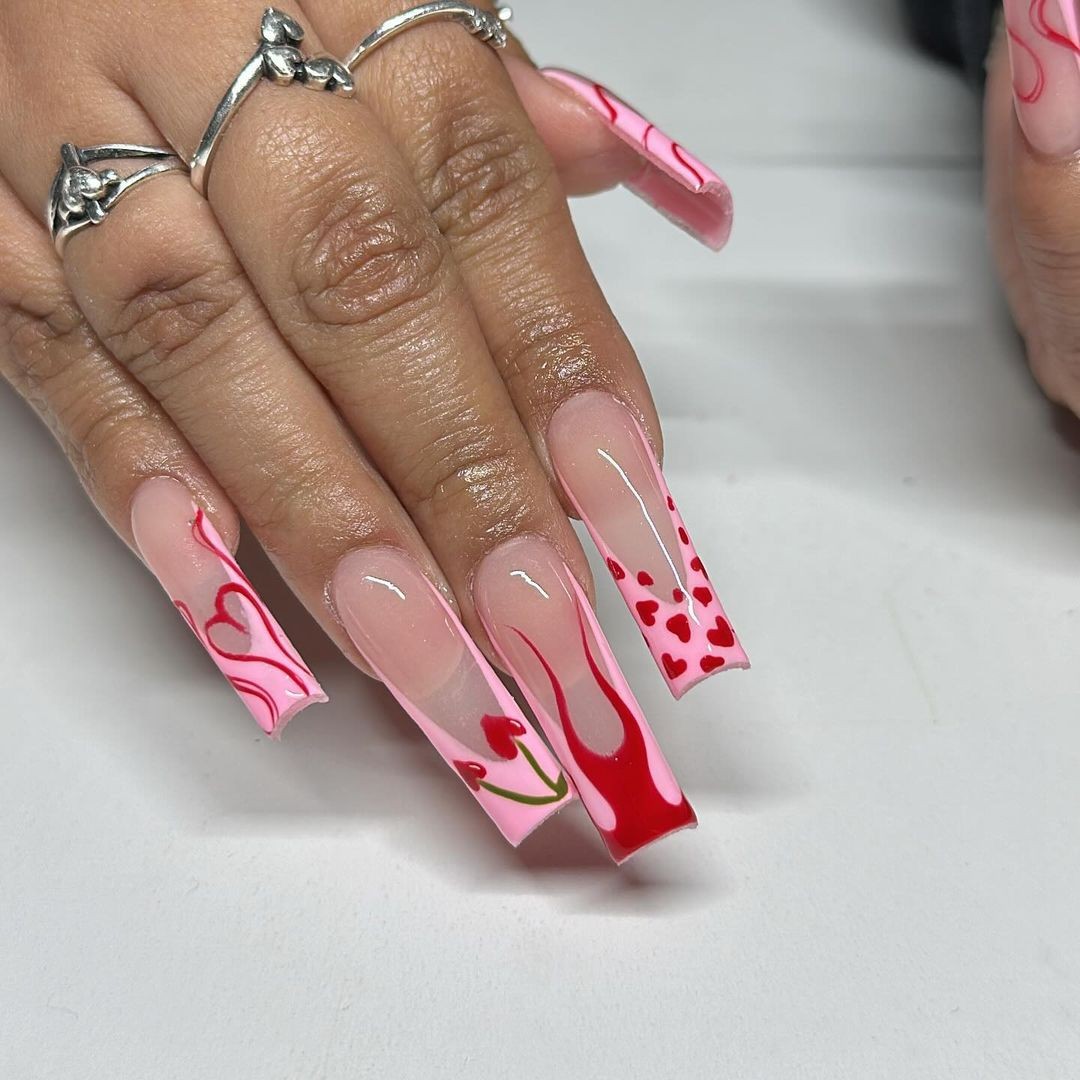
Imagine a nail art masterpiece that defies the ordinary by combining vibrant pink hues with the allure of flirtation. Our reimagined classic French tips feature a neon pink border that adds an extra layer of sophistication to this timeless design. The pièce de résistance is the addition of hand-painted hearts and fluid strokes, which not only elevate the visual appeal but also tell their own story of romance and drama. This design isn’t about following trends; it’s about setting them.
Each nail becomes a canvas that captures the essence of the bright and dark shades used. The beauty of this design lies in its versatility – it’s perfect for both everyday wear and special occasions. The short nails provide a grounded foundation, while the gel overlay gives the acrylics a glass-like finish that catches the eye at every summer gathering. Whether you’re attending a summer soirée or just want to add some extra flair to your daily look, this design is sure to turn heads.
To recreate this stunning look at home, start with a base coat and follow it up with some nude polish. Use tape as a guide to achieve crisp edges on your French tip design before applying the neon pink polish. For added depth and dimension, draw precise hearts and strokes using red acrylic paint and a fine brush. Finally, seal everything in place with topcoat for a long-lasting finish.
Hello Kitty Couture
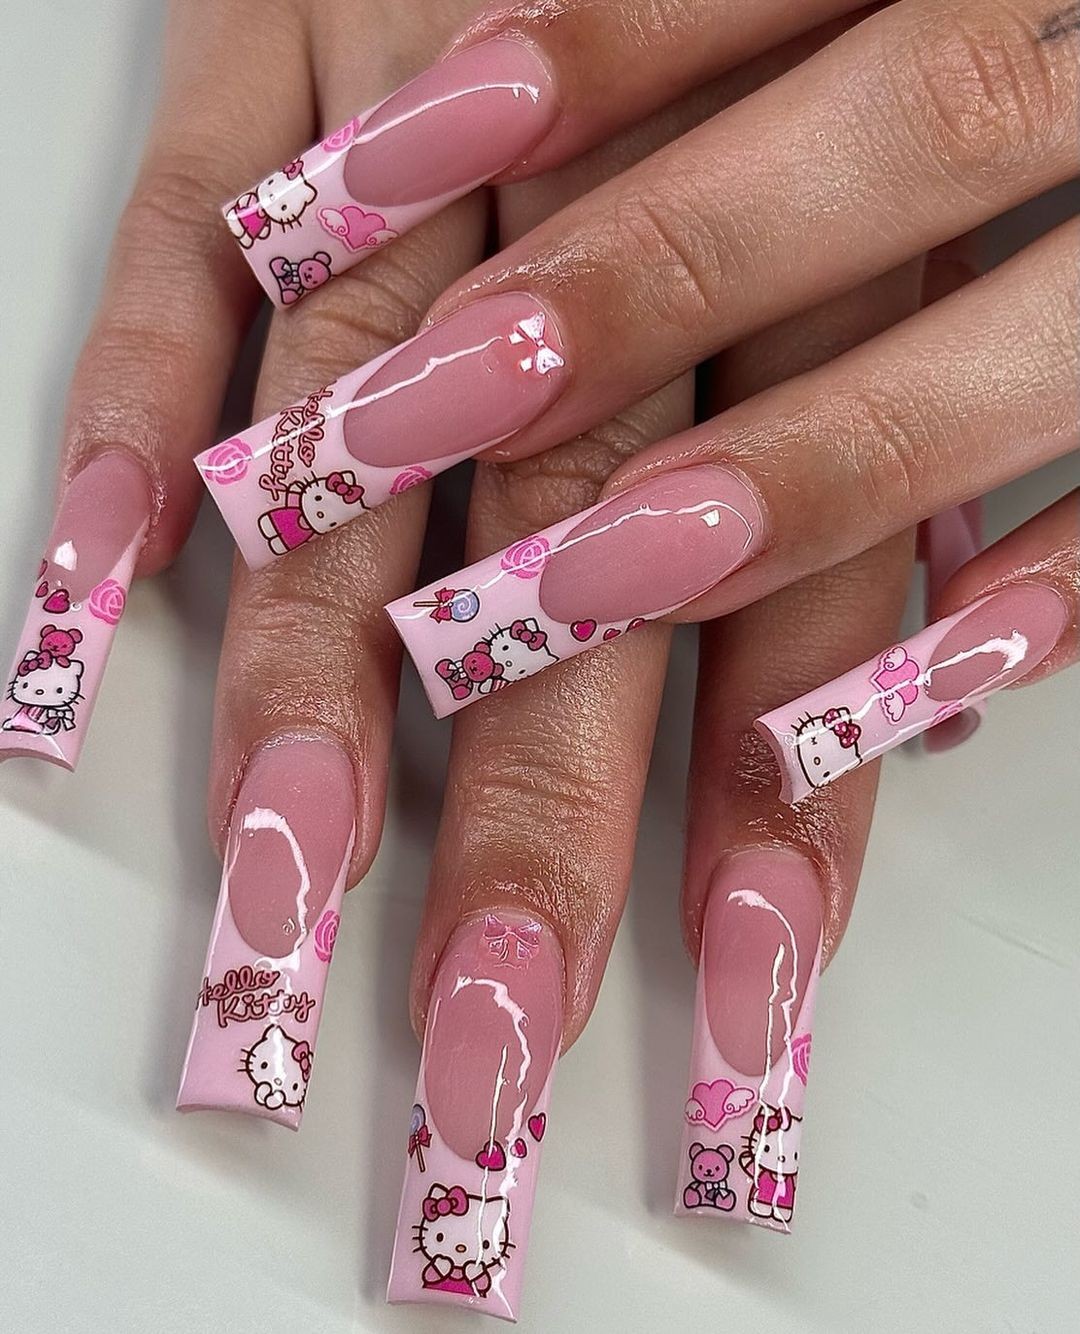
Bringing back childhood nostalgia in a modern twist, this Hello Kitty nail art inspiration combines pink coffin nails with the beloved character’s iconic bow, roses, and friends. The gel polish shines as brightly as the cuteness factor in this design, making it perfect for those who want to revisit their youth with a contemporary flair. The @nailzbykenzz photo showcases the perfect balance of light and soft tones, blending playfulness with professionalism.
From a technical standpoint, this nail art is all about precision and attention to detail. Using nail decals or hand-painted Hello Kitty elements requires a steady hand and an eye for design. With the right brushstrokes and placement, each nail becomes a unique canvas showcasing the character’s world. DIY Guide: Begin with a base coat, then layer on the pale pink gel polish. Use a fine brush to apply your decals or paint Hello Kitty details.
Ensure each nail features a distinct element of the design. Finish with a gel top coat for added shine and longevity. For DIY enthusiasts, patience is key when working with detailed decal placements – take your time and don’t rush!
Simple Love
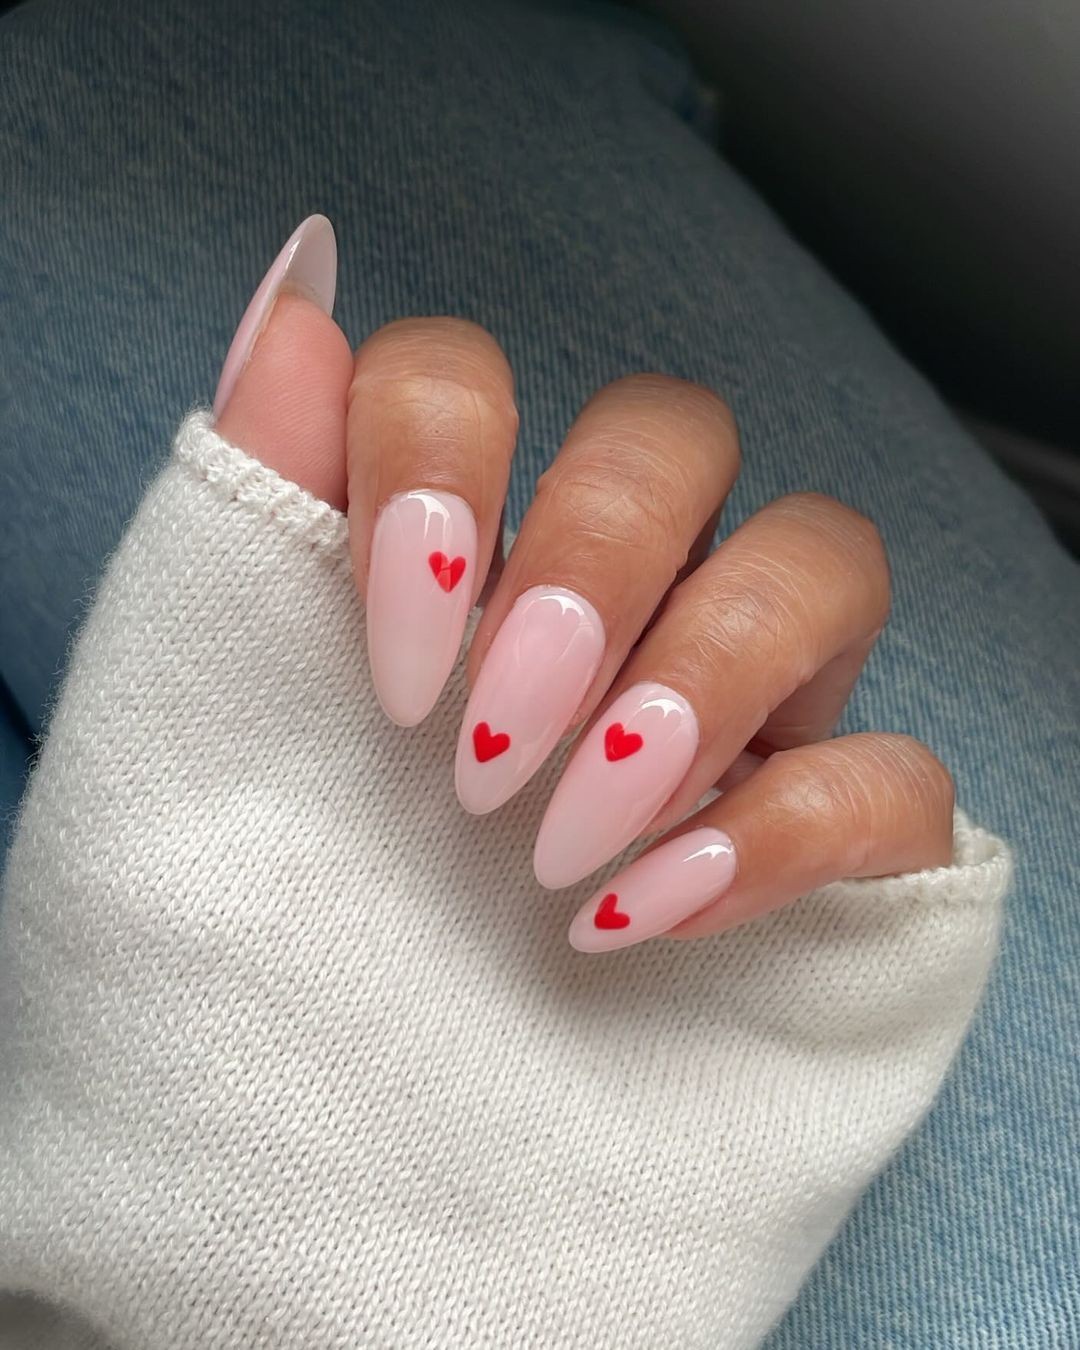
The understated charm of this design lies in its simplicity, elevated by a pop of whimsy courtesy of the single red heart on each nail. Rather than relying on bold statements, this look speaks volumes through its subtlety. As a nod to summer’s warm tones, it’s a refreshing departure from over-the-top designs that can dominate the nail art scene. This pedicure-friendly design is equally as charming when applied to toes.
To recreate this look, you’ll need:* Base coat (OPI: Natural Nail Base Coat)* Soft pink polish (Essie: Ballet Slippers)* Red polish for hearts (Essie: Really Red)* Top coat (Sally Hansen: Insta-Dri Anti-Chip)This minimalist design not only aligns with current trends but also translates beautifully to gel applications. Feel free to get creative and add some artistic flair with a topcoat layer when you’re ready to mix things up.
This look is just as stunning on shorter gels or natural nails, offering endless possibilities for customization.
Matte and Shine Duo
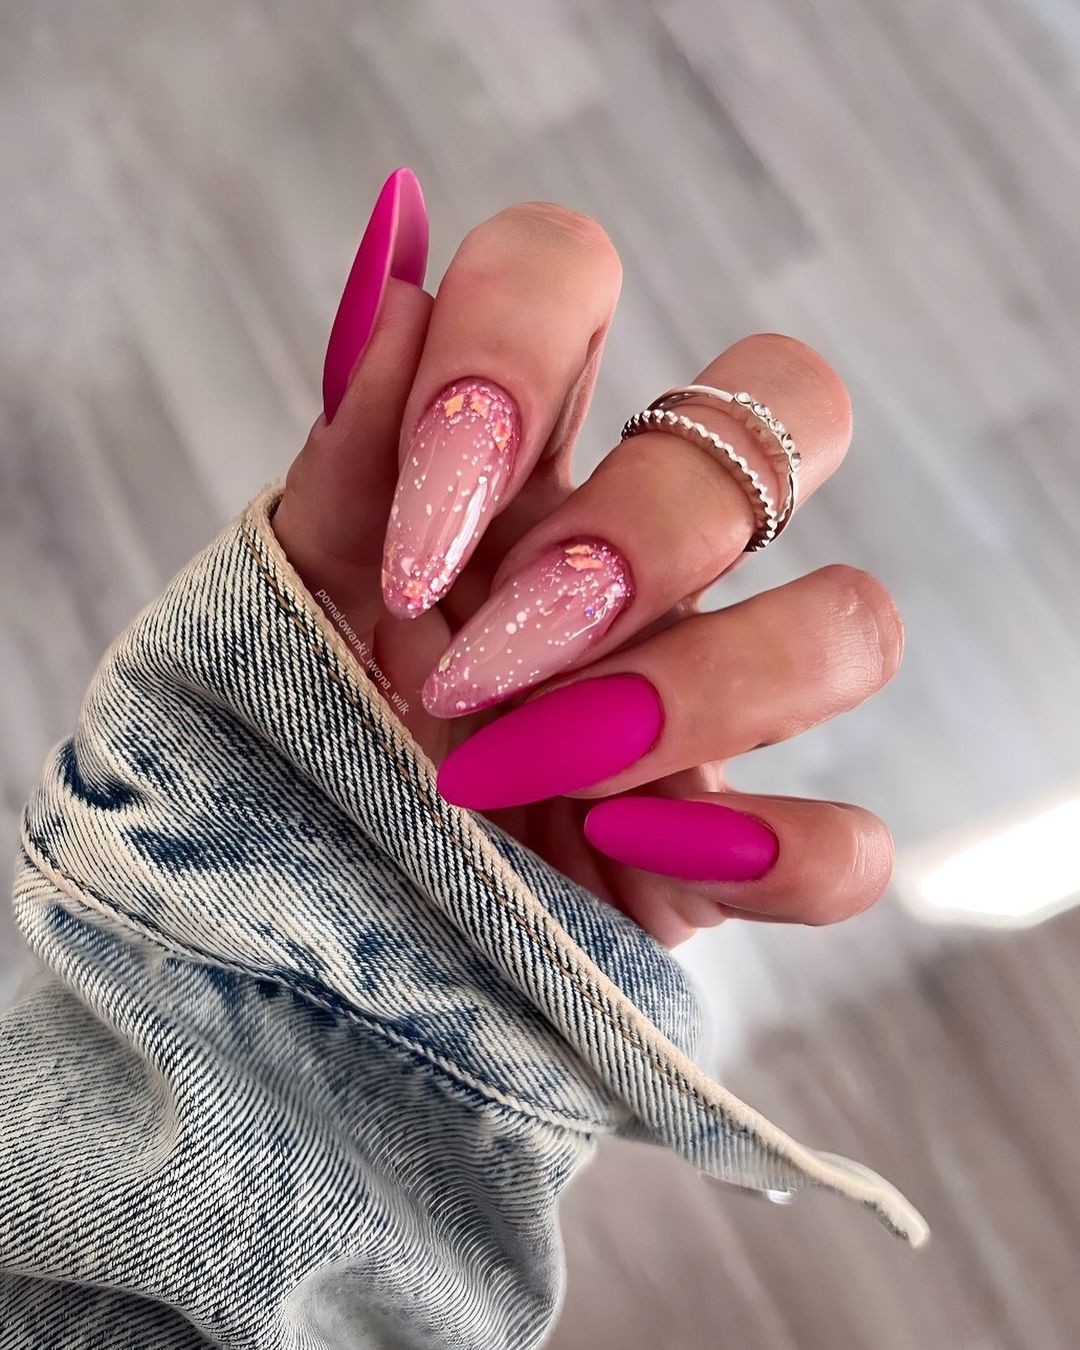
Versatility on nails is a true showstopper. The pink nail trend has taken the summer by storm, offering not just one statement color but also a delicate, speckled nude option that’s essentially two fabulous designs in one. The bold matte fuchsia hue is perfect for making a splash at any summer gathering, while the glossy nude adds a touch of elegance and sophistication. The long almond-shaped nails featured here allow the design to truly shine, demonstrating just how versatile this look can be.
The creative team behind this inspo opted for a combination of base coats, polishes, and top coats to bring the design to life. The consumables included Essie’s ‘Here to Stay’ base coat, ‘Matte About You’ matte pink polish, OPI’s ‘Bubble Bath’ nude polish, and ‘Princesses Rule!’ glitter top coat, as well as a matte top coat for the pink nails.
As a professional in the beauty industry, I must say that the contrast between the matte bright pink and the sparkly nude is truly unexpected yet utterly chic. This design has the potential to work beautifully at both holiday events and beachside gatherings.
Are you ready to recreate this simple yet elegant look? Here’s your step-by-step guide: start with base coats, apply the fuchsia polish, followed by a matte top coat for the pink nails.
For the nude nails, sprinkle glitter while it’s still tacky, then seal with a glossy top coat. Voila! Your DIY nail art is complete.
Subtle Pink Ombre
The essence of summer is encapsulated in this understated yet charming nail design. A gentle pink ombre effect, subtly fading from the cuticle to the tip, is punctuated by a dainty heart detail on the transparent tip. This minimalist gel look exudes effortless romance and pairs seamlessly with pastel hues.[Image: @setsbysenia]To achieve this whimsical look, start by applying a base coat (OPI’s Natural Nail Base Coat).
Next, blend Gelish’s Pink Smoothie with clear gel polish from the cuticle to the tip to create the ombre effect. Be sure to cure each layer before moving on to the next. Add a small white heart for a playful touch and finish with a no-wipe top coat for a glassy sheen. As an expert in the field, I can attest that this gradient requires a high level of skill to execute flawlessly – a testament to the elegance of this manicure.
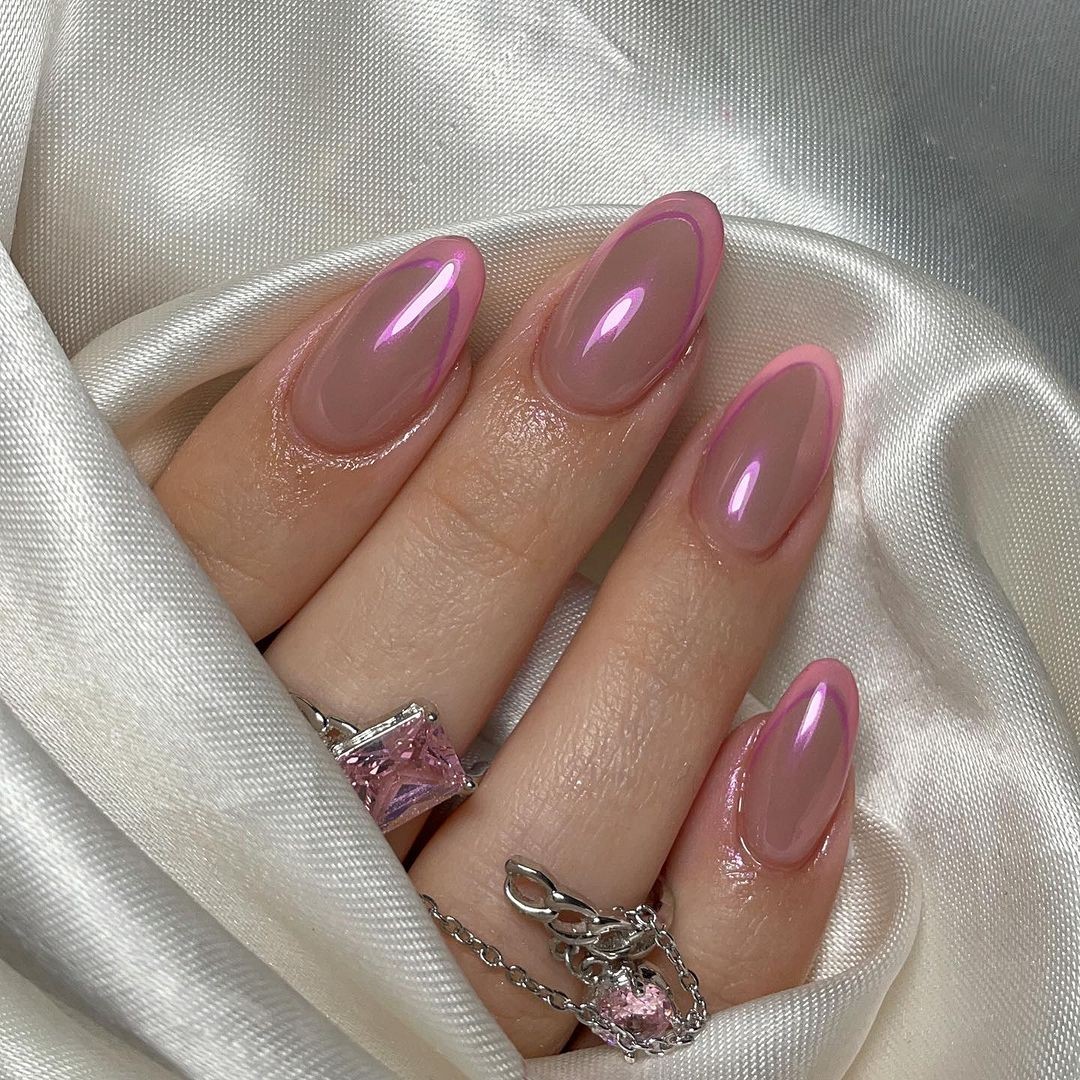
Elegant Minimalism
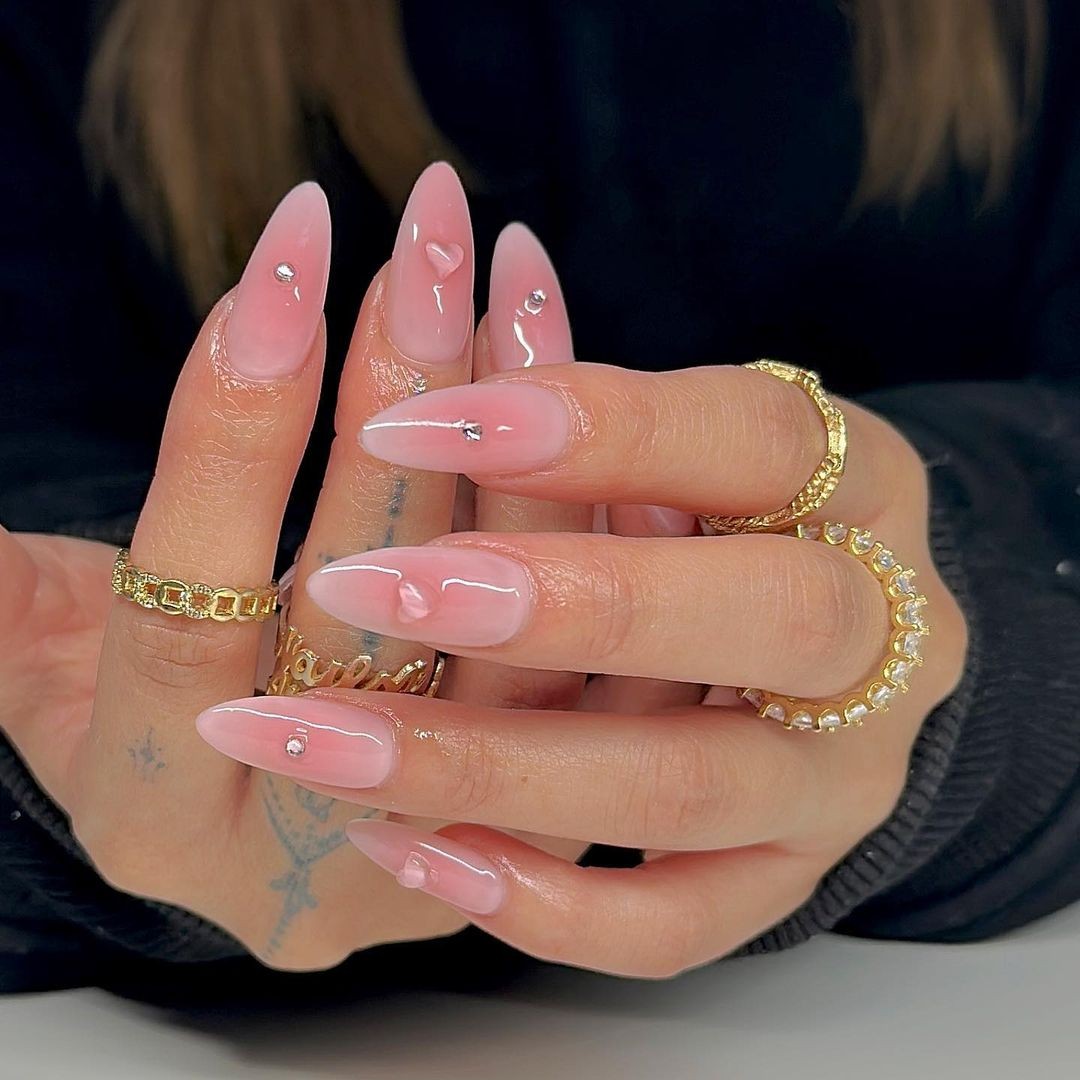
This design combines simplicity with elegance, featuring a translucent pink base paired with a single gel crystal. The result is a statement-making look that’s both understated and on-trend. The soft pink hue works beautifully as a pedicure option for your toes or as a subtle accessory to any summer outfit.
For this look, @nailsxanalysse credits Hard as Nails by Sally Hansen as the base polish, Sugar Daddy by Essie as the gel polish color, and Gel Setter top coat from Essie for securing everything in place. The key to this design’s success is the precise placement of the crystal, which catches the light perfectly to add just enough sparkle without overpowering the overall look.
To replicate this design at home, start with a thin layer of sheer pink gel polish over your base, cure it, and then apply a small dot of adhesive where you want the crystal to sit. Use tweezers or a wax pencil to position the crystal before curing again. Finally, seal everything in place with a layer of Gel Setter top coat to maintain that glossy finish.
Swirling Hearts Fantasy
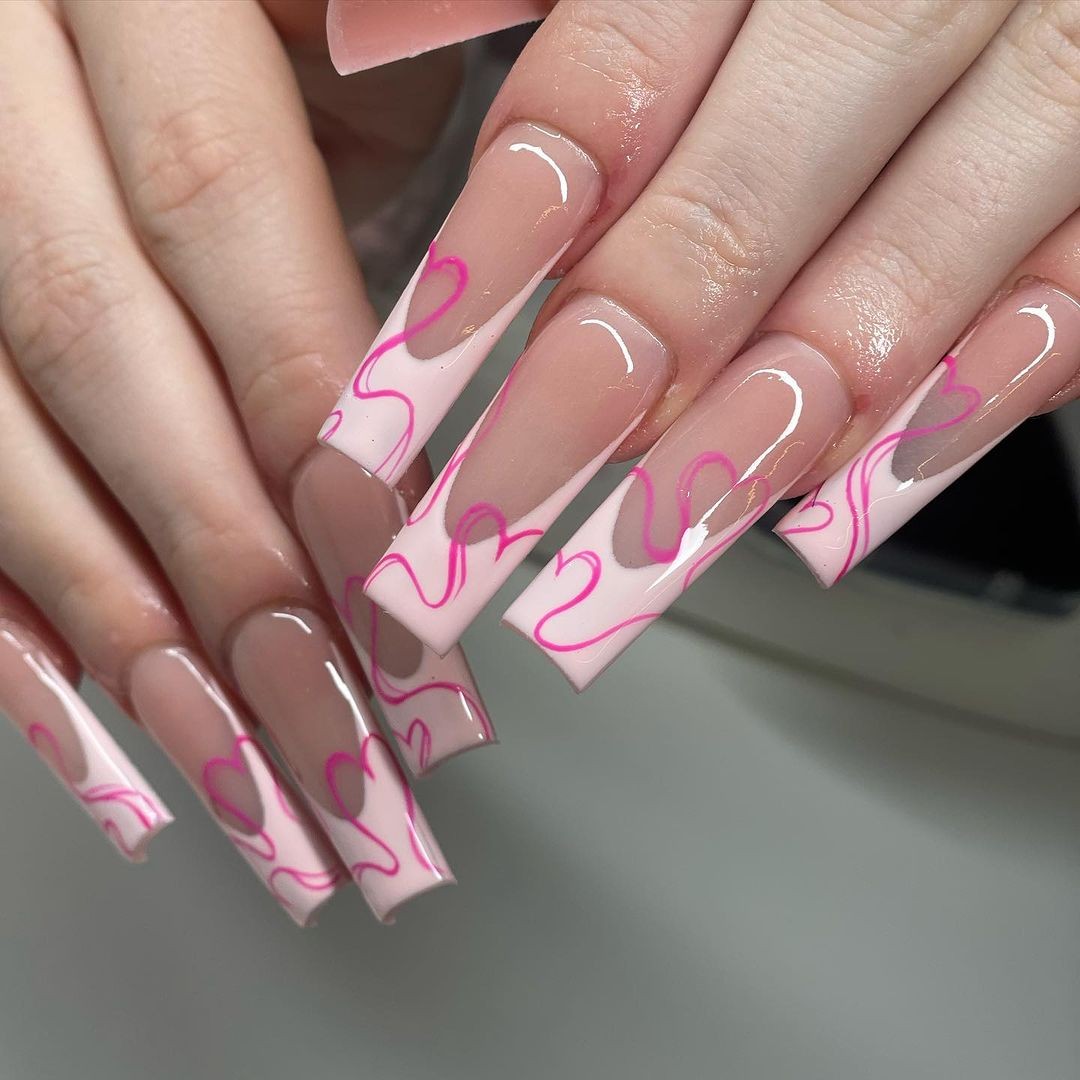
The enchanting art of photography is brought to life by the delicate tips, soft swirls, and vibrant hearts in bright pink. This captivating design embodies the essence of pink summer nails, where the transparency of the tips adds length without overpowering the neon and bright pink details that cascade down each nail. As a manicurist, I appreciate how the sheer base allows the gel color to take center stage, elevating my intricate designs without diminishing their beauty.
This harmonious blend of art and style creates an effortless summer mani. To recreate this look, you’ll need:* Base coat (CND Stickey)* Sheer pink gel polish (Gelish: Pink Smoothie)* Neon pink polish (China Glaze: Pool Party)* Detailing brush* Top coat (Essie: Gel Setter)Here’s how to achieve this stunning mani: Apply your preferred base coat, followed by a sheer pink gel for added color. Using a detailing brush, paint on neon pink swirls and hearts, ensuring they remain fluid and clean.
Finish with your favorite top coat for a glossy finish that showcases all the cute details.
Ombre Hearts Delight
A sweet and charming take on the pink summer nails theme is captured in this photo. The design features a gradient effect achieved by sponging on light to bright pink gel polish, seamlessly blending from one shade to another. Adding a touch of whimsy are tiny white hearts created using a dotting tool. This understated yet captivating look is perfect for short gel nails or a simple, short-term manicure. The credit for this lovely photo goes to @ehnails_xx.
To recreate this design, start by applying a base coat, such as Orly Bonder. Then, use Gelish’s Light Elegant for the ombre effect, sponging on the polish and blending it upwards to achieve the desired gradient. Use a dotting tool to add small white hearts, created with Essie’s Blanc. Finally, seal the design with Seche Vite Dry Fast top coat for added shine.
Abstract Love
The featured photos showcase a remarkable blend of creativity and artistry. A fusion of vibrant pink and soft white creates an abstract representation of love on a canvas of acrylic nail art, adorned with heart outlines that serve as the perfect combination of simplicity and elegance. This design is particularly noteworthy for its ability to seamlessly merge modern trends with timeless gel techniques, resulting in a unique blend of neon-like vibrancy and nuanced subtlety.
To replicate this stunning look, you’ll need: base coat (Sally Hansen Hard as Nails), pink acrylic powder (Young Nails Cover Pink), white acrylic paint (for the heart outlines), nail forms (for efficient acrylic application), and top coat (IBD Just Gel Polish Top Coat). The combination of these elements allows for a design that is both modern and timeless, making it perfect for everyday wear or special occasions.
Here’s how to bring this vision to life: apply base coat, followed by the placement of nail forms. Mix pink acrylic powder with monomer and apply it to the form, shaping as needed to achieve the desired look. Once set, use white acrylic paint to draw heart outlines. Finally, seal your design with top coat for a glossy finish that will withstand the test of time.
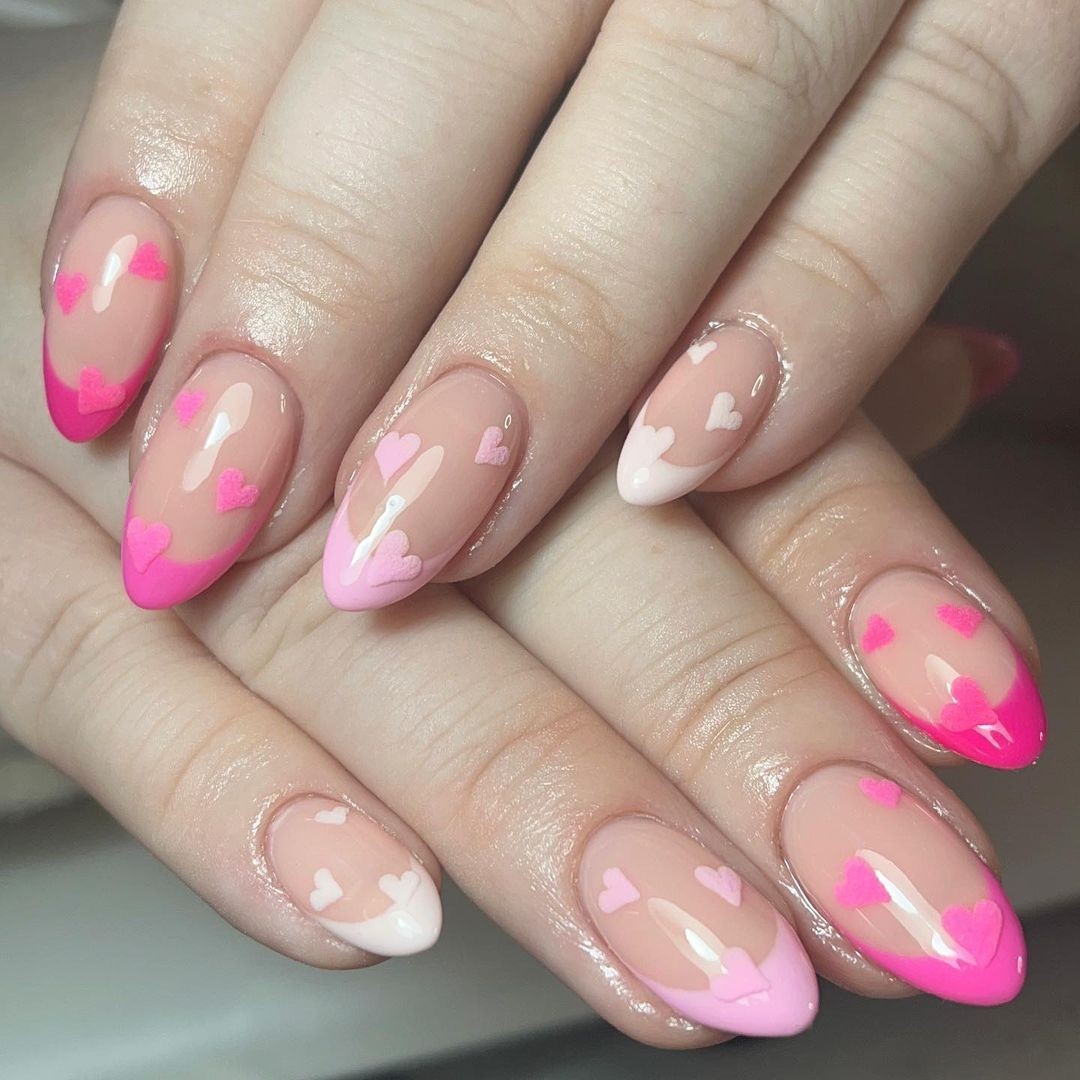
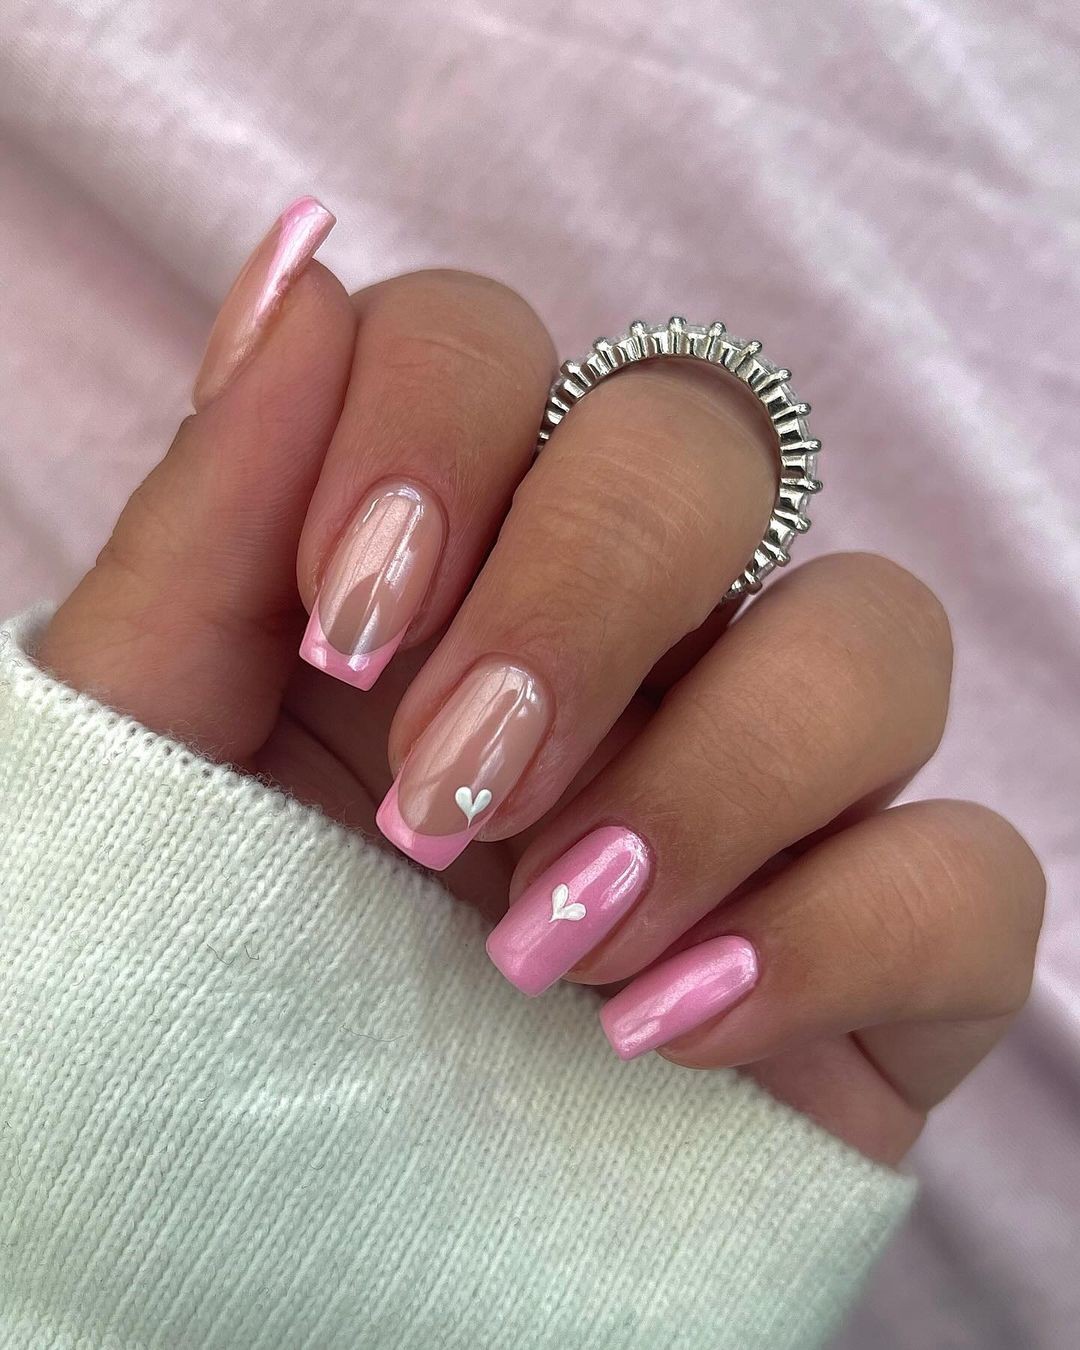
Sweetheart Pink
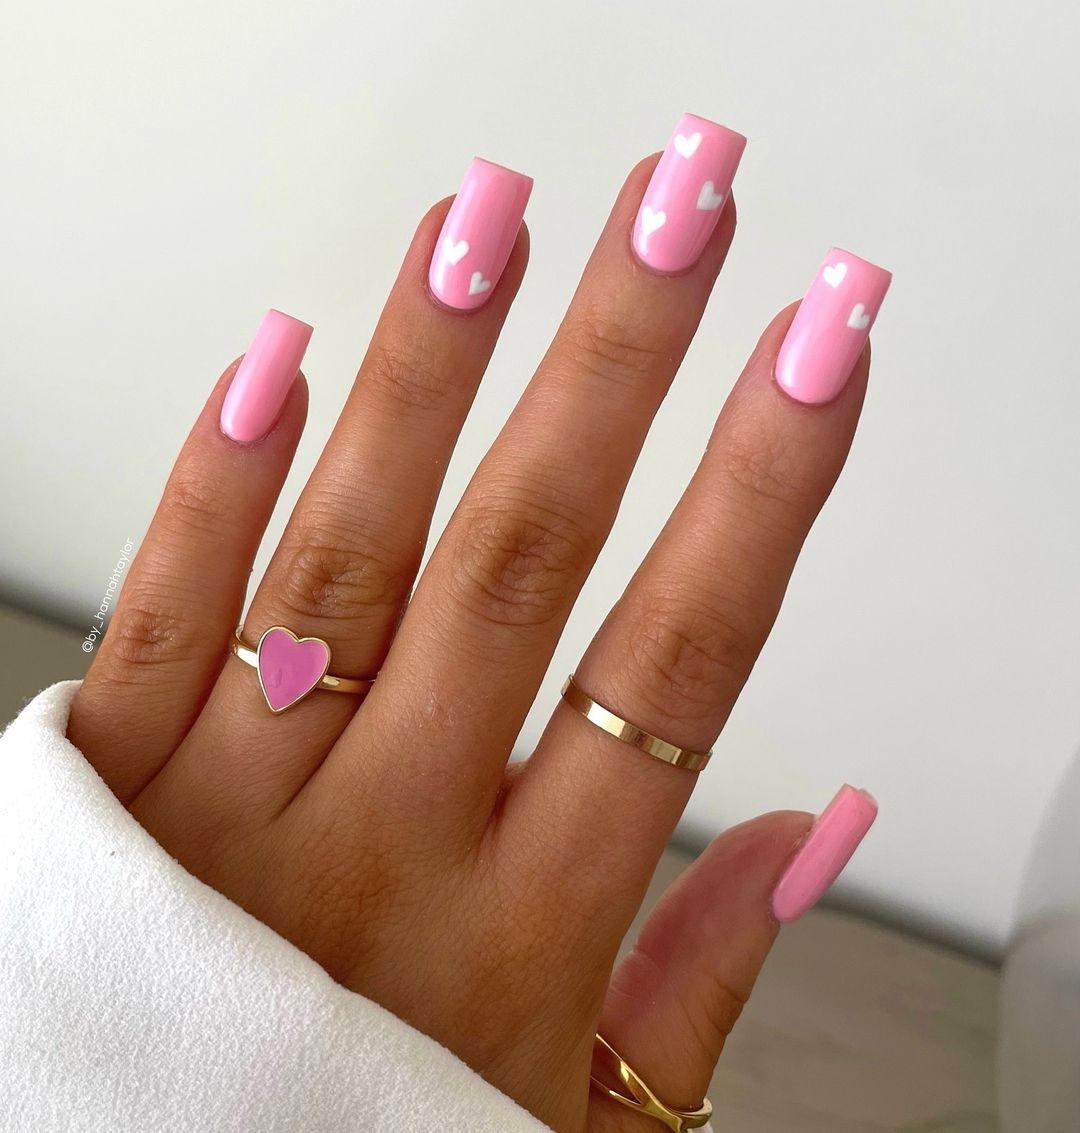
This whimsical nail art design is reminiscent of a sweet love letter, where one finger is wrapped in a soft pink hue while charming white hearts adorn the others on a delicate pink base. The simplicity and elegance of this look make it perfect for a summer-inspired pedicure or gel manicure. The spaced-out hearts give off the impression that they were intentionally placed with precision, adding to the design’s allure.
To recreate this beauty, you’ll need:Base coat (OPI: Natural Nail Base Coat)Pink polish (Essie: Mod Square)White polish for hearts (Sally Hansen: White On)Top coat (Essie: Good To Go)As a professional manicurist myself, I’m captivated by the understated charm of this design. It’s a perfect blend of sweet and sophisticated. Step-by-step:Begin with your base coat, then apply two coats of pink polish to the index finger. Using a dotting tool, create small white hearts on the other nails.
Finally, seal everything in place with a fast-drying top coat to add shine and protection.
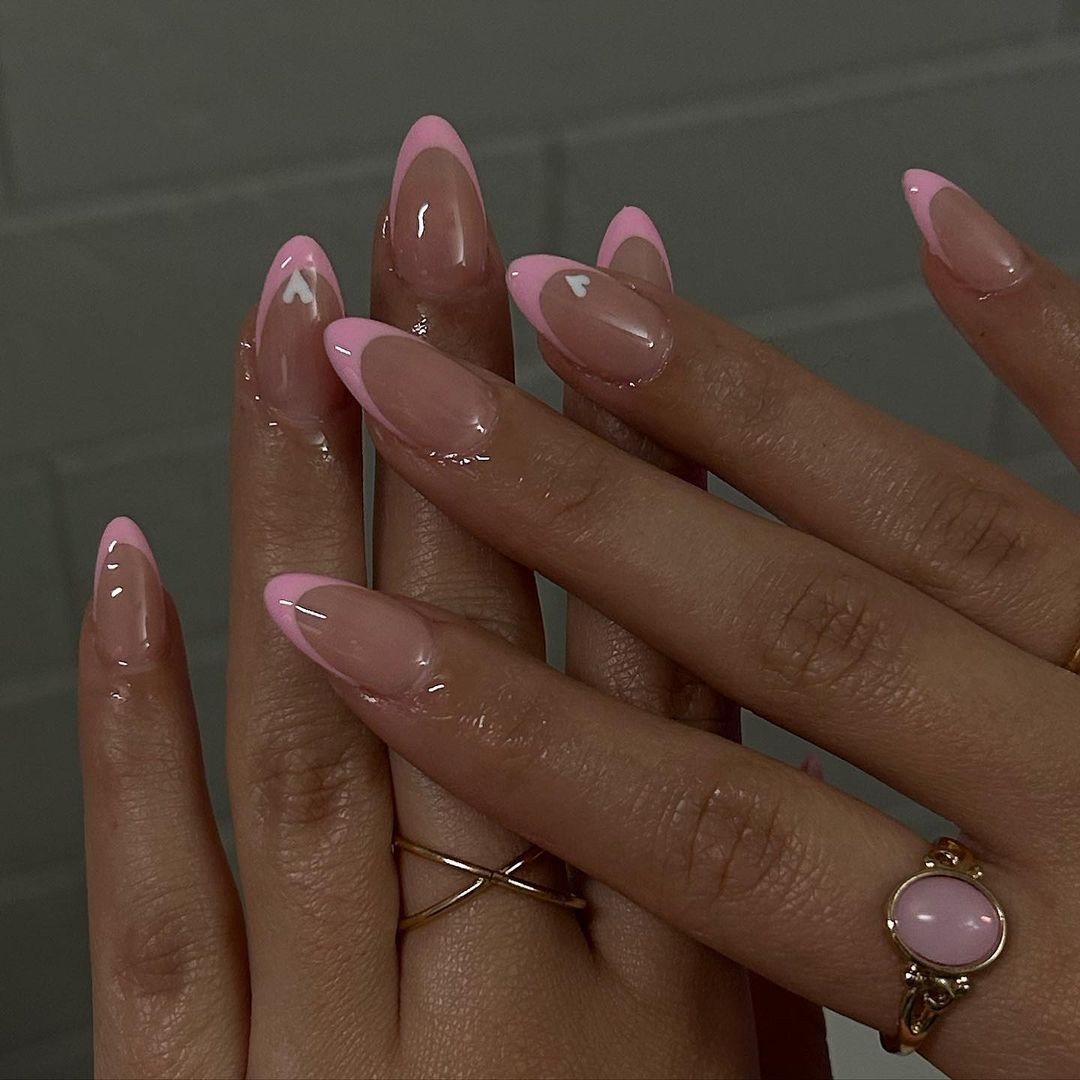
Pink French Charm
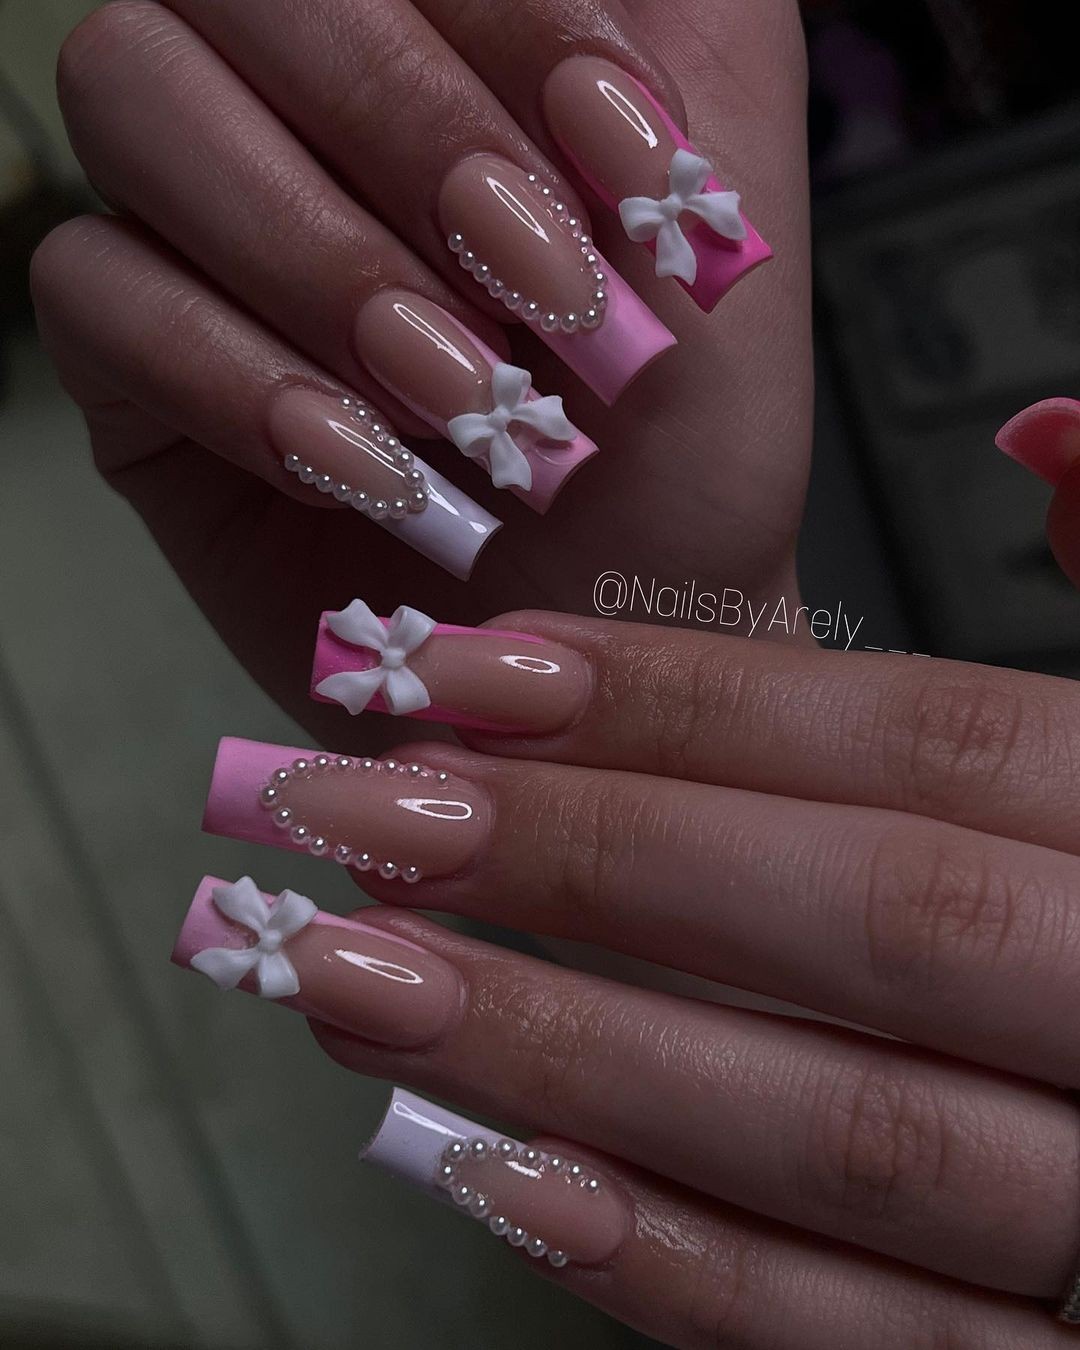
Reinventing the classic French manicure, this design takes a trendy turn with pink summer nails that exude elegance and whimsy. The combination of white bows, pearl accents on pink tips, and gel finishes creates a charming visual contrast that would be perfect for inspo coffin nails or a short square shape.
Inspired by @nailsbyarely___, this look is easily achievable using the following consumables: CND’s Sticky Base Coat, Gelish’s Pink Smoothie polish for the tips, white acrylic paint for bows, pearls or rhinestones, and Seche Vite Dry Fast top coat. To elevate this traditional design, simply add a pop of neon edge to create a bold, eye-catching look.
For a step-by-step guide on how to achieve this stunning manicure at home, follow these easy steps: Begin with the base coat, followed by a clean line application of pink polish for the French tip. Use acrylic paint to draw the bows and secure them with a dot of top coat. Finally, seal everything with a clear top coat to ensure lasting sparkle.
Gradient of Hearts
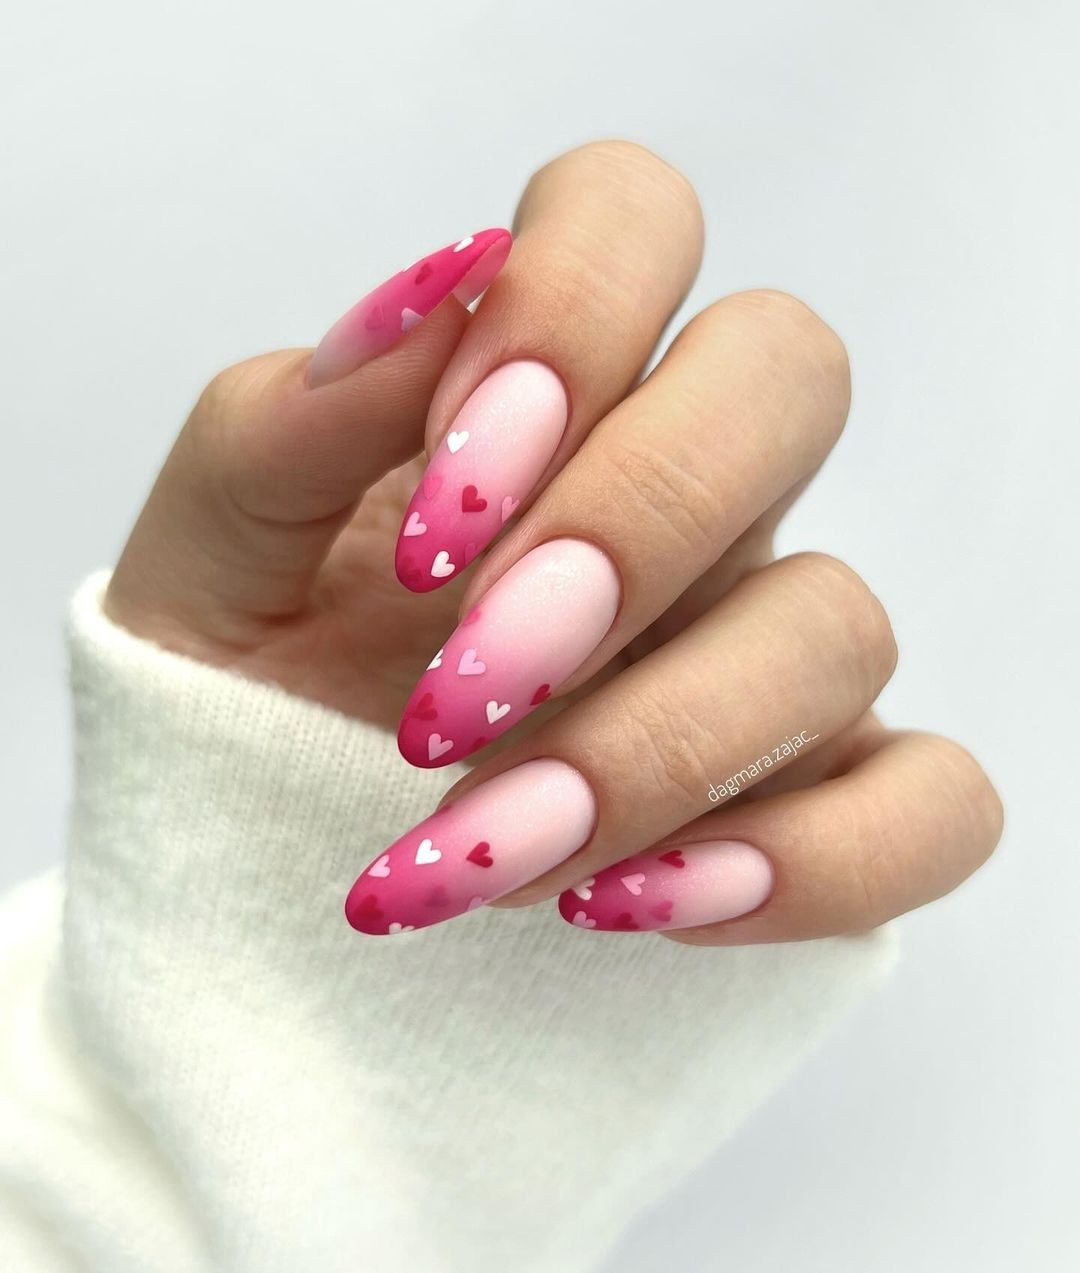
This captivating nail art design showcases a stunning ombre effect, transitioning from a bold pink to a clear base adorned with adorable hearts trickling down the nail. The vibrant color scheme makes it an excellent choice for holiday-themed nails or adding a playful touch to everyday looks. The inspiration behind this design is credited to @dagmara. zajac_.
To recreate this look, you’ll need the following ingredients: OPI’s Natural Nail Base Coat as your base coat, Gelish’s Hot Rod Red for the pink gel polish, white gel polish for the hearts, a sponge to achieve the gradient effect, and IBD’s Just Gel Polish Top Coat to seal it all in. The design’s unique feature is its ability to balance bold, vivid colors with soft, subtle hues. It’s perfect for those who crave neon glamour but also appreciate simplicity.
To replicate this look, start by applying your base coat, then use the sponge to blend the pink gel polish towards the tip of the nail. Use a fine brush to add white gel hearts and cure them under the lamp. Finally, top it all off with top coat for a glossy finish that showcases the design’s sparkling details.
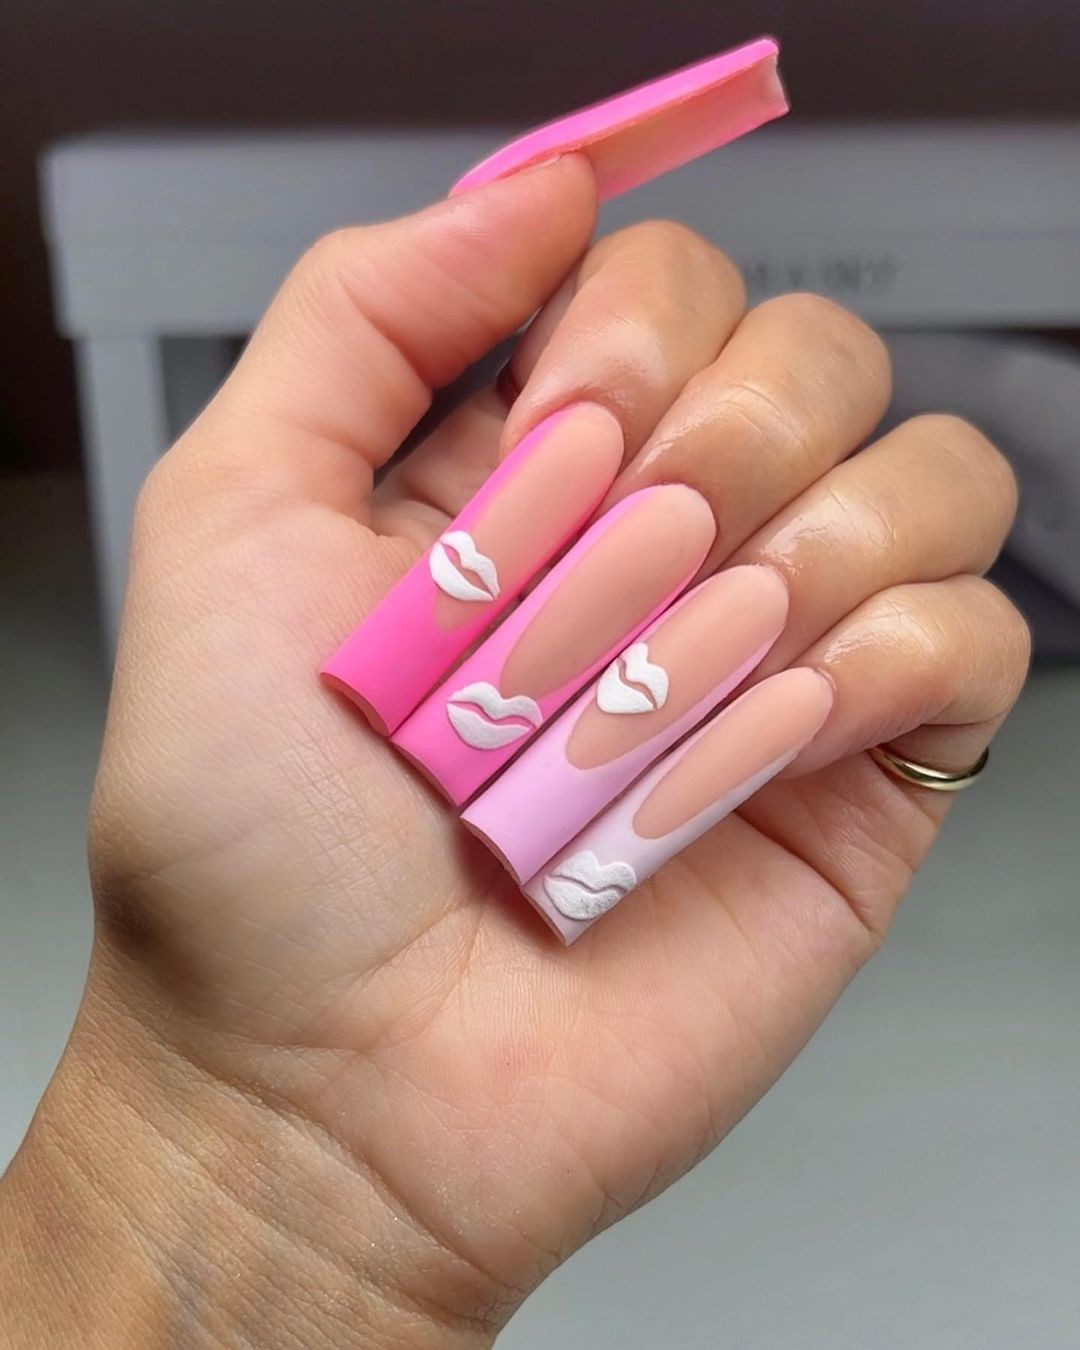
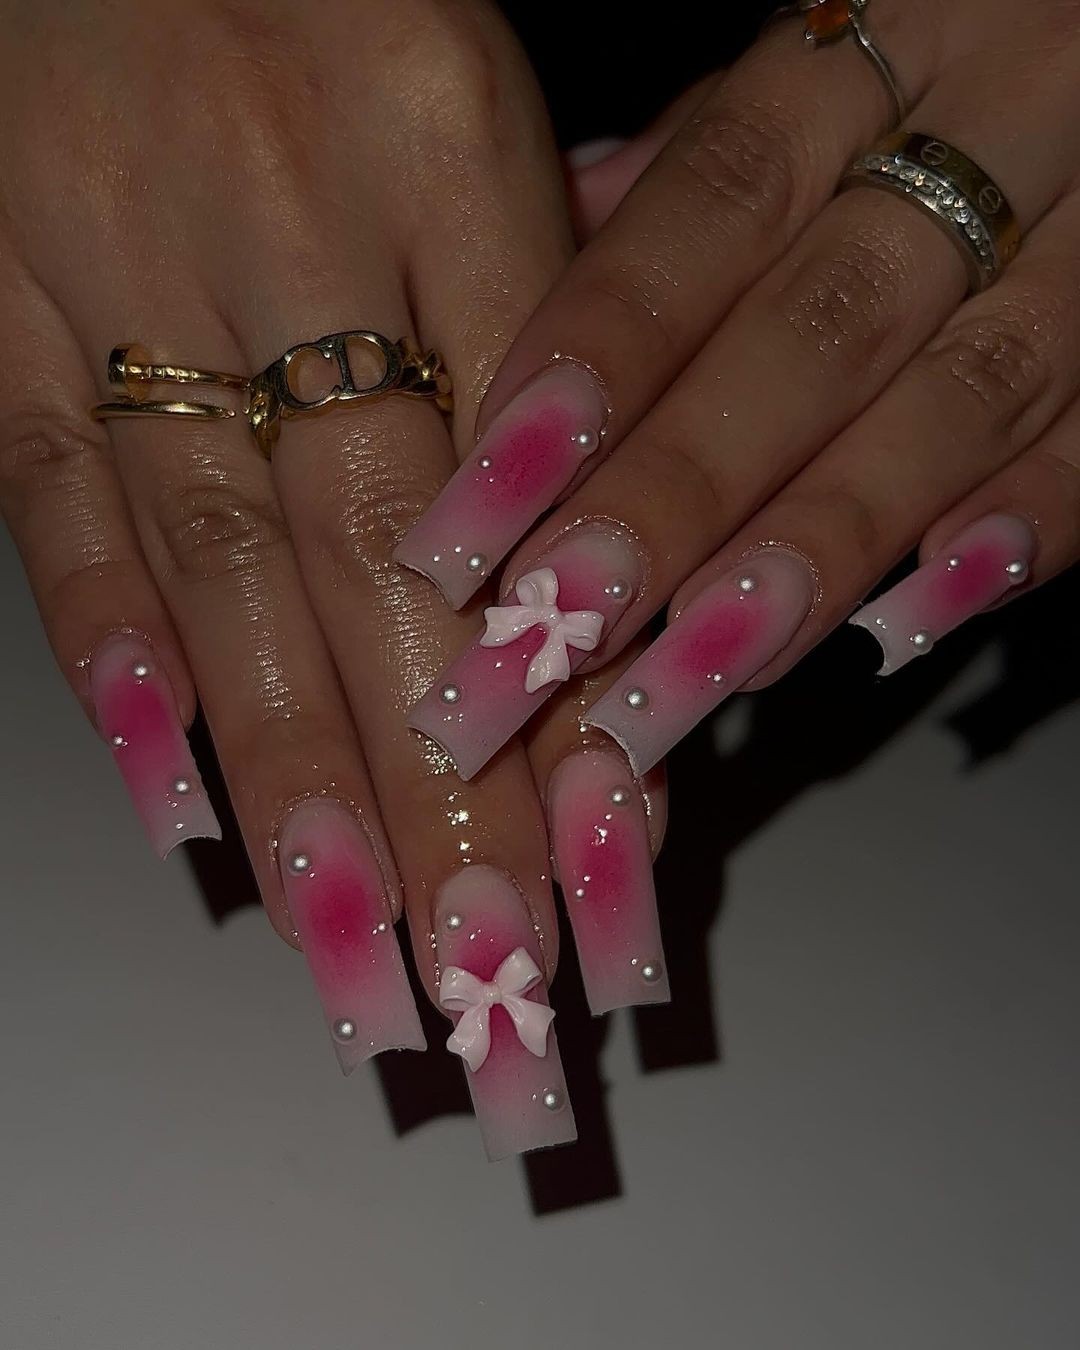
Pink Elegance with a Bow
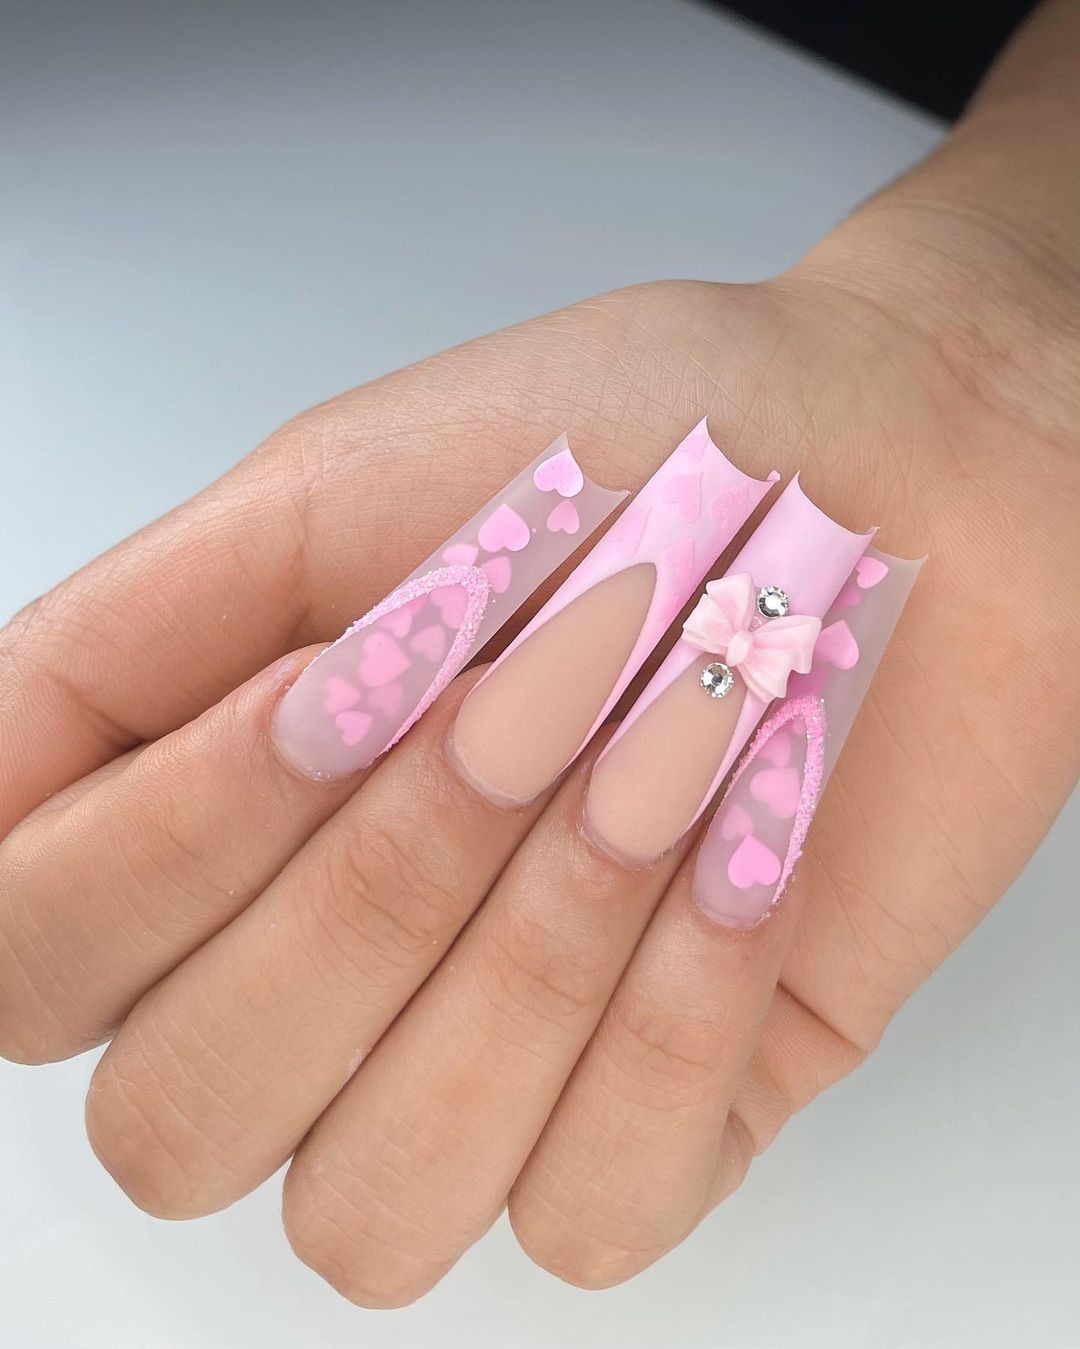
Elevate your summer look with this divine combination of elegance and coolness. The nude base paired with a pink gradient at the bottom creates a stunning contrast, while the addition of little heart shapes and a large bow on the thumb, adorned with a rhinestone in the center, adds a playful touch. This design is perfect for coffin or short square nails, offering a cute yet simple look that’s sure to turn heads. The key to recreating this look is the strategic use of colors and textures.
Start by applying a base coat followed by a nude polish. Next, create a gradient effect using pink polish, carefully blending the colors to achieve the desired ombre look. Once you’ve achieved the perfect shade, delicately paint on heart shapes to add a touch of whimsy. To complete the design, attach a bow to the thumb using top coat dab and secure it with a rhinestone in its center. Finish everything off by applying another layer of top coat to give your design some added sparkle.
With OPI’s Pink Flamenco, Essie’s First Base, Ballet Slippers, and Sally Hansen’s White On at your fingertips, you’ll be ready for any summer occasion that comes your way.
Starry Pink Gradient
The nail art featured showcases a breathtaking ombre effect, where a bold pink hue seamlessly transitions into a sheer base. Delicate white starbursts add a touch of elegance to this vibrant design, making it perfect for the holiday season or everyday wear. The credit for this stunning photo goes to @pressedbycharlotte_.
For those looking to replicate this look, here’s what you’ll need: Orly Bonder (or an alternative base coat), Gelish’s Shocking Pink (or another neon pink gel polish), Sally Hansen’s White On (or another white polish), and Gelish’s Top It Off (or another top coat). As a professional in the field, I appreciate the simplicity of this design, which combines bold neons with understated artistry to create a chic nail idea that anyone can recreate.
To achieve this look, start by applying your base coat, then use a sponge to apply the pink gel polish and create the ombre effect. Use a fine brush to add the white starburst designs, and cure everything under a lamp before finishing with a top coat.
Gradient Hearts Charm
In the world of nail art, there’s no shortage of creative inspiration – but sometimes it’s the simplest designs that truly make our hearts skip a beat. Case in point: this delicate French tip manicure featuring a subtle pink gradient, sprinkled with tiny heart accents that add just the right touch of whimsy. The key to pulling off this understated yet eye-catching design lies in finding harmony between soft and bold colors.
To achieve the look, start by applying a base coat to protect your nails and provide a smooth canvas for painting. Next, apply a nude polish to set the stage for the gradient effect that follows. Using a gentle touch, work the pink polish from the tip of the nail up towards the cuticle, blending the colors seamlessly as you go. To add a playful pop of personality, use a dotting tool to create delicate heart shapes on each nail – the perfect finishing touch to this effortlessly chic design.
Finally, seal everything in place with a quick-dry top coat for added durability and shine.
Marble Pink Fusion
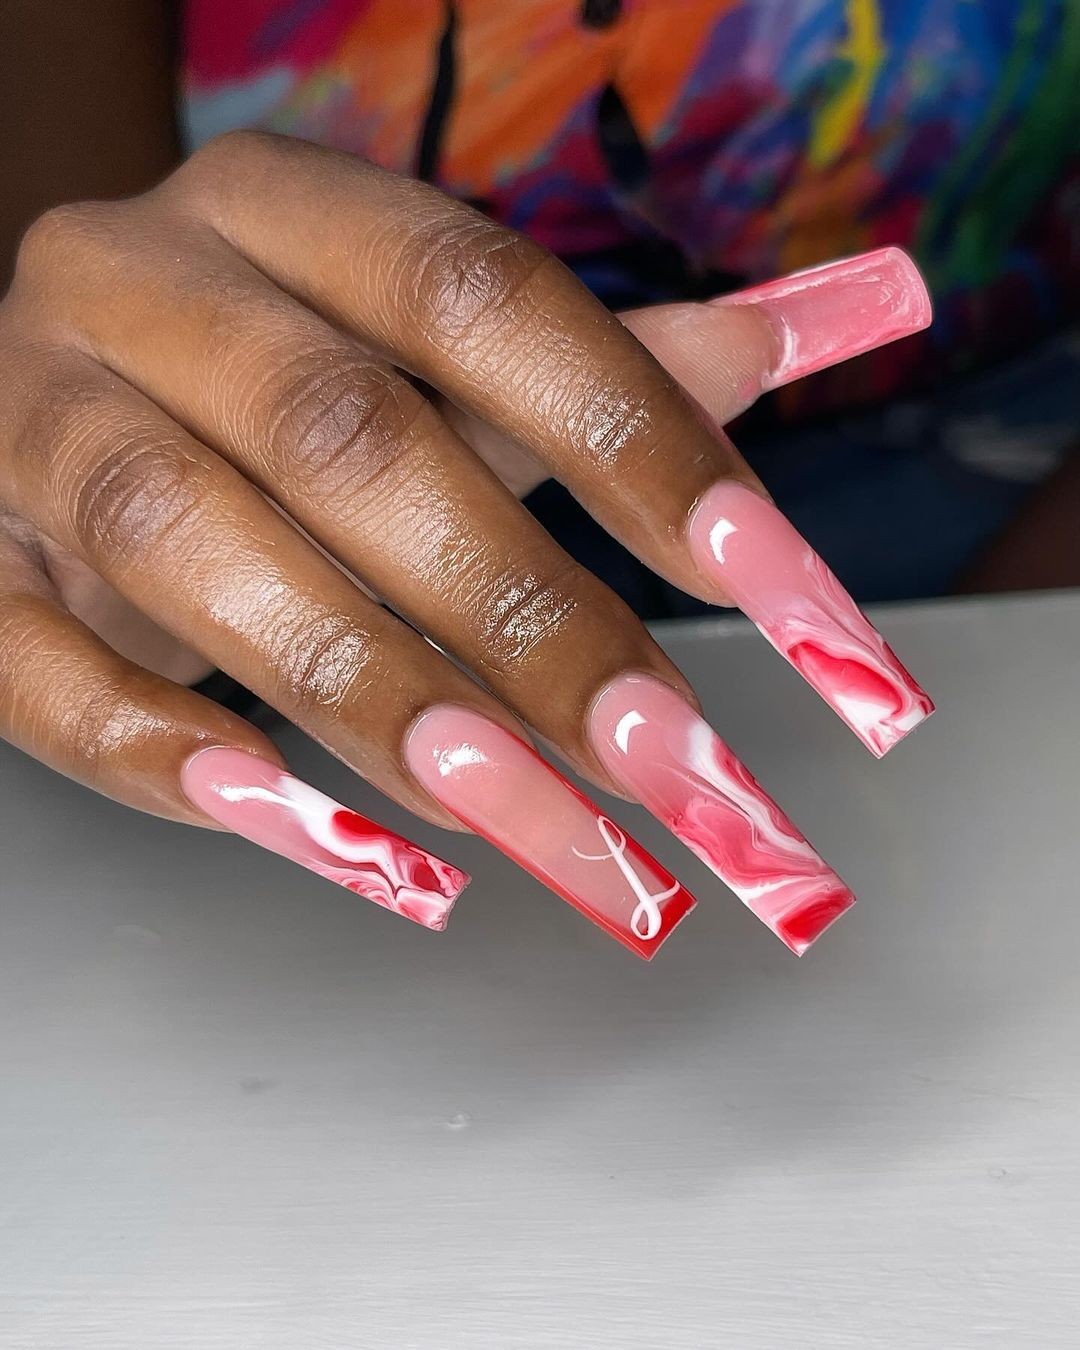
The blog post features a stunning photo of luxurious summer nails, showcasing an exquisite marble design that combines translucent and pink hues with abstract red patterns. This chic and sophisticated look is perfect for making a statement at holiday or beach gatherings. The manicure’s depth and intricacy are truly breathtaking – it’s as if the nail art belongs in a museum like MoMA. However, the super-fine details also make it an ideal choice for those seeking more wearable acrylics.
To achieve this look, start by applying a base coat, followed by two coats of pink gel polish. While the pink is still wet, add dots of red gel polish and use a marbleizing tool to blend the colors together. Once cured under the lamp, seal everything in with a top coat.
Studded Matte Elegance
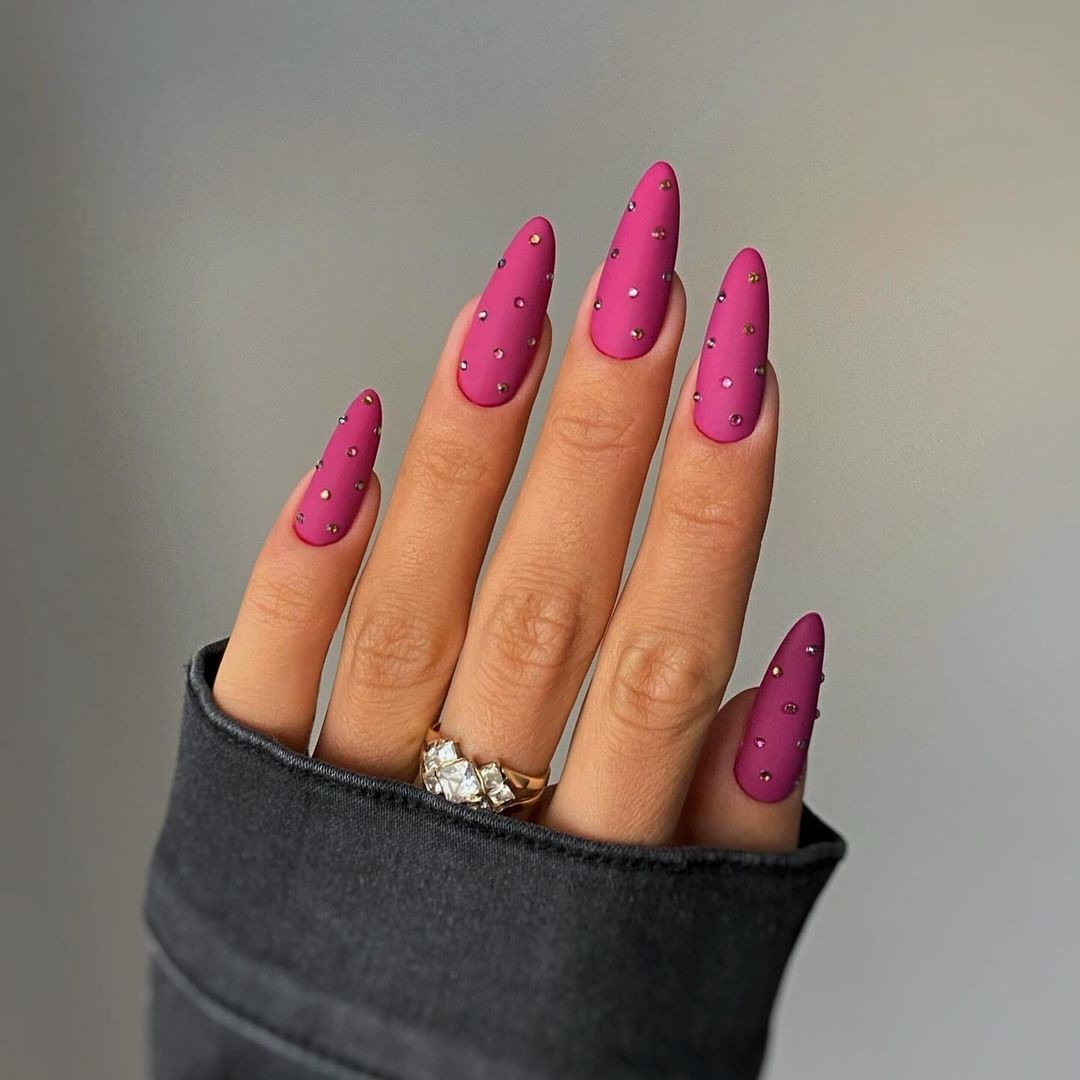
The ultimate matte nail design is now within reach – just imagine it: a rich pink base infused with golden stud accents. With these simple steps, you can recreate this stunning look at home. First, gather your essential supplies: a reliable base coat (CND’s Sticky Base Coat), a vibrant matte pink polish (Essie’s Matte About You), gold studs, nail glue, and a top-notch matte finisher (OPI’s Matte Top Coat).
Whether you’re a seasoned nail artist or a DIY enthusiast, this gel design will leave you feeling elegant and on-trend. The flat, textured finish is particularly well-suited to almond or short square-shaped nails, making it perfect for those who prefer a more understated look. But don’t just take our word for it – the matte finish is all it takes to give your pink summer nails a trendy twist. Who says you can’t have fun and stay on top of the latest nail trends?
To get started, begin by applying a thin layer of base coat, followed by a generous coat of pink polish. Allow both layers to dry completely before adding a matte top coat. Next, use nail glue to secure your gold studs in place, taking care not to disturb the matte finish. Finally, skip the top coat and admire your handiwork – you’ll be rocking this chic, modern look in no time!
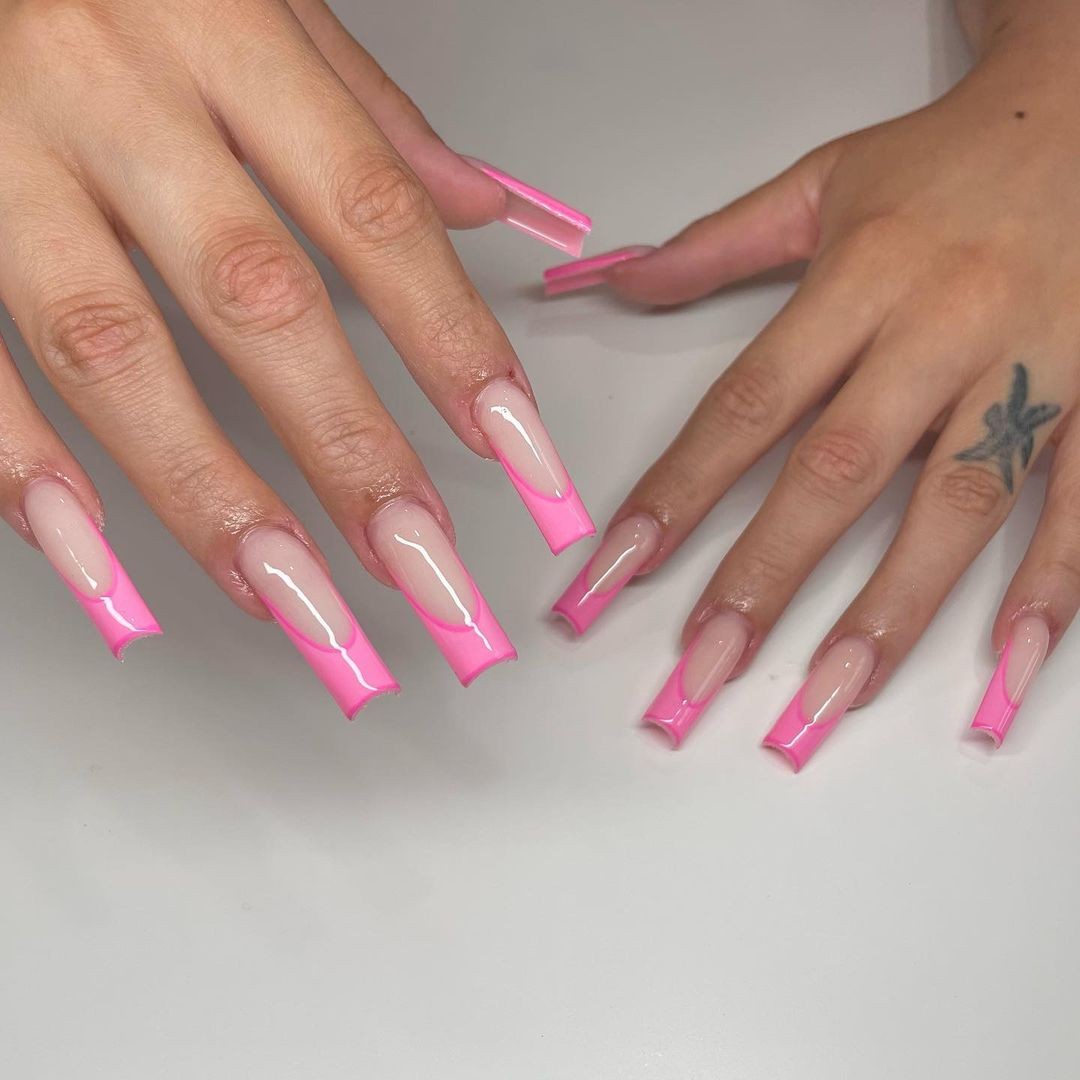
Pink French Perfection
In this modern twist on the classic French manicure, a pop of bright pink takes center stage. The short gel design showcases a flawless execution, with crisp lines and a precise finish that highlights the professional technique used. This look is sure to turn heads, whether you’re dressing up or keeping things casual. And with its timeless appeal, it’s perfect for summer. The key to achieving this look lies in the layering process.
Begin by applying a base coat, followed by two coats of nude polish on each nail. Allow the nails to dry completely before carefully painting the pink polish onto the tip of each nail. Finally, seal everything in place with a glossy top coat.
Pink Blossom Chic
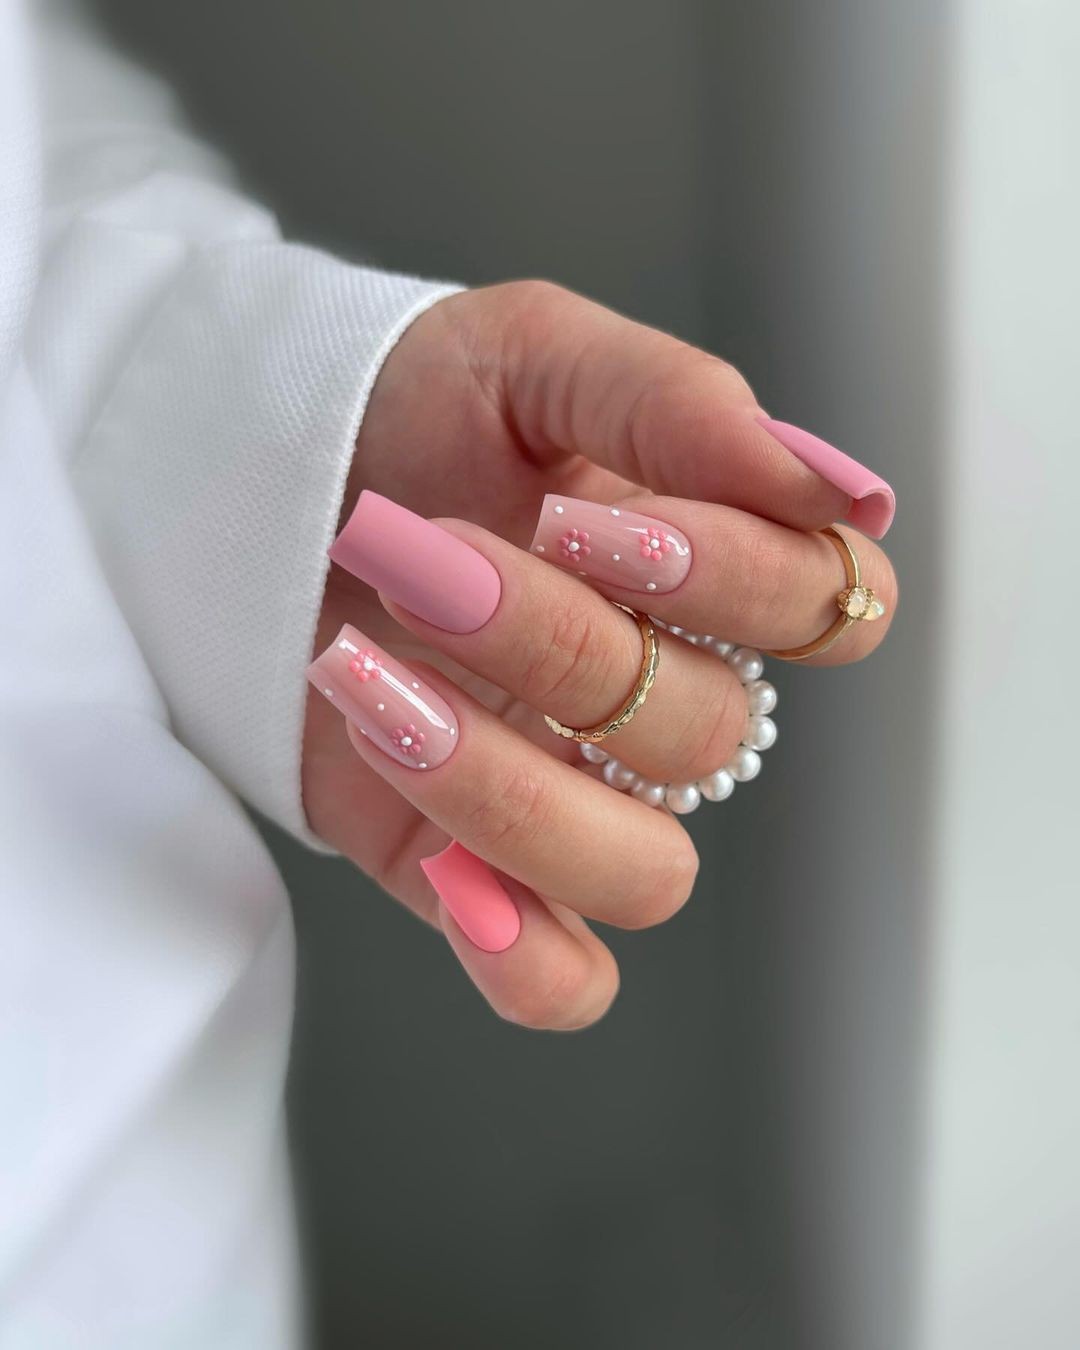
The perfect summer mani has arrived, featuring a mesmerizing blend of soft pinks and delicate flower art. A range of pinks with a matte finish on some nails is beautifully complemented by white floral details outlined in subtle sparkles on others. This eye-catching look is sure to turn heads, whether you’re attending a holiday party or just want to add some flair to your everyday style.
To recreate this stunning mani, you’ll need the following essentials:
Base coat (Essie: Strong Start)
Matte pink polish (Essie: Comfy in Cashmere)
White polish for floral details (OPI: Alpine Snow)
Fine detailing brush
Rhinestones
Matte top coat (OPI: Matte Top Coat)
The combination of matte polish and delicate art creates a look that’s both simple and fun, making it a perfect fit for the summer season. With this DIY guide, you can easily achieve the same stunning results.
To get started, apply two coats of the pink matte polish after your base coat. For the detailed nails, use a fine brush to paint white flowers and add rhinestones while the polish is still tacky. To maintain the matte finish on some nails, be sure not to apply top coat. On the other nails, however, applying a clear top coat will keep everything secure.
Sleek Pink Simplicity
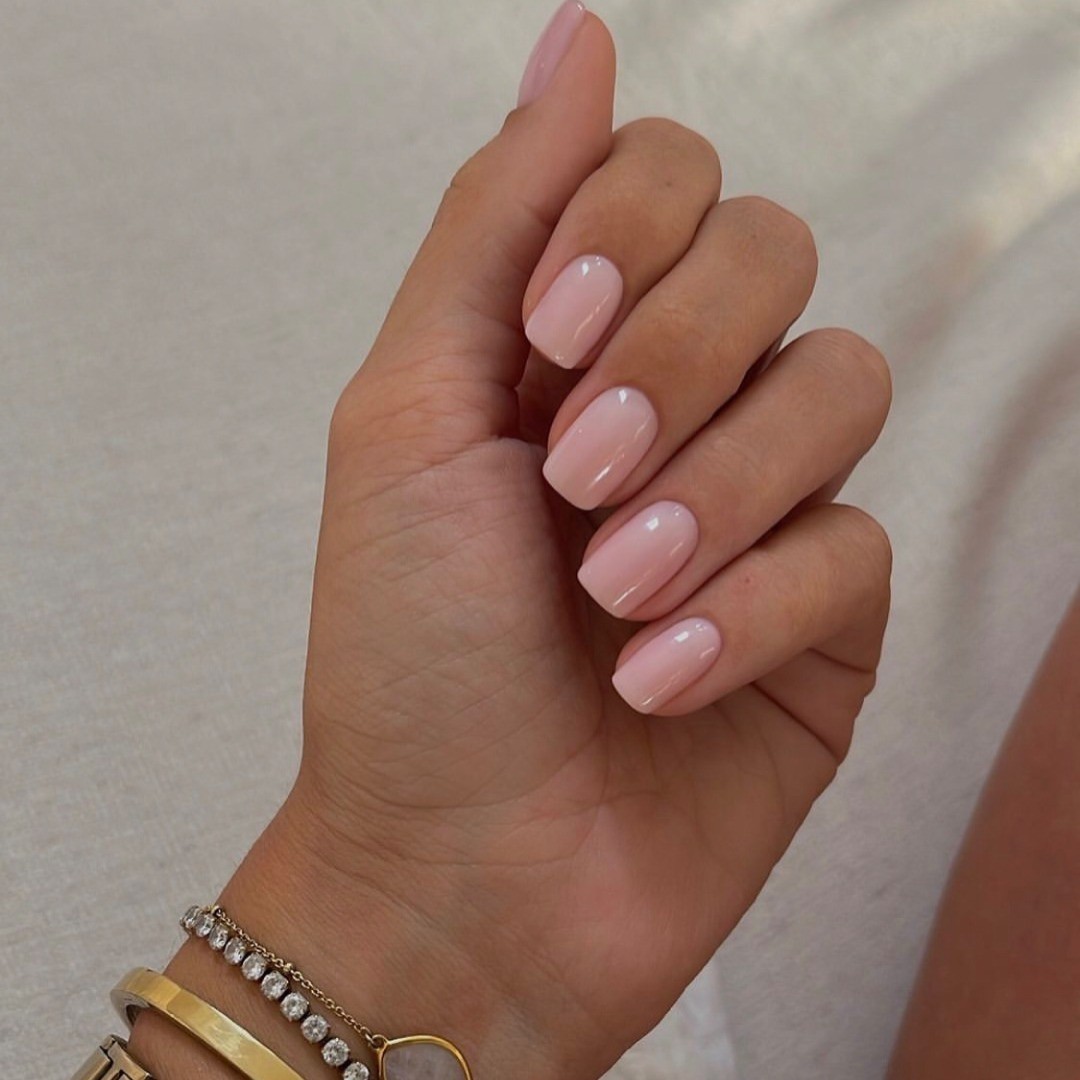
The simplicity of this nail design is what makes it so striking, with a soft pink hue that exudes freshness. And if you didn’t know, short nails are currently the epitome of chic, offering a perfect blend of trendy, pretty, and cute. For those seeking a statement look without going overboard, this minimalist approach is the way to go.
The key to achieving this look lies in the expertly selected products: CND’s Sticky Base Coat provides a solid foundation, while Gelish’s Pink Smoothie adds a touch of sophistication with its rich pink color. Finishing off the look is Gelish’s Top It Off, which adds an extra layer of shine and polish. This design is incredibly versatile, capable of elevating both casual and formal outfits to new heights.
Whether you’re looking for a laid-back or polished look, these gel or acrylic nails will undoubtedly take your style to the next level. Simply follow this simple process: start with the base coat, apply two coats of pink polish, allowing each layer to dry completely before moving on to avoid any pesky smudges. Finally, seal it all off with a top coat for an added touch of glamour and sparkle.
Pink Ombre Dreams
Imagine a delicate fusion of pink and white, where translucent tips fade seamlessly into white polka dots that shine like tiny stars. A sweet bow adds a playful touch to this whimsical art piece on your nails, making it a perfect blend of elegance and fun for daytime or nighttime wear. Photo credit: @nailsxolily.
To recreate this look, you’ll need the following essentials:* Base coat (OPI’s Natural Nail Base Coat)* Pink gel polish (Gelish’s Kiss Me, I’m a Prince)* White polish for dots (Sally Hansen’s White On)* Pink ribbon for bow* Top coat (IBD’s Just Gel Polish Top Coat)This manicure is all about striking the right balance between sophistication and playfulness. And with this simple yet artistic design, you’ll be rocking a look that’s equal parts chic and charming.
Swirls and Sparkles
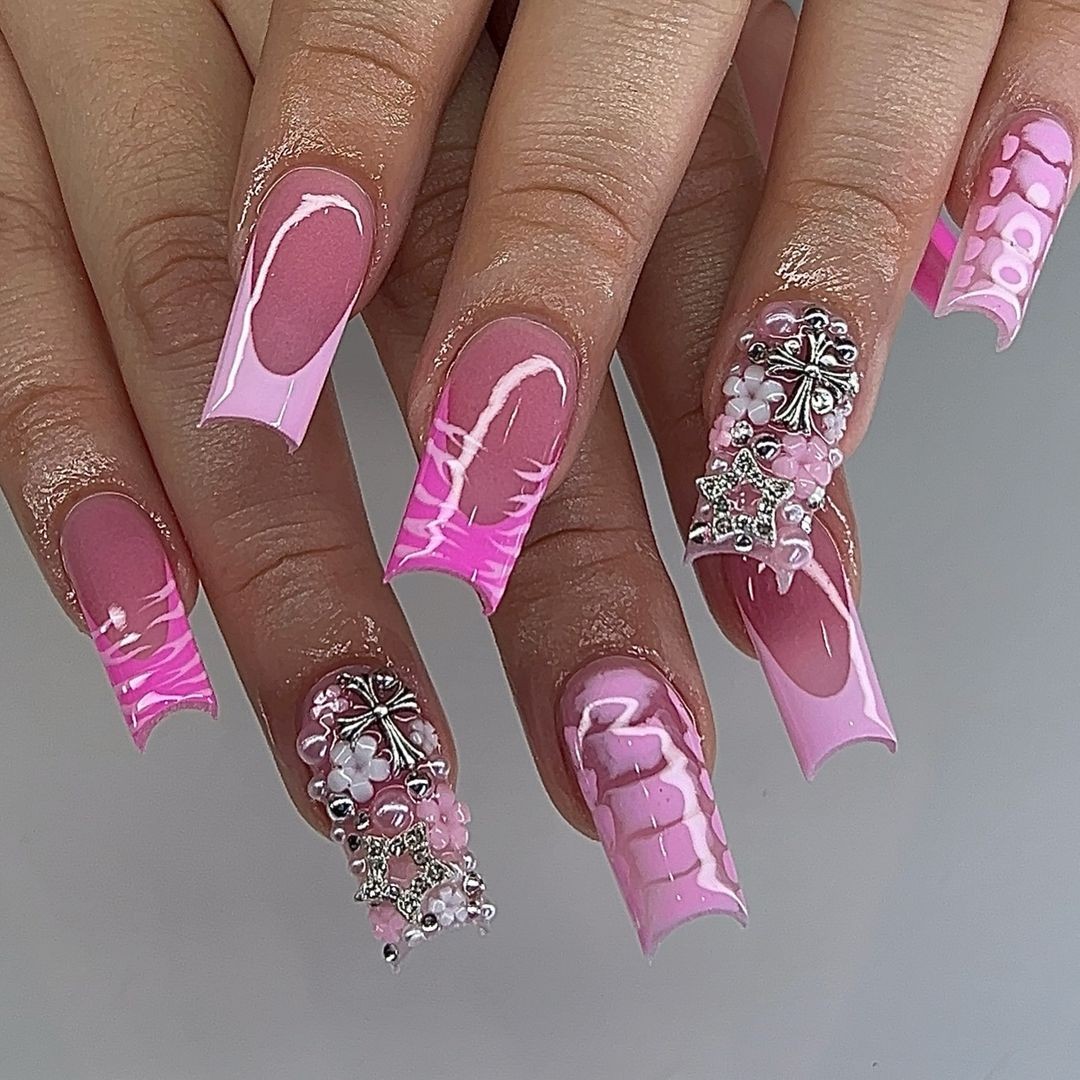
Elevate your nail game with this stunning design featuring transparent nail tips in hot pink swirls, adorned with sparkling stones and bows. The luxurious look is sure to turn heads, thanks to the perfect balance of trendy transparency and bold color. For those who crave attention-grabbing nails, this look is a must-have. The combination of pink builder gel, acrylic paint, and top coat creates a truly eye-catching effect.
To achieve this look at home, start by applying a strong base coat to prep your nails. Then, apply a thin layer of pink builder gel to provide structure for the design. Once cured, use pink acrylic paint to create the signature swirls. Finally, secure any stones or bows in place with nail glue and seal everything with a top coat. With practice and patience, you can recreate this stunning look on your own nails.
Pink Marble Elegance
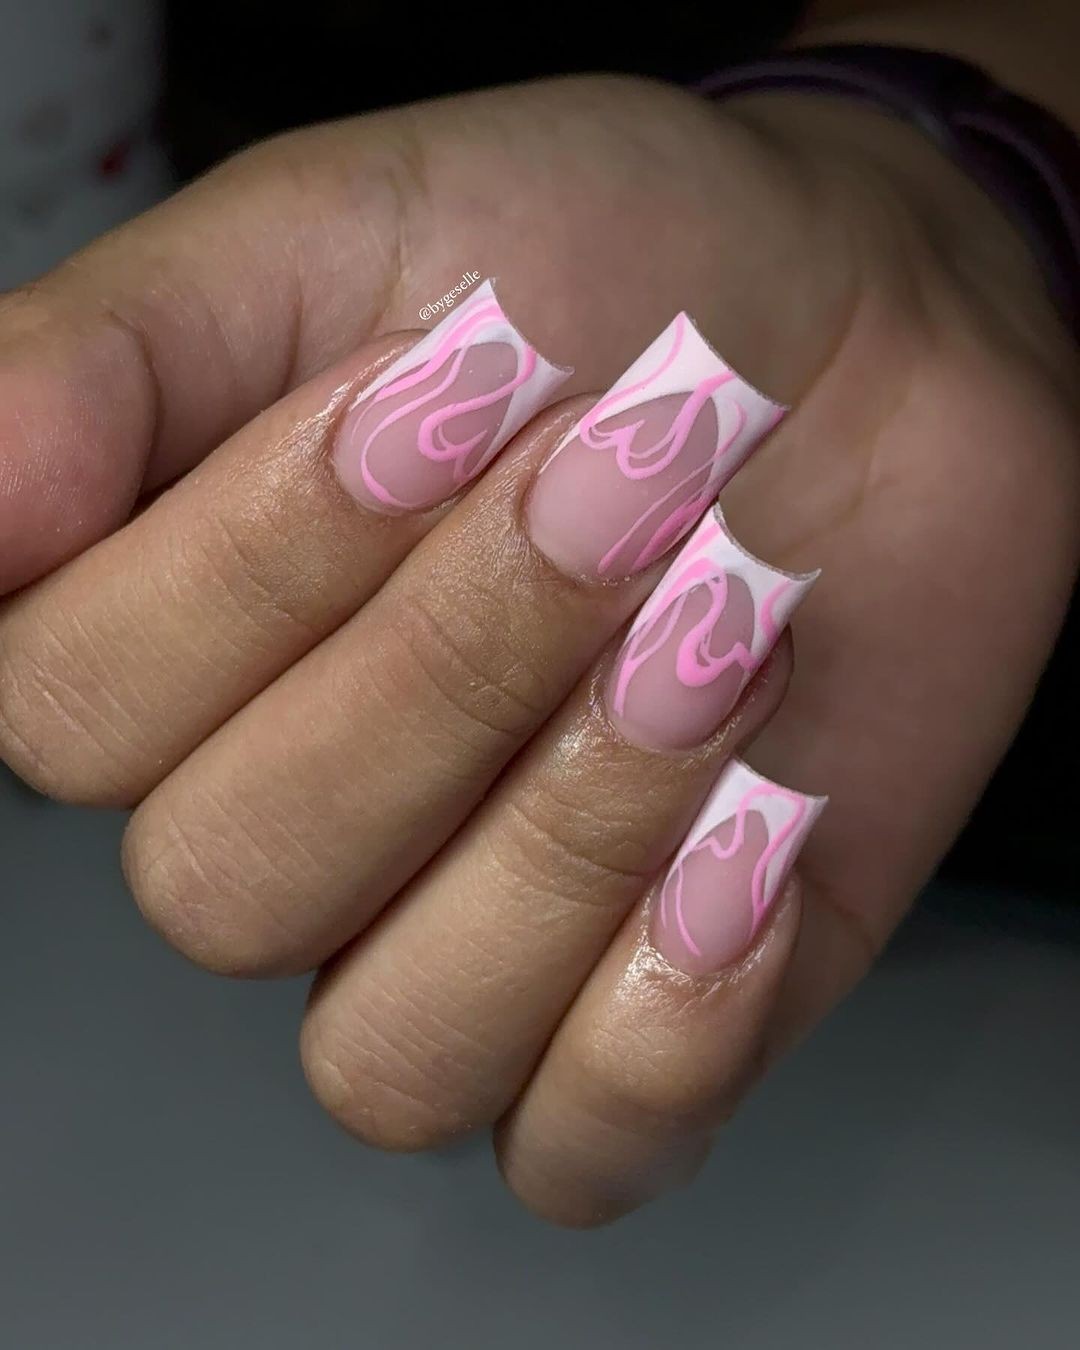
Imagine a manicure that exudes sophistication while still being playful – this beautiful marble nail art design achieves just that. The soft pink base, paired with white veins, creates an elegant yet minimalist look perfect for those who prefer understated beauty. It’s also a great option for a trendy toenail pedicure idea if you want to try something new. The credit for this stunning visual goes to @_. bygeselle.
To recreate this masterpiece, you’ll need the following:* Base coat (CND: Sticky Base Coat)* Soft pink polish (OPI: Put it in Neutral)* White polish for marbling (OPI: Alpine Snow)* Detailing brush* Top coat (Seche Vite Dry Fast)The combination of bright base and white marbling gives this design a fun yet professional vibe, reminiscent of pink summer nails. Here’s how to achieve the look yourself:Start by applying the base coat, then layer on your soft pink polish.
Use the detailing brush to gently drag white polish across the nails, creating a marble effect. Finish with a top coat and get ready to show off your new sparkle!
Pink Flare French Tips
Imagine strolling down the street with a vibrant French tip design that’s anything but ordinary – a nude base paired with a bold neon pink flare. This unexpected combination is perfect for those looking to give classic nail art a trendy twist. The key to this look lies in its simplicity, making it easy to achieve and perfect for quick summer fun.
To recreate this design at home, start by applying the Sally Hansen base coat ‘Hard as Nails’ followed by two coats of Essie’s ‘Ballet Slippers’.
Once dry, apply China Glaze’s ‘Shocking Pink’ in a French tip design using either a brush or tape for crisp lines. Finish with OPI’s ‘Rapidry Top Coat’ to seal and shine.
Q: Can I achieve these nail designs without professional tools?
A: Absolutely! With patience, practice, and a steady hand, you can recreate these looks at home. The key is to let each layer dry completely before moving on to the next.
Q: How long will a gel manicure last?
A: A properly applied gel manicure can last up to three weeks depending on nail growth and proper care.
Q: What’s the best way to remove gel polish?
A: The safest way is to soak your nails in acetone and gently scrape off the polish with a wooden stick, taking care not to damage the nail bed.
With these styles, your nails will not only reflect the latest trends but also capture the playful spirit of summer.
Simply apply, let dry, and enjoy the attention that comes with having a unique and eye-catching manicure.