As the summer days unfold, do you possess the flair to make them truly unforgettable? Or are your nails as unremarkable as a plain white sheet? Summer ombre nails have transcended mere trendiness; they’ve become an art form that demands attention. To dive deeper into what makes these designs truly jaw-droppingly stunning, let’s examine the intricate dance of colors, the subtle nuances in texture and finish, and the way it all comes together to create a masterpiece on your fingertips.
Perhaps it’s the fluid transition from one hue to another that leaves you mesmerized, or maybe it’s the added dimension provided by glitter or other embellishments. Whatever the secret ingredient may be, one thing is certain: summer ombre nails are not just a fashion statement, but a reflection of your unique personality and style.
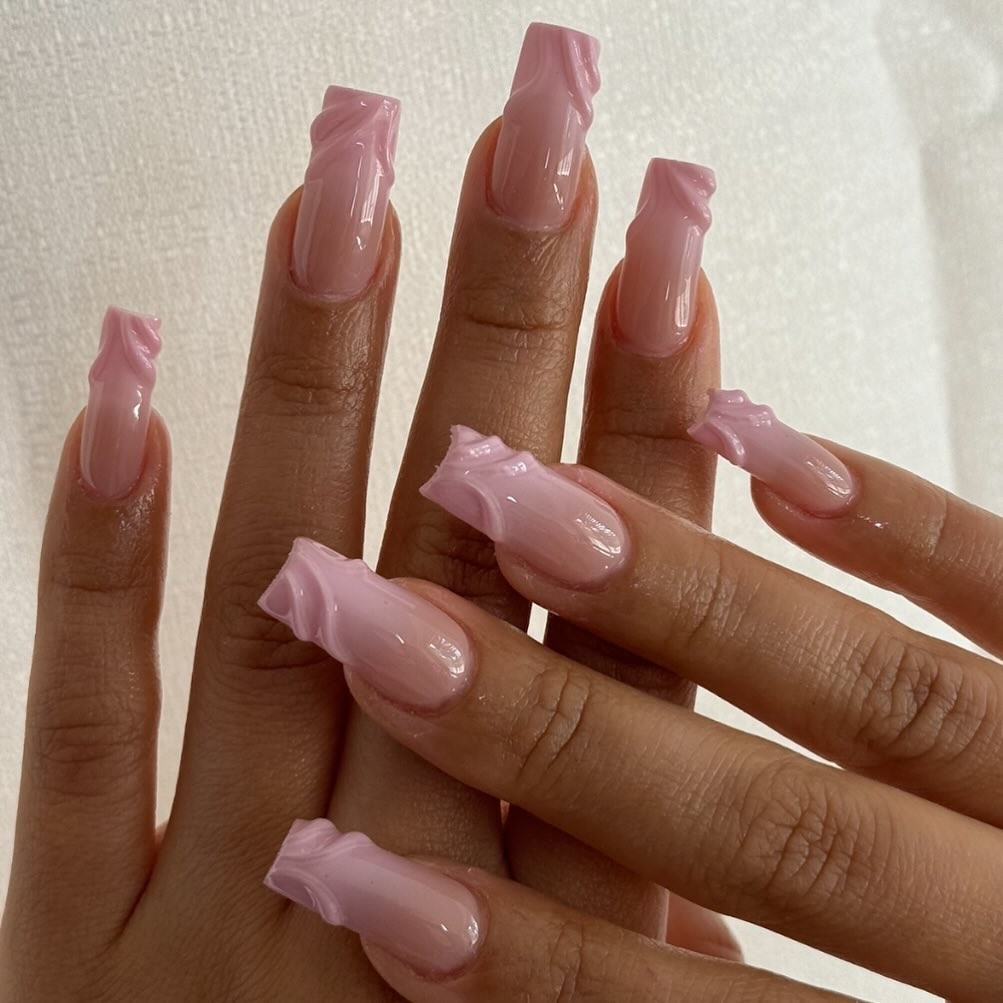
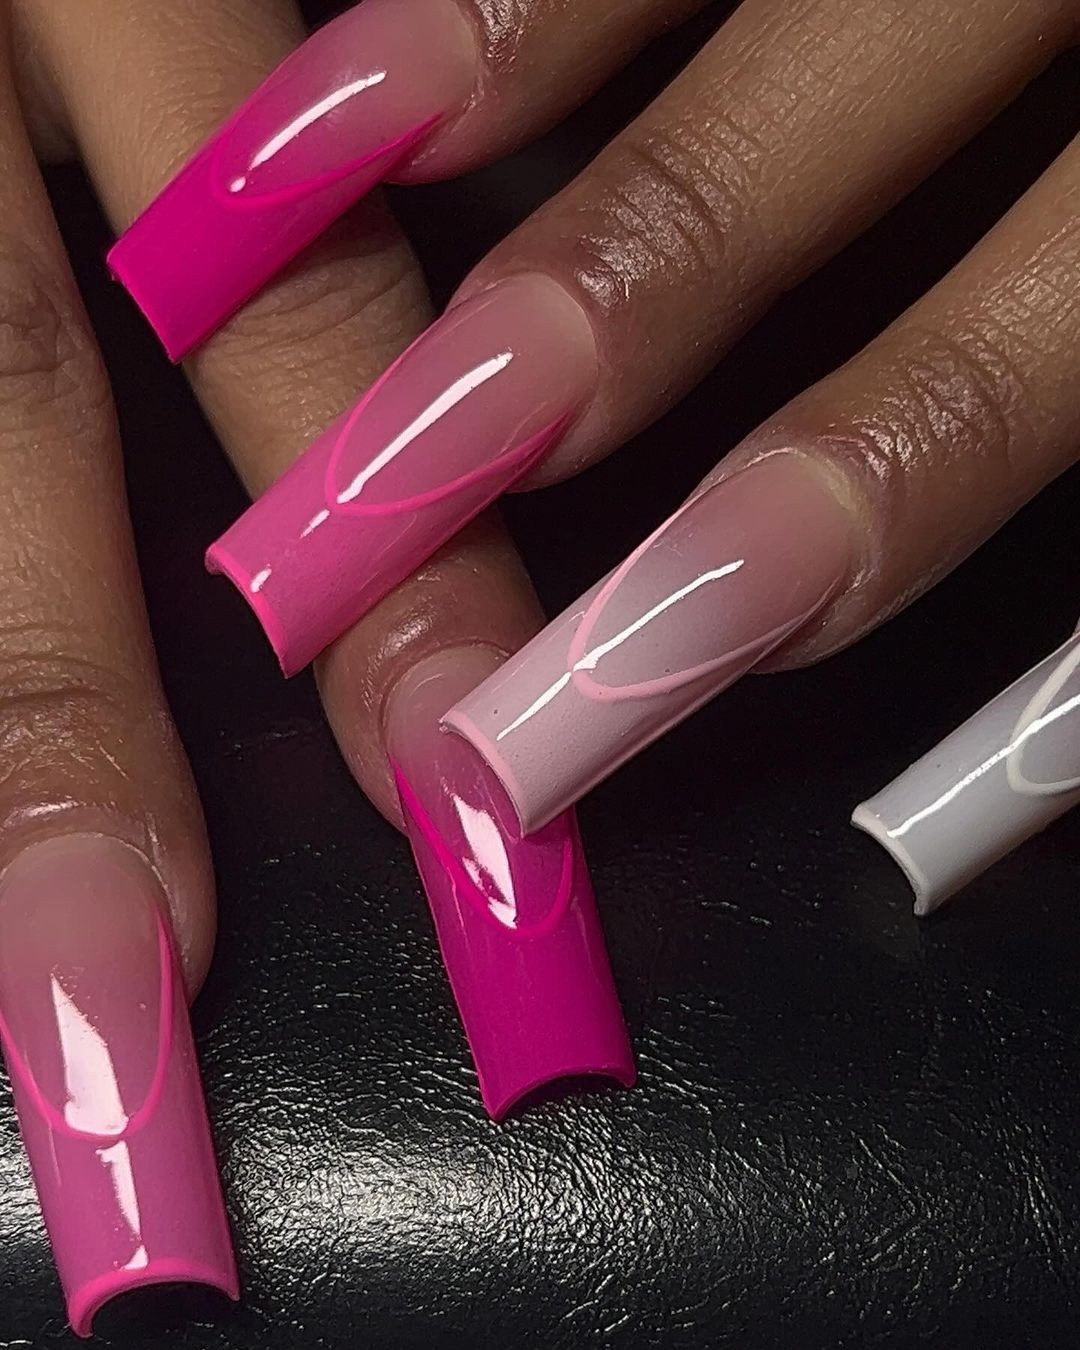
A Blossoming Romance: Pink Ombre Delight
Summer’s sweet charm is distilled in a harmonious blend of white and pink hues. The gentle gradation from blush to vibrant pink is a delight for the eyes, evoking carefree summer days. This fresh and lively combination is achieved by applying a base coat, followed by a soft white base color. Then, using a sponge and a light touch, dab both pink and white polish onto the nail, merging the colors with gentle stippling.
Finish with a topcoat for a flawless finish that exudes the warmth and joy of a sunny summer morning. To recreate this look, you’ll need: Base coat – OPI Natural Nail Base Coat, Pink polish – Essie’s ‘Muchi, Muchi’, White polish – Sally Hansen’s ‘White On’, Topcoat – Seche Vite Dry Fast Top Coat
Serene Skies: Blue Ombre Elegance
Summer’s serenity is embodied by the soothing hue of blue, which provides a sense of tranquility. This ombre design begins with a neutral tone and gradually transitions into a calming blue, evoking a refreshing breath of fresh air. Perfect for those seeking to inject some peacefulness into their hectic lives.
Credit: @lakierowy_apolacz
Ingredients:
Base coat: CND Sticky Base
Blue shades utilized: Essie ‘Bikini So Teeny’ and Essie ‘Blue Rhapsody’
topcoat: INM Out the Door Top Coat
To achieve this summer-inspired look, start by applying a base coat to your nails for protection. Begin with the lighter blue polish as a base, then use a sponge to blend the darker shade from the tip downward. Finally, seal the design with a fast-drying topcoat, capturing the essence of summer on your fingertips.
Glacial Glamour: Sparkling Icy Tips
Imagine a radiant sunset reflected on the ocean’s surface, with rose gold accents adding a touch of luxury. This design is perfect for making a statement, thanks to its coffin-shaped tips. To recreate this glamorous summer getaway look, start by applying a base coat to ensure your artistry stays in place. Next, apply a thin layer of pink polish, followed by a dusting of loose glitter in rose gold and silver hues while the polish is still sticky.
Use a fine detail brush to meticulously place Swarovski crystals, adding them wherever you see fit. Finish the design under a UV lamp and seal it with a topcoat for an unparalleled glass-like shine.
Electric Edge: Neon & Black Contrast
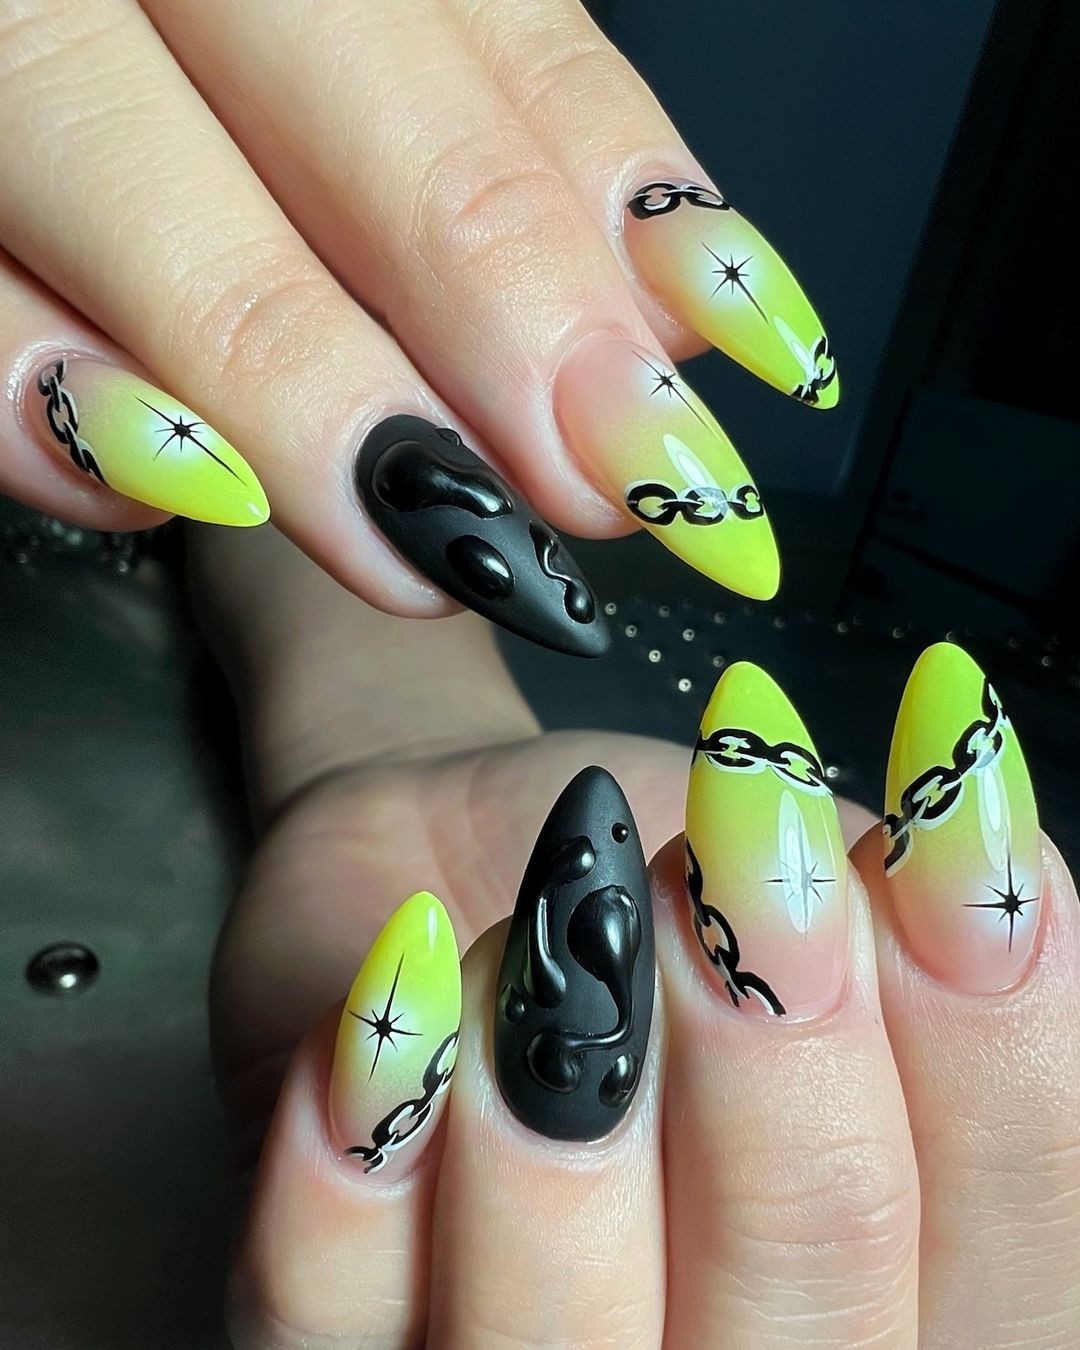
The fusion of neon’s vibrancy with black’s dramatic depth creates a striking visual effect. The almond-shaped nails boast a bright neon base that’s juxtaposed against sleek black designs, producing an eye-catching contrast. To add an extra layer of sophistication, I applied a glossy topcoat that catches the light and draws attention. Photo credit: @thenailwhispererTo recreate this look, start by applying your base coat, followed by two coats of neon polish.
Once dry, use a fine brush to create black designs on the nail, envisioning the canvas as if it were a blank slate. Don’t be afraid to experiment with abstract shapes – imperfection is key here. Finally, seal everything in place with a topcoat for added shine.
Pastel Dreams: Soft Ombre & Line Art
Elevate the classic summer ombre manicure with innovative designs that harmoniously blend soft pastel hues with playful line art within a coffin-shaped canvas. This creative fusion results in a sophisticated and beautiful outcome. To achieve this look, begin by applying a CND Stickey Anchoring Base Coat to provide a protective barrier for your nails. Next, utilize a sponge to create an ethereal gradient with Essie’s ‘Mint Candy Apple’ and ‘Fiji’ pastel shades.
For added flair, employ Sally Hansen’s Nail Art Pen in Black to draw whimsical line art – allowing your imagination to run wild. Finally, seal the design with Glisten & Glow Top Coat, adding a glossy finish to the overall look.
Pink Glitter Paradise: Sparkly Meets Sleek
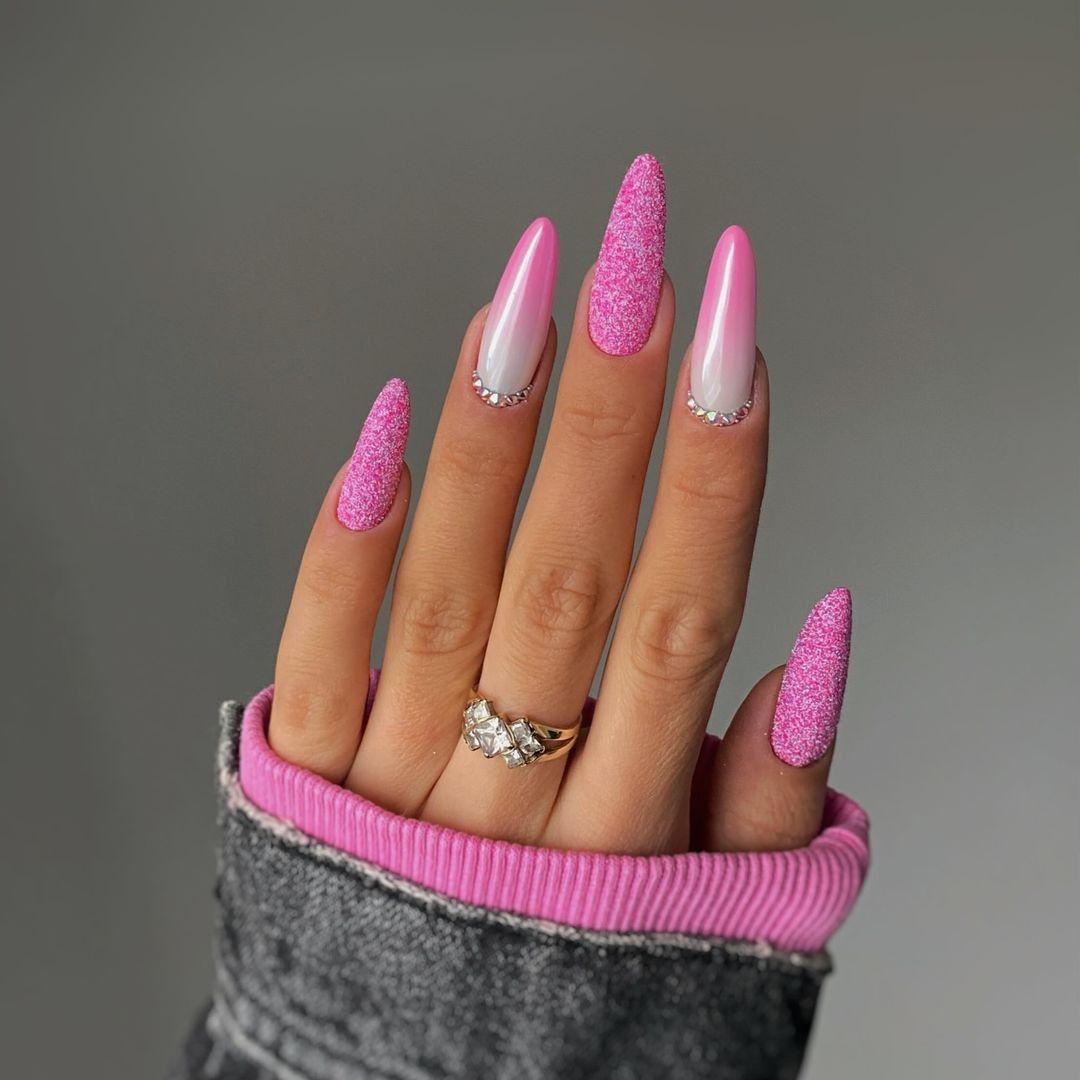
Step into a whimsical world of pink perfection with this show-stopping nail design. The combination of smooth ombre and textured glitter creates a mesmerizing visual effect that’s sure to turn heads. Starting at the cuticle, a soft pink hue transitions seamlessly into a dazzling explosion of rose gold sparkles. To achieve this look, begin by applying an Orly Bonder Rubberized Basecoat for increased staying power.
Paint on Essie’s ‘Ballet Slippers’ and ‘A Cut Above’ in a gradient fashion, starting with the lighter shade at the cuticle and gradually building up to the darker hue towards the tip of the nail. While the polish is still wet, sprinkle loose pink glitter along the length of the nail for added depth and dimension. Next, add silver nail studs at the transition line between the pink and gold sections to create a stunning jewel-toned effect.
Finally, seal it all in with an INM Out the Door Top Coat to prevent those pesky sparkles from disappearing prematurely. Credit: @pegi_nails
Royal Flair: Purple Marble & Sparkle
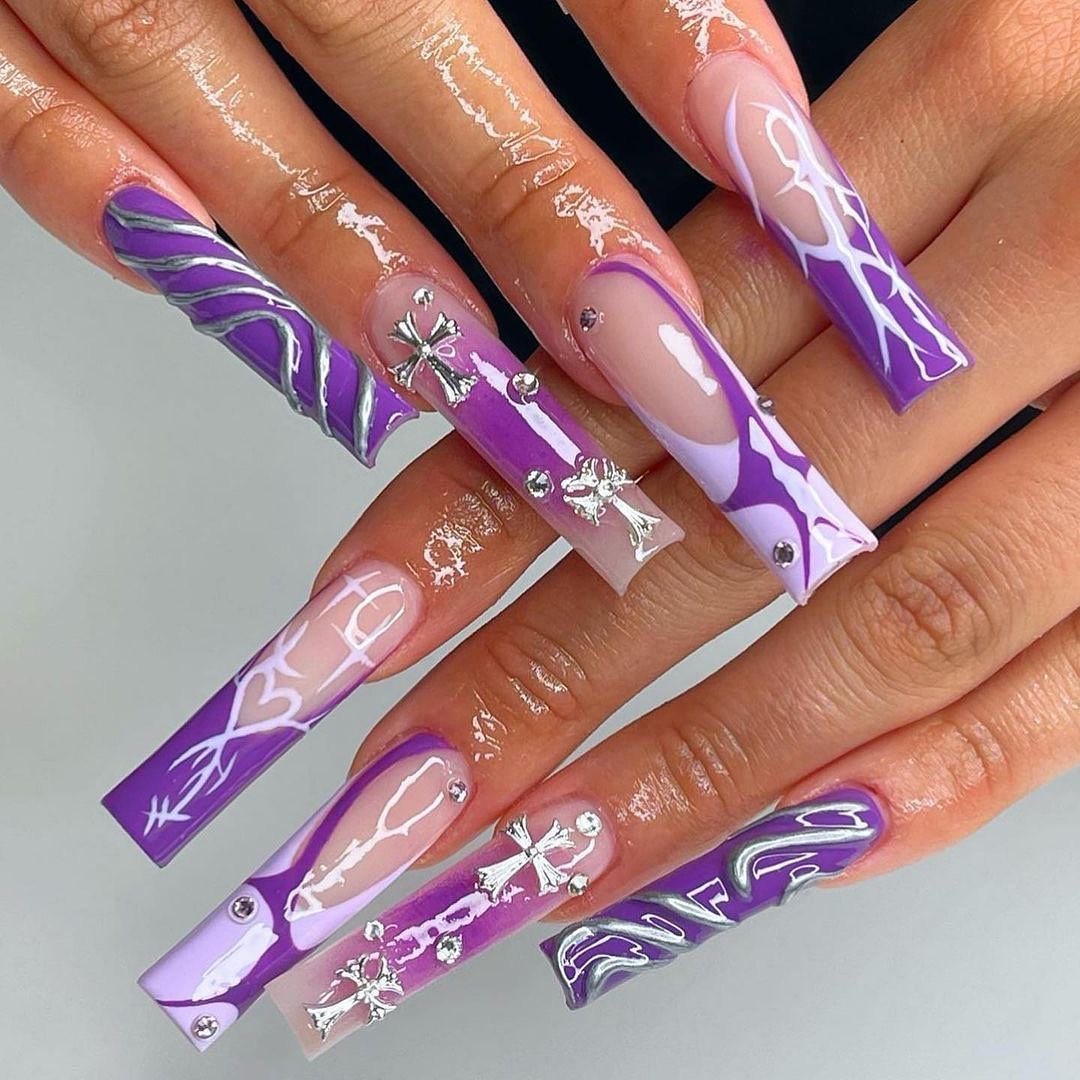
Imagine a luxurious nail design that seamlessly blends artistry with nobility. This stunning combination of purple and white marble, adorned with shimmering rhinestones, is sure to make a statement. Perfect for those who crave both trendiness and sophistication. To recreate this masterpiece, start by applying Zoya Anchor Base Coat as the foundation. Next, paint on OPI’s ‘Do You Have this Color in Stock-holm?’ purple polish.
For the marble effect, carefully dot on OPI’s ‘Alpine Snow’ white polish and gently swirl it together with a fine-tipped tool to achieve a mesmerizing pattern. Once the polish is slightly tacky, add Premium Nail Art Rhinestones to imbue the design with elegance. Finally, seal in the beauty with Zoya Armor Top Coat for a long-lasting finish.
Whispering Lilac: Subtle Elegance
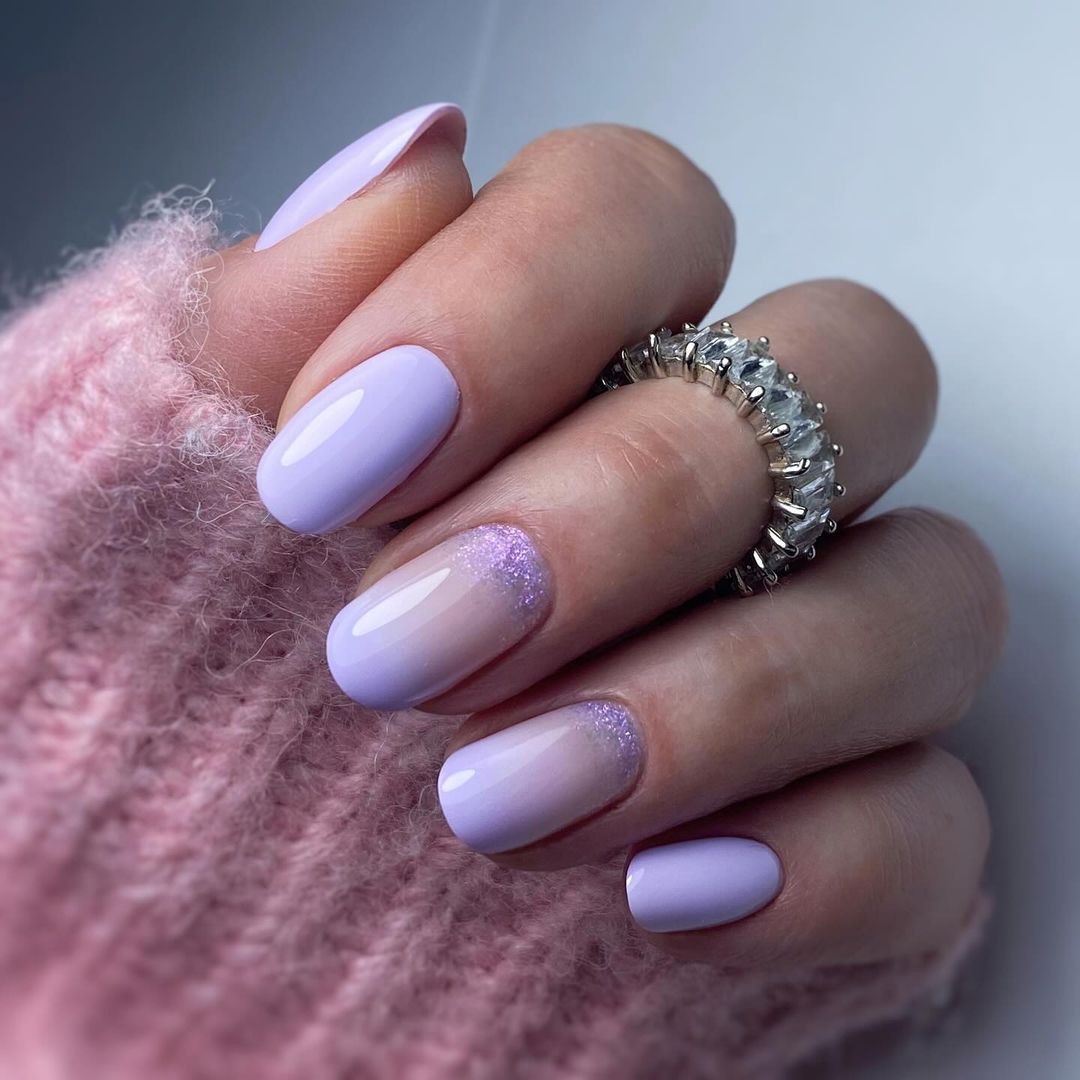
Indulge in the soothing essence of summer with a short nail design that exudes understated elegance. The whisper-soft lilac hue is perfectly complemented by a sprinkle of glitter, creating a look that’s both simple yet sophisticated. To achieve this effortless beauty, start by applying a base coat to create a smooth canvas. Next, apply two coats of the lilac polish to ensure an even finish. For added visual interest, add a touch of glitter at the tips or on one nail.
Finally, seal it all in with a topcoat to protect your design from the harsh effects of acetone and maintain its radiant shine for longer.
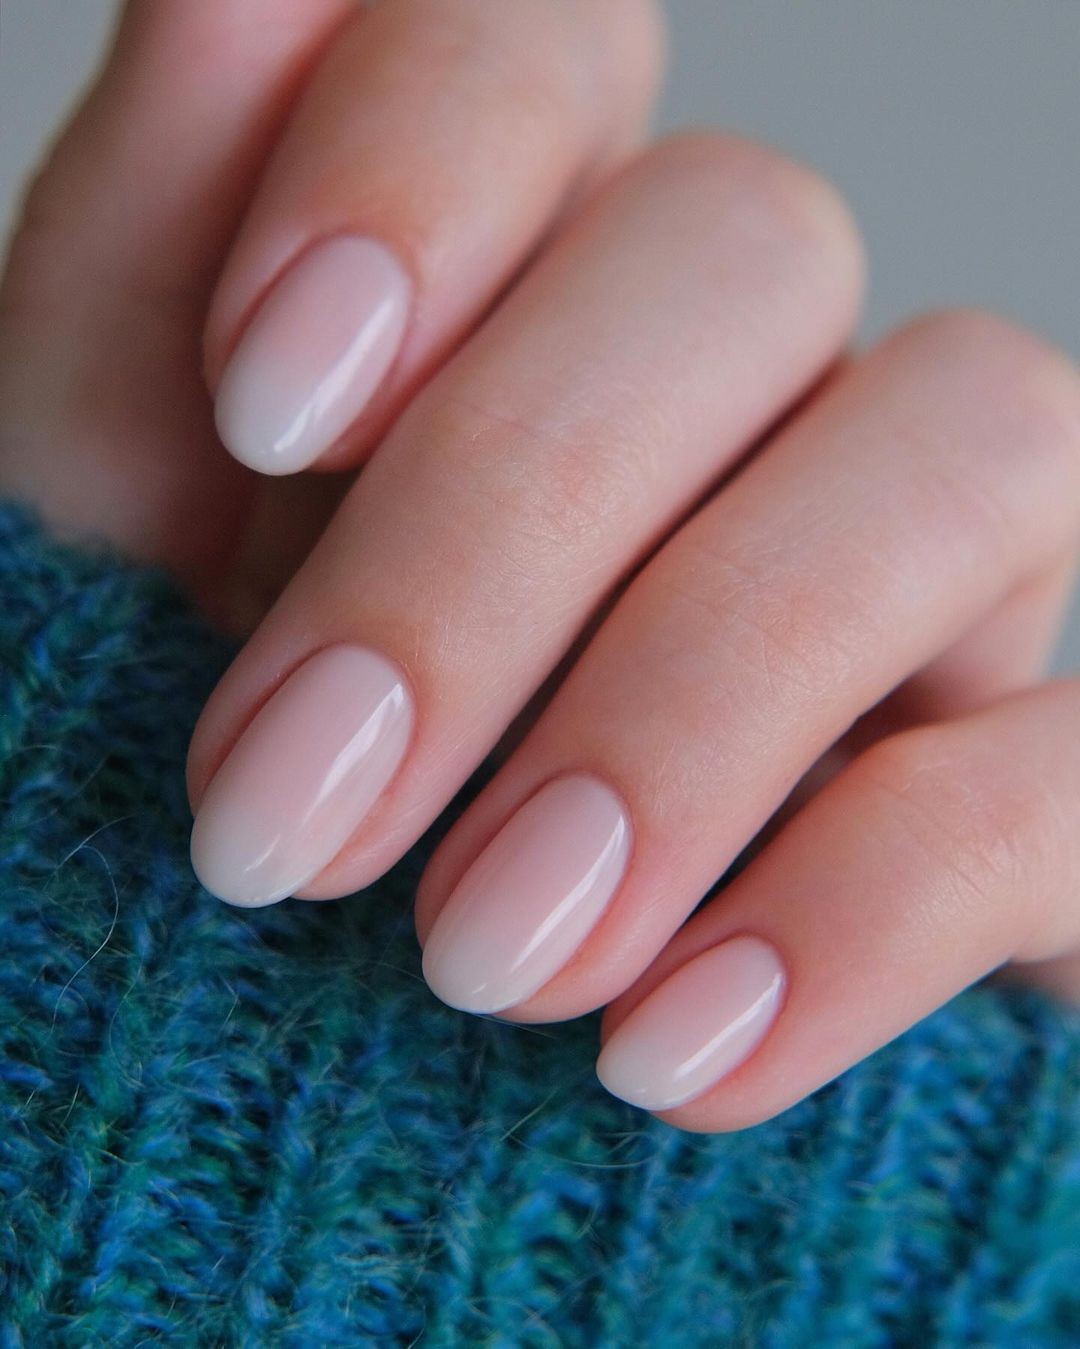
Nude Shimmer: Chic & Sheer
This elegant nail design combines the sophistication of a classic nude look with a touch of glamour. The combination of a timeless base color and a shimmering overlay creates an irresistible sheen, making it both trendy and understated. The perfect blend of subtle and stunning.
[Image credit: @learnahstarbuck_nailartist]
To achieve this look, start by applying a layer of gel base coat to ensure your design lasts.
Then, apply two coats of the nude gel polish, followed by one or two coats of the shimmer gel polish. Make sure to cure each layer under a UV lamp before moving on to the next step. Finally, seal it all off with a topcoat for that extra-glossy finish.
Sunset Sparkle: Gradient and Gems
Imagine a summer ombre nail design that’s as vibrant as a sunny day. The gradient shifts seamlessly from a soft pink hue to a warm peach tone, complete with sprinkles of glitter that catch the light like fireflies on a summer evening. It’s a look that’s equal parts playful and sophisticated. The key to recreating this stunning design lies in the right combination of products. Start by applying an Essie All-in-One Base coat to ensure your polish adheres evenly.
Then, build the gradient using OPI’s ‘Mod About You’ pink polish and ‘Freedom of Peach’ orange polish, blending them together with a makeup sponge for a smooth transition. Next, add some sparkle with OPI’s ‘Princesses Rule!’ glitter polish, dotting it on strategically to create a whimsical effect. For an added touch of glamour, incorporate small round rhinestones wherever you like while the top layer is still sticky.
Finally, seal everything in place with Essie Gel Setter topcoat and get ready to bask in the glory of your radiant summer ombre nails.
Sheer Elegance: Classic French Manicure
With a modern twist on the classic French manicure, this design boasts a durable and flawless finish courtesy of the gel method. This timeless and elegant look exudes sophisticated simplicity. The photo credit goes to @amberjhnails for capturing its essence.
To achieve this neutral perfection, start by applying a base coat of Gelish Foundation Base Gel. Then, paint on the light pink hue with Gelish ‘Simple Sheer’ gel polish.
Next, use a brush to carefully apply white gel from Gelish ‘Arctic Freeze’ to the tip area, ensuring a precise finish. Once cured under UV light, seal it all in with a layer of Gelish Top It Off Gel Sealer for long-lasting shine.
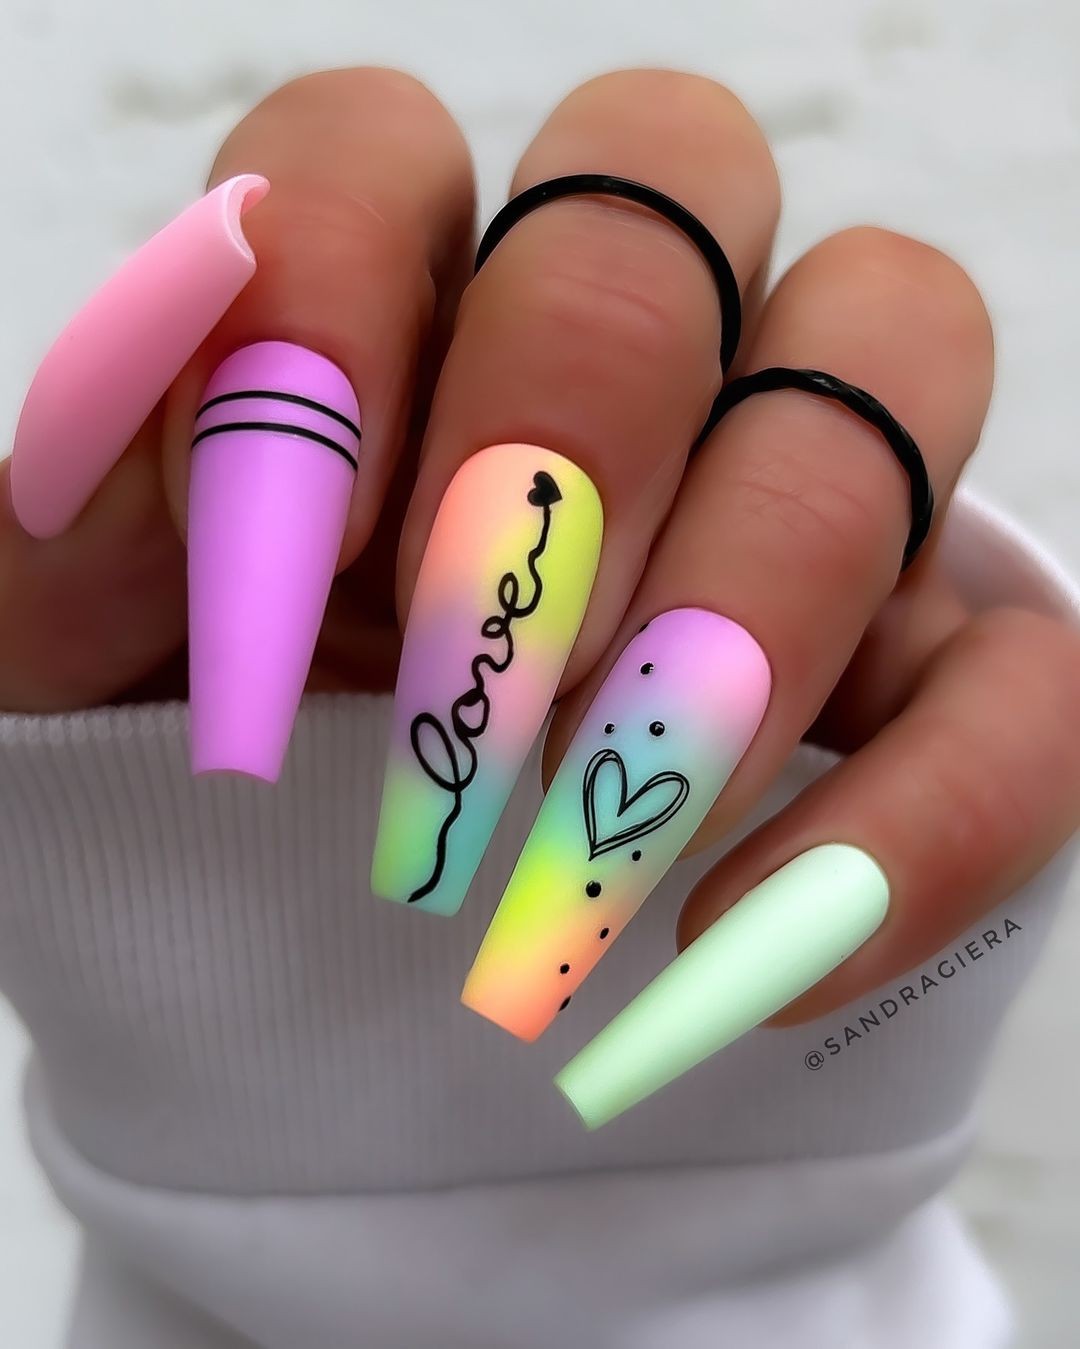
Pastel Rainbow: Softly Blended Splendor
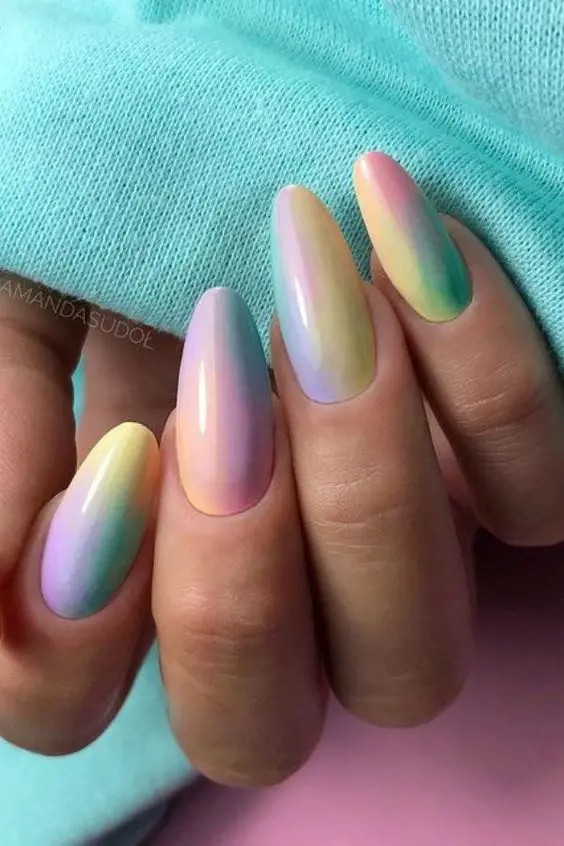
Why limit yourself to just one hue when you can create a whimsical masterpiece? A soft, gradient pastel rainbow of blue, pink, purple, and yellow takes center stage on these long nails. The ethereal design transports you to a summery state of mind, where the only concern is soaking up the sunshine.
[Photo credit: @pradaandpearls]
To achieve this dreamy effect, start by applying a clear base coat. Next, gently sponge each pastel shade onto your nails in a seemingly random order.
As you work through the colors, blend them together seamlessly to avoid any harsh transitions. Once you’ve completed the color palette, seal it all with a glossy topcoat. Not only does this finish enhance the vibrant hues, but it also ensures they remain chip-resistant throughout your summer escapades.
Materials:
Base coat: Sally Hansen Double Duty Base & Top Coat
Pastels: Essie pastel range (a selection)
Topcoat: Sally Hansen Miracle Gel Top Coat
Blue Illusion: Negative Space Elegance
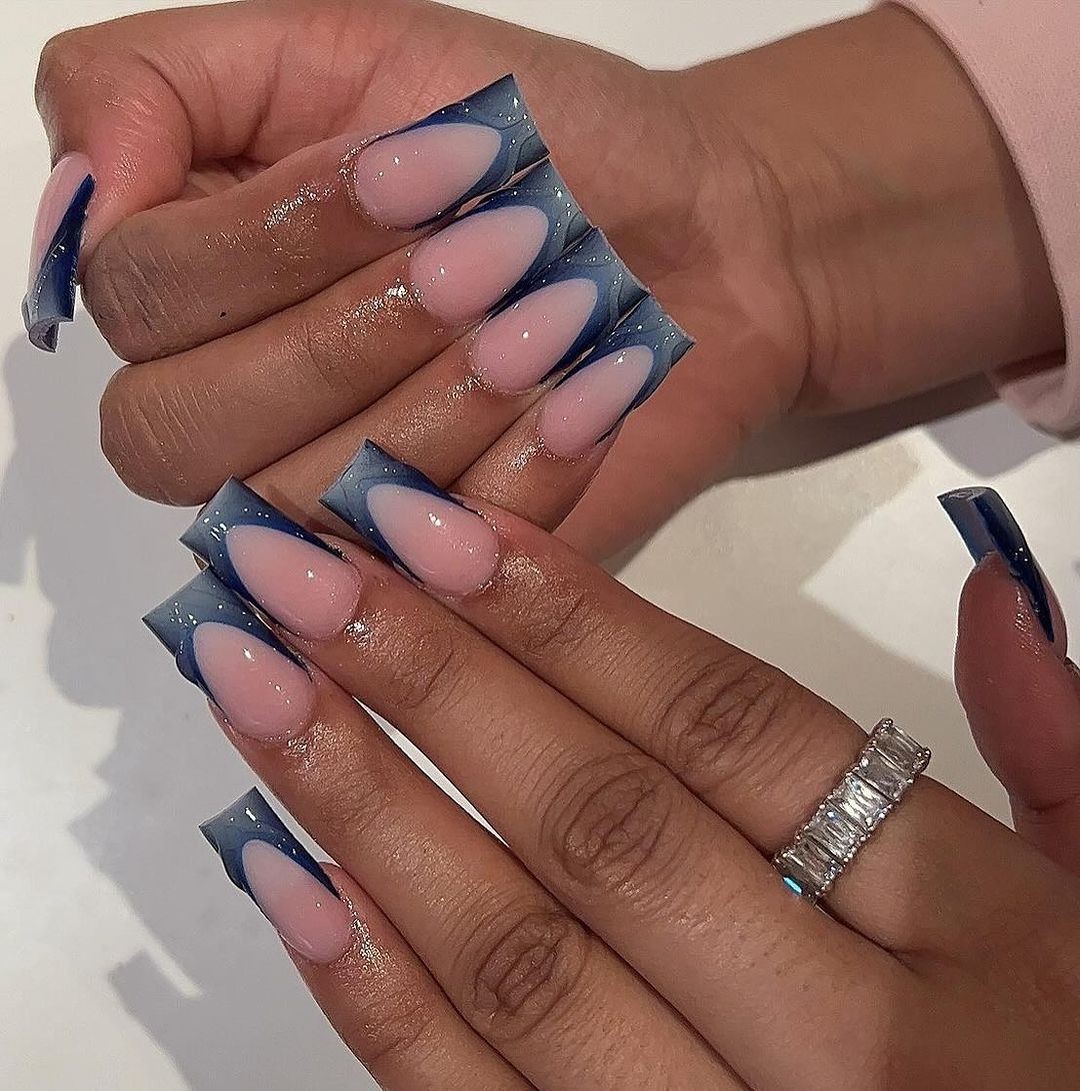
The standout design features Deborah Lippmann Gel Lab Pro Base Coat as its foundation, followed by a layer of Sally Hansen’s ‘Bare Dare’ gel polish in a nude hue. The true showstopper, however, is the abstract blue artwork created using Gelish’s ‘My One Blue Love’. To achieve this unique look, start by applying the base coat for added durability. Then, build your design by painting the nude gel polish as your base color.
Use a fine brush to carefully add the blue patterns, leaving some areas transparent to create negative space. Finally, seal the design with a glossy top coat from Deborah Lippmann’s Gel Lab Pro collection.
Minty Fresh: Soft Touch with Glitter Accents
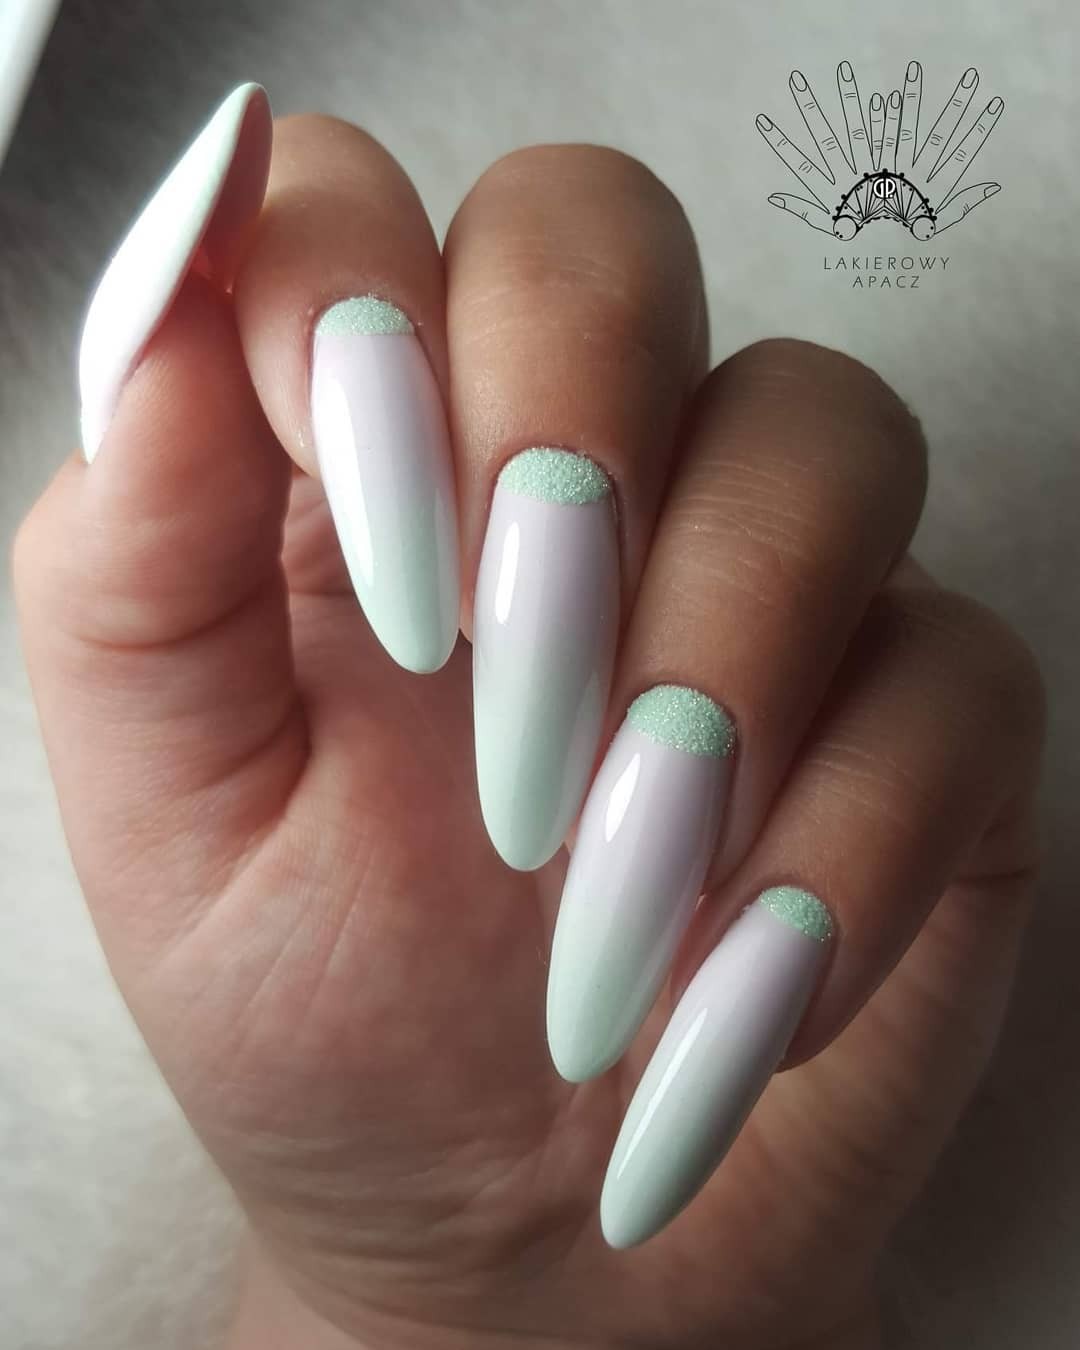
Summer-inspired gel nails boast an understated elegance, with almond-shaped tips that evoke a sense of serenity. A refreshing minty hue serves as the backdrop for sparkling glitter accents, subtly hinting at the carefree joy of the season. The key to recreating this look lies in the thoughtful combination of products: start by applying a breathable base coat from ORLY, followed by two coats of LeChat’s ‘Mint Cocktail’ gel polish.
Allow the polish to dry completely before adding thin layers of Martha Stewart Crafts’ ‘Sugar Cube’ glitter at the tips for a frosted effect. Finally, seal your design with ORLY’s Breathable Treatment + Shine topcoat, which prioritizes both nail health and radiant shine.
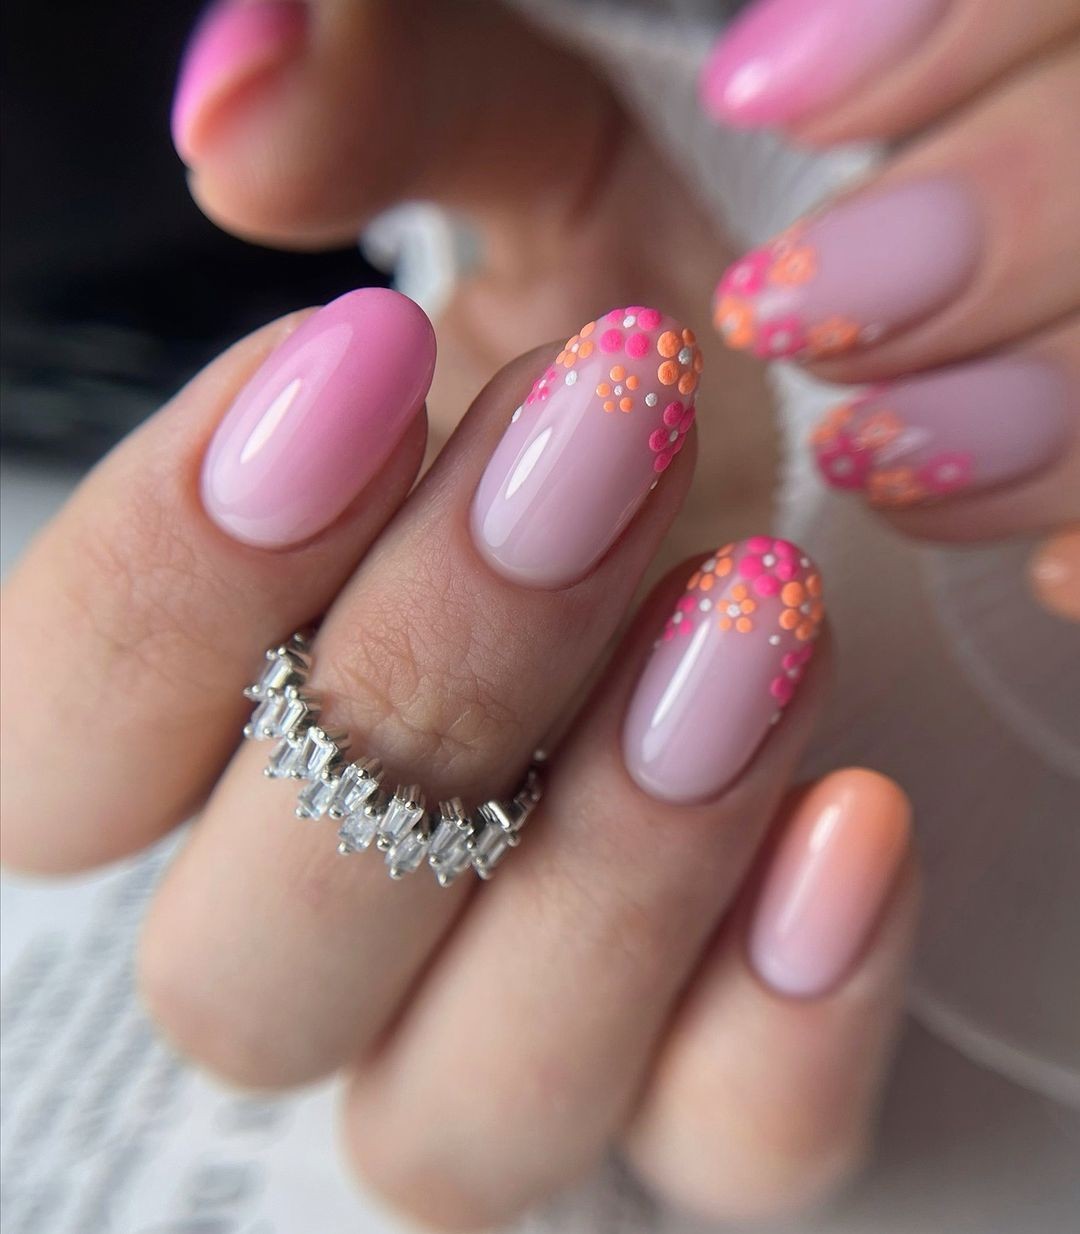
Pink Perfection: Ombre and Polka Dots
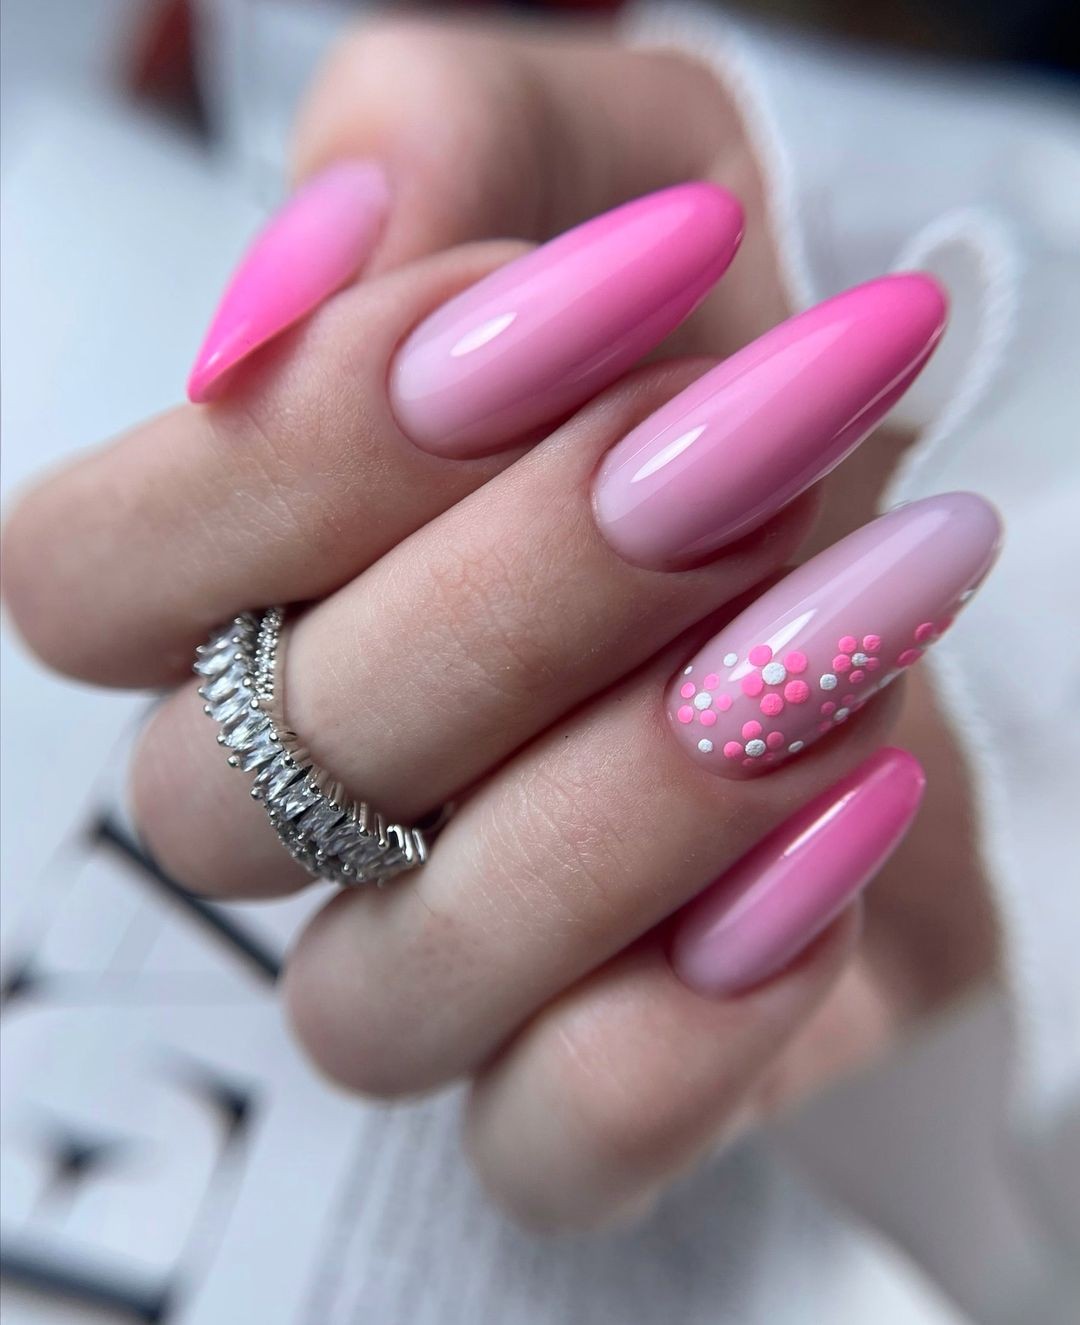
The nails showcased are a vibrant fusion of fun and playfulness, featuring a trendy gradient pink effect with soft, adorable polka dots. The color palette is reminiscent of a sunny day, complete with the perfect blend of sweet and playful notes.
To achieve this look, start by applying a base coat, followed by two shades of pink that are blended together to create an ombre effect.
Use a sponge to smooth out any rough edges, then move on to adding white polish for the polka dots using a dotting tool. Finally, seal your design with a topcoat to keep it looking fresh and intact.
Pastel Palette: A Soft Almond Symphony
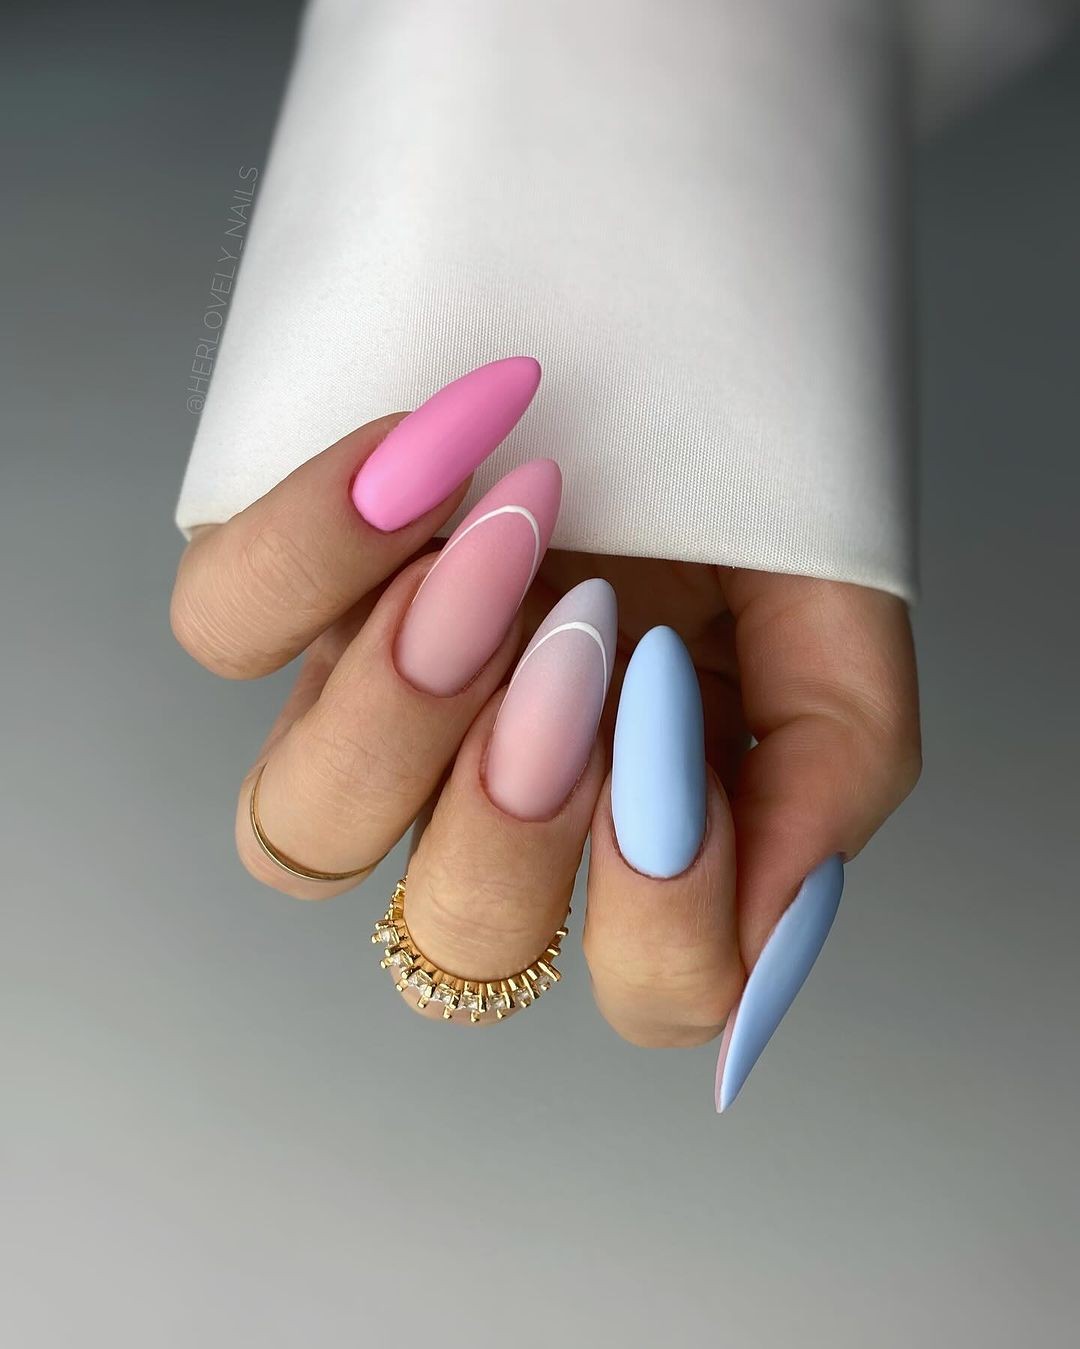
A delicate palette of pastels, featuring hues of pink, blush, and subtle blue, comes together in perfect harmony. These almonds-inspired nails exude an air of sophistication, while also capturing the carefree essence of a summer sky. Each one is a unique canvas, reminiscent of blooming flowers. Photo credit: @herlovely_nailsTo achieve this look, start by applying Jessica Cosmetics’ Reward Base Coat as your foundation. Next, alternate between pastel pink and blue for a touch of whimsy.
For the nails featuring line art, use Sally Hansen’s Nail Art Pen in White to add delicate details after the base color has dried. Finally, seal it all off with a top coat to lock everything in place.
Modern French: Sky Blue Twist
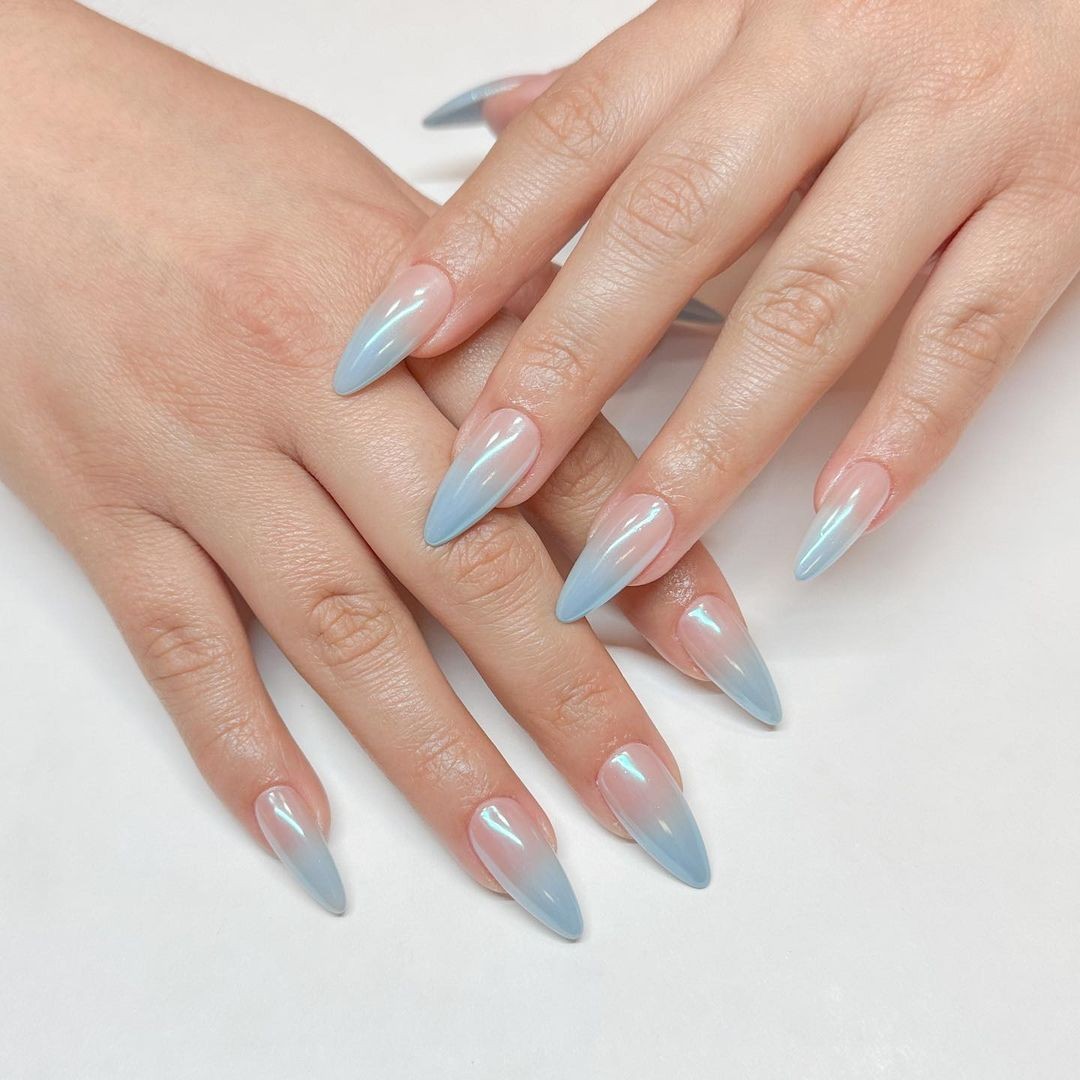
Elevate the classic French manicure by infusing it with a modern twist. Combine a transparent base coat with a sky blue tip, evoking the vibrant hues of a summer ocean breeze. This updated take on the traditional look is perfect for sizzling hot days when you want to radiate beachy vibes from your fingertips. To achieve this stunning effect, start by applying a reliable base coat.
Then, carefully paint aquamarine polish onto the tips of each nail, injecting a contemporary touch into this timeless style. Finish with a swift application of quick-drying topcoat to seal in the color and smooth out every nail surface. The result is a fresh, airy look that’s sure to turn heads.
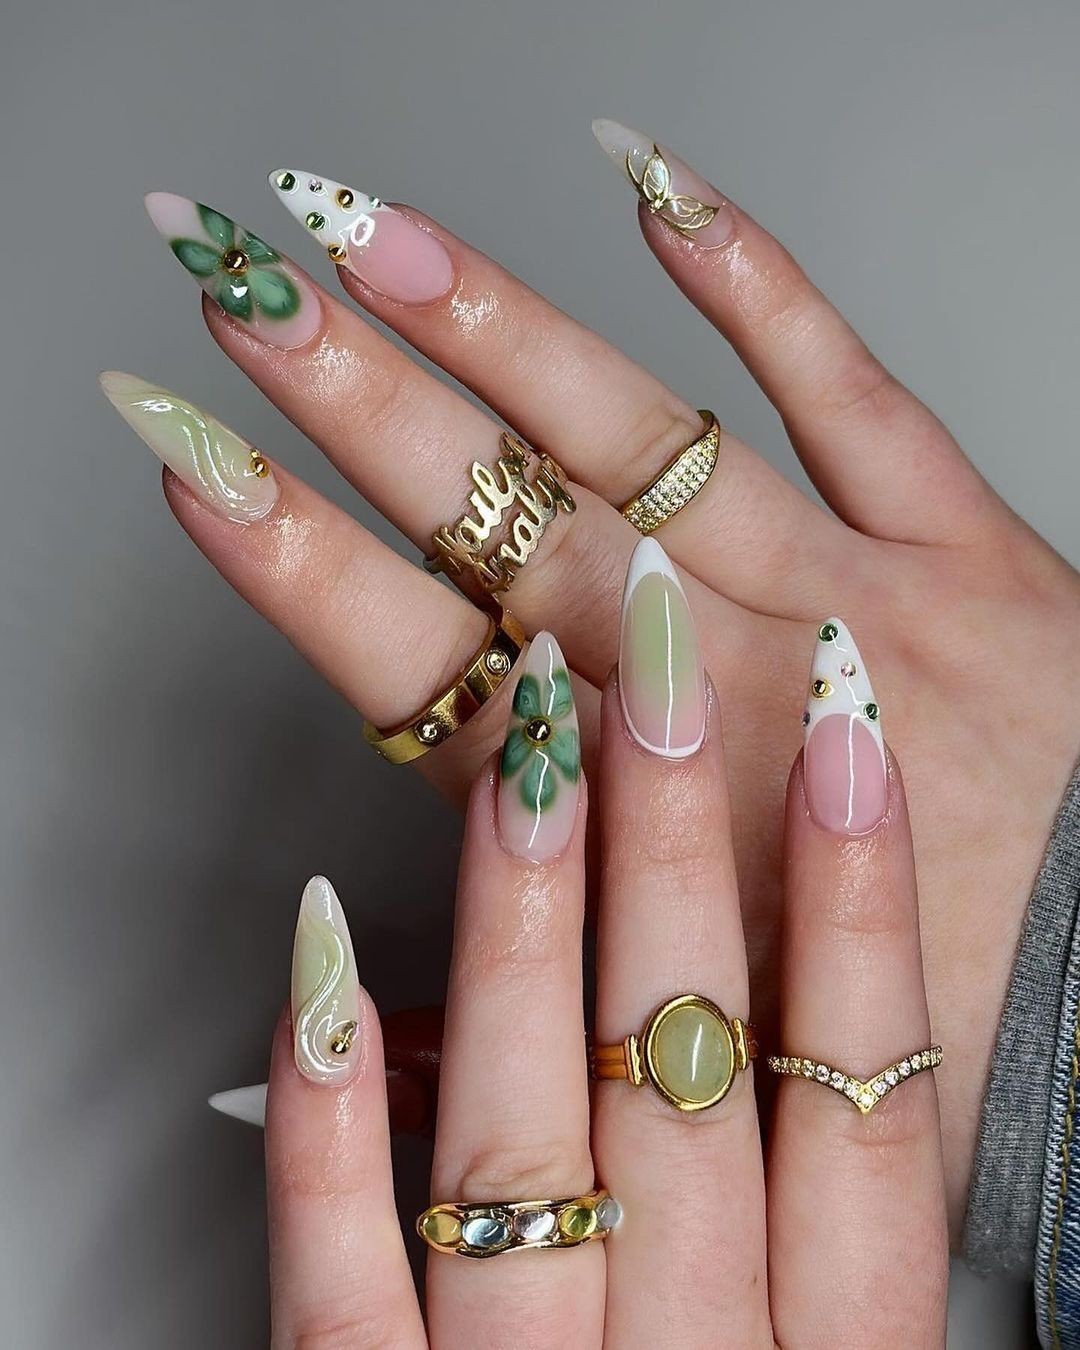
Green Marble Majesty: Natural Elegance
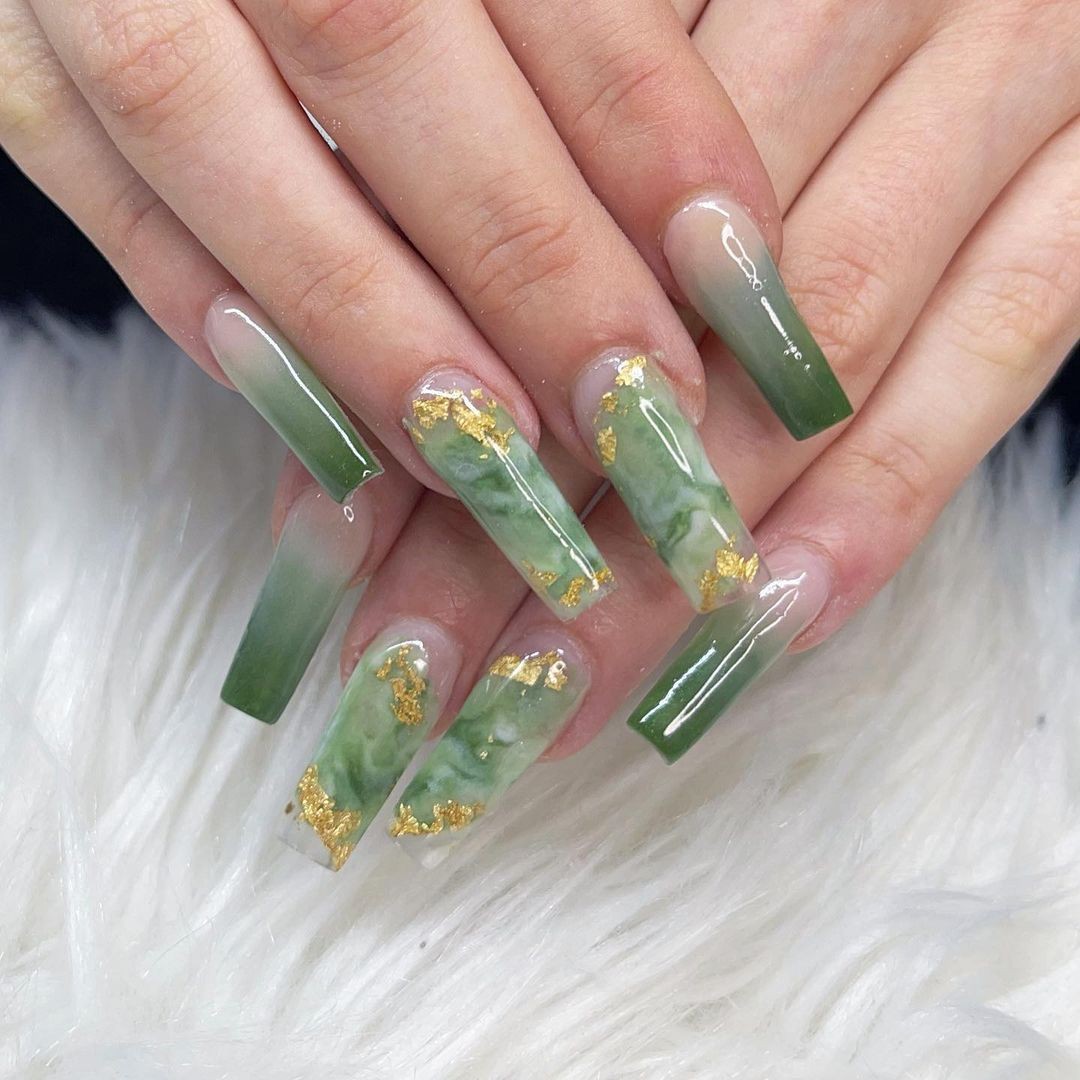
Imagine having a lush garden at your fingertips – that’s what these nails are all about. The combination of green marble effect and gold leaf creates a harmonious blend of earthy elegance and luxury. As seen on @nailsby_hermz. To achieve this stunning look, start by applying a base coat to create a smooth canvas. Then, using a thin brush, marbled Essie’s ‘Off Tropic’ green polish with ‘Private Weekend’ white polish. Don’t forget to add the gold leaf flakes before they dry!
Finally, seal it all in with CND Vinylux Long Wear Top Coat for a long-lasting finish.
Fluid Pink: Watercolor Waves
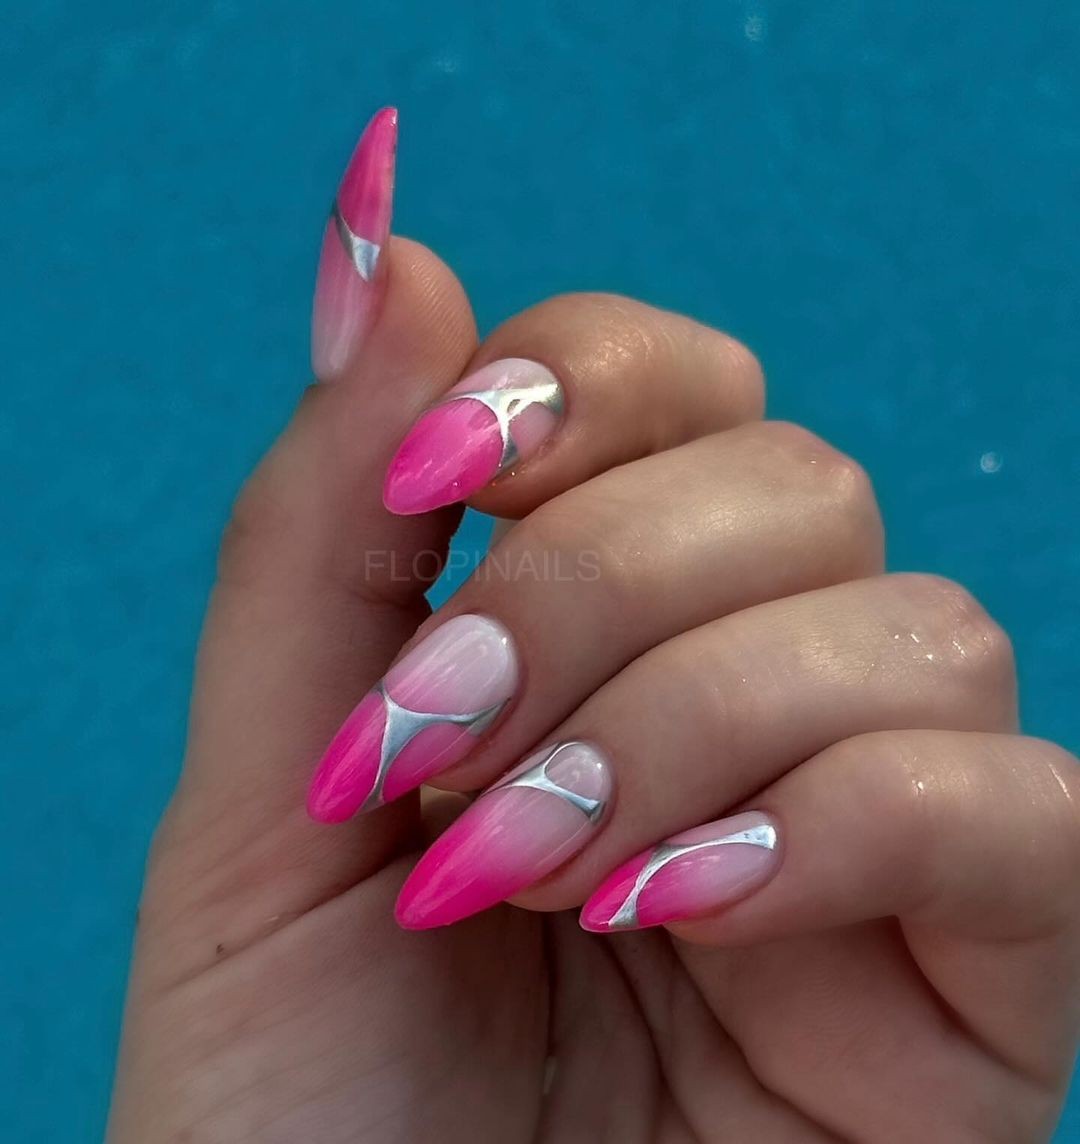
When you combine China Glaze’s ‘Pink Voltage’ and ‘White On’ by Sally Hansen, applied to a detailed brushstroke, you get stiletto nails that shine as bright as summer clouds at sunset. The pink polish is enhanced by silver accents, adding an air of sophistication. The photo credit goes to @flopi. nails.
To achieve this look, start with a base coat from China Glaze, specifically the Strong Adhesion Base Coat.
Then, using a detail brush, create a watercolor effect with the pink and white polishes. Finally, seal everything in place with INM’s Out The Door Top Coat. Add some glamour by incorporating silver striping tape.
Glossy Drizzle: Gel Artistry
The nail art design features a clear glossy base, topped with a vibrant pink polish that appears to melt like candy. The result is a fun, sugary-appealing finish that’s almost irresistible to touch.
(Credit: @nnailedbynic)
To achieve this look, you’ll need the following materials:
Gelish Foundation Gel Base Coat (foundation coat)
Gelish ‘Clear Gel’ (transparent nail polish)
Gelish ‘Pink Smoothie’ (pink nail polish)
Gelish Top It Off Gel Sealer (sealing layer)
Begin by applying the gel basecoat, followed by a curing process. Next, use a dotting tool to drizzle on the pink gel in a zigzag pattern and cure again.
Finally, seal your design with a top coat for a wet and sleek finish.
Artistic Expression: Blue and Yellow Nail Art

Embark on an artistic journey with this stunning gel nail design! The swirling blues and yellows are mesmerizing, while the floral accents add a playful touch. Each nail is a miniature work of art, perfect for those who crave creative expression.
To achieve this look, you’ll need:* OPI GelColor Base Coat* OPI GelColor in ‘Can’t Find My Czechbook’ for the blue gel polish* OPI GelColor in ‘Exotic Birds Do Not Tweet’ for the yellow gel polish* OPI GelColor in ‘Alpine Snow’ for white art details* OPI GelColor Top CoatBegin by applying a base coat to each nail. Next, create the gradient background by layering blue and yellow gels under UV light. Use white gel polish to add artistic flourishes between each curing cycle.
Finally, seal your masterpiece with a topcoat, ensuring it’s protected from chipping or fading.
Kaleidoscope Glitter: A Spectrum of Sparkle

Step into a kaleidoscope of color with this vibrant nail art design. Begin by applying a protective base coat to ensure your nails remain healthy throughout the process. Next, paint on a sheer polish in a soft, pastel hue, allowing it to dry slightly before adding a sprinkling of mixed hexagon glitter flakes in various colors. Finish off the look by sealing everything in place with a glossy topcoat, perfect for showcasing the playful dance of light and color as you move.
Pink Ombre Bloom: Delicate Floral Elegance
The beauty of these nails lies in the harmonious blend of soft pink ombre effects, delicate white floral artistry, and playful pops of pink glitter. The subtle interplay between sophistication and fun is effortlessly achieved through this creative combination.
Photo credit: @prettyv.
nails
Products:
Base coat: OPI Natural Nail Base Coat
Pink polishes: A gradient effect using OPI ‘Shorts Story’ and ‘Mod About You’
White polish for art: OPI ‘Alpine Snow’
Pink glitter: Fine pink glitter dust
Topcoat: OPI Top Coat
To recreate this look, start by applying a base coat, then build a gradient ombre effect using your pink polishes. Next, use white polish to create delicate hand-painted floral designs and add a touch of pink glitter to select nails for added flair.
Finally, seal the design with topcoat for a high-shine finish and optimal protection.
Pastel French Fade: Soft Gradient Elegance
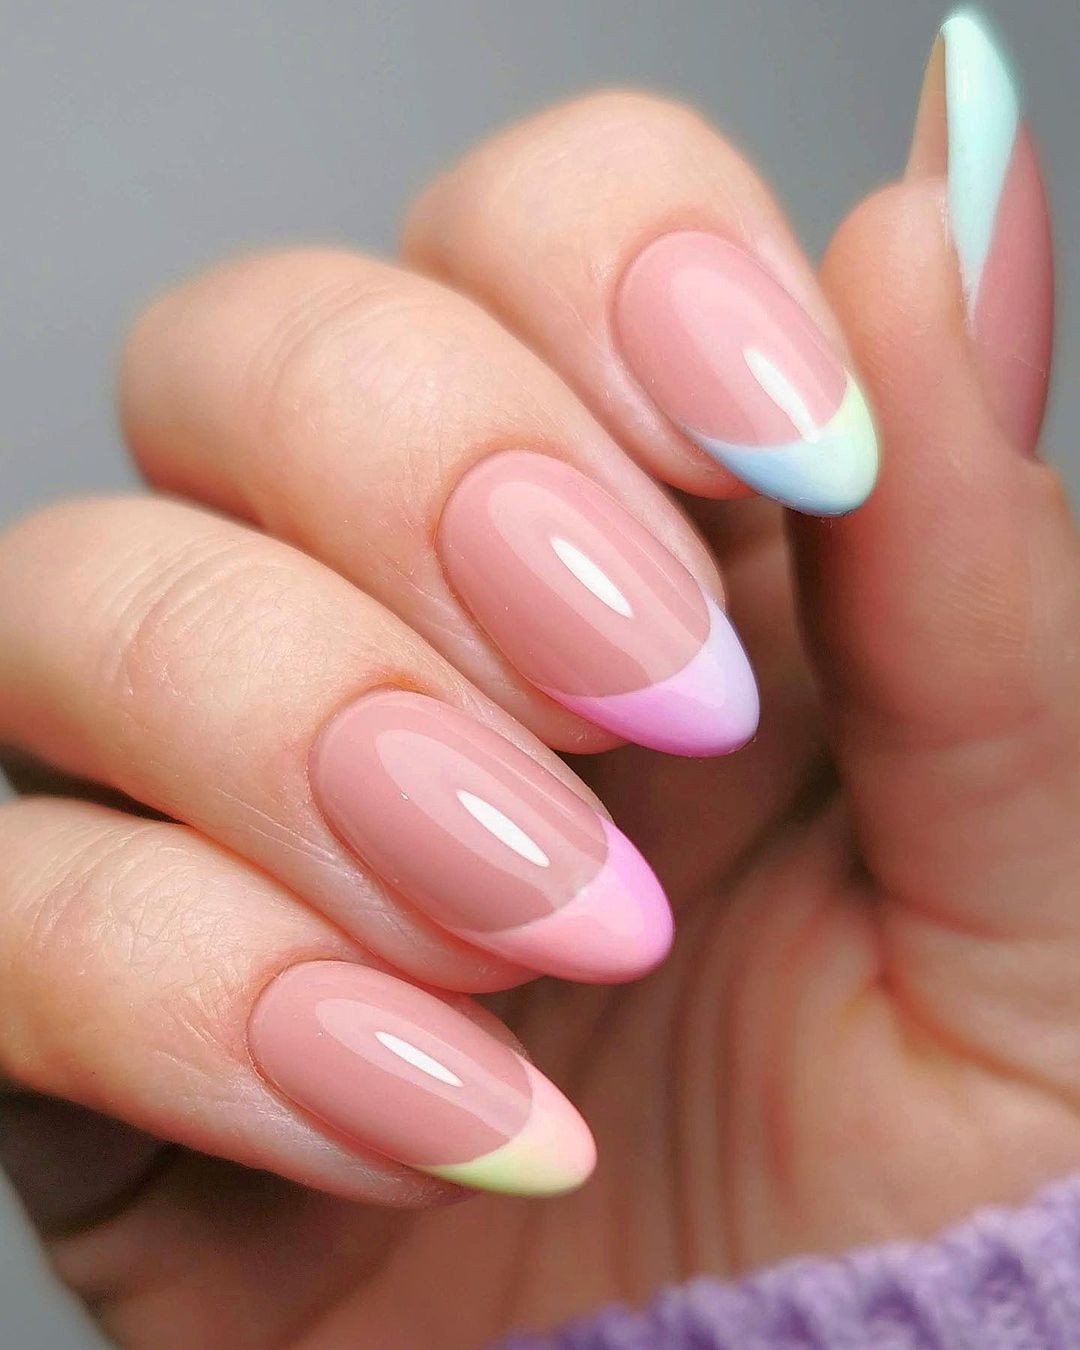
Say au revoir to traditional French manicures and hello to a soft, sunny spin! By combining gel polish in pink, blue, and blush hues, we’ve created a trendy pastel fade that’s sure to brighten up your day. Imagine having sunshine at your fingertips with this delightful design.
Majestic Green: Emerald Elegance
These emerald green and soft pink stiletto nails are a true masterpiece of style and sophistication, boasting intricate floral patterns and golden accents that elevate them from mere nail art to a fashion statement of elegance. The combination of OPI’s Natural Nail Base Coat, ‘Sweet Heart’ pink polish, Essie’s ‘Off Tropic’ green polish, gold foil, and floral decals or stickers creates a look that is truly divine.
To achieve this stunning design, begin by applying the base coat, followed by a few coats of pink on some nails and green on others. Next, add the accent designs using gold nail foil and floral stickers, finishing off with Essie’s ‘Good To Go’ Top Coat to seal in the beauty and add a radiant shine.
Vibrant Geometry: Pink and White Precision
In this bold design, the contrast between bright pink hues and crisp white surfaces creates visually striking geometrical patterns. This unique aesthetic is perfect for those who crave making a statement with their beauty choices.
The photo credit goes to @klawsbykaylana.
To recreate this look, you’ll need:
– Base coat: Sally Hansen Hard as Nails Base Coat
– White polish: Sally Hansen ‘White On’
– Pink polish: China Glaze ‘Bottoms Up’
– Topcoat: Sally Hansen Insta-Dri Top Coat
Begin by applying the base coat to protect your nails. Next, paint a white coat over the entire nail and allow it to dry completely. Use nail tapes to create precise geometric shapes or lines, which will be filled with the vibrant pink polish.
To prevent smudges and ensure a sharp design, finish off with a quick-drying topcoat.
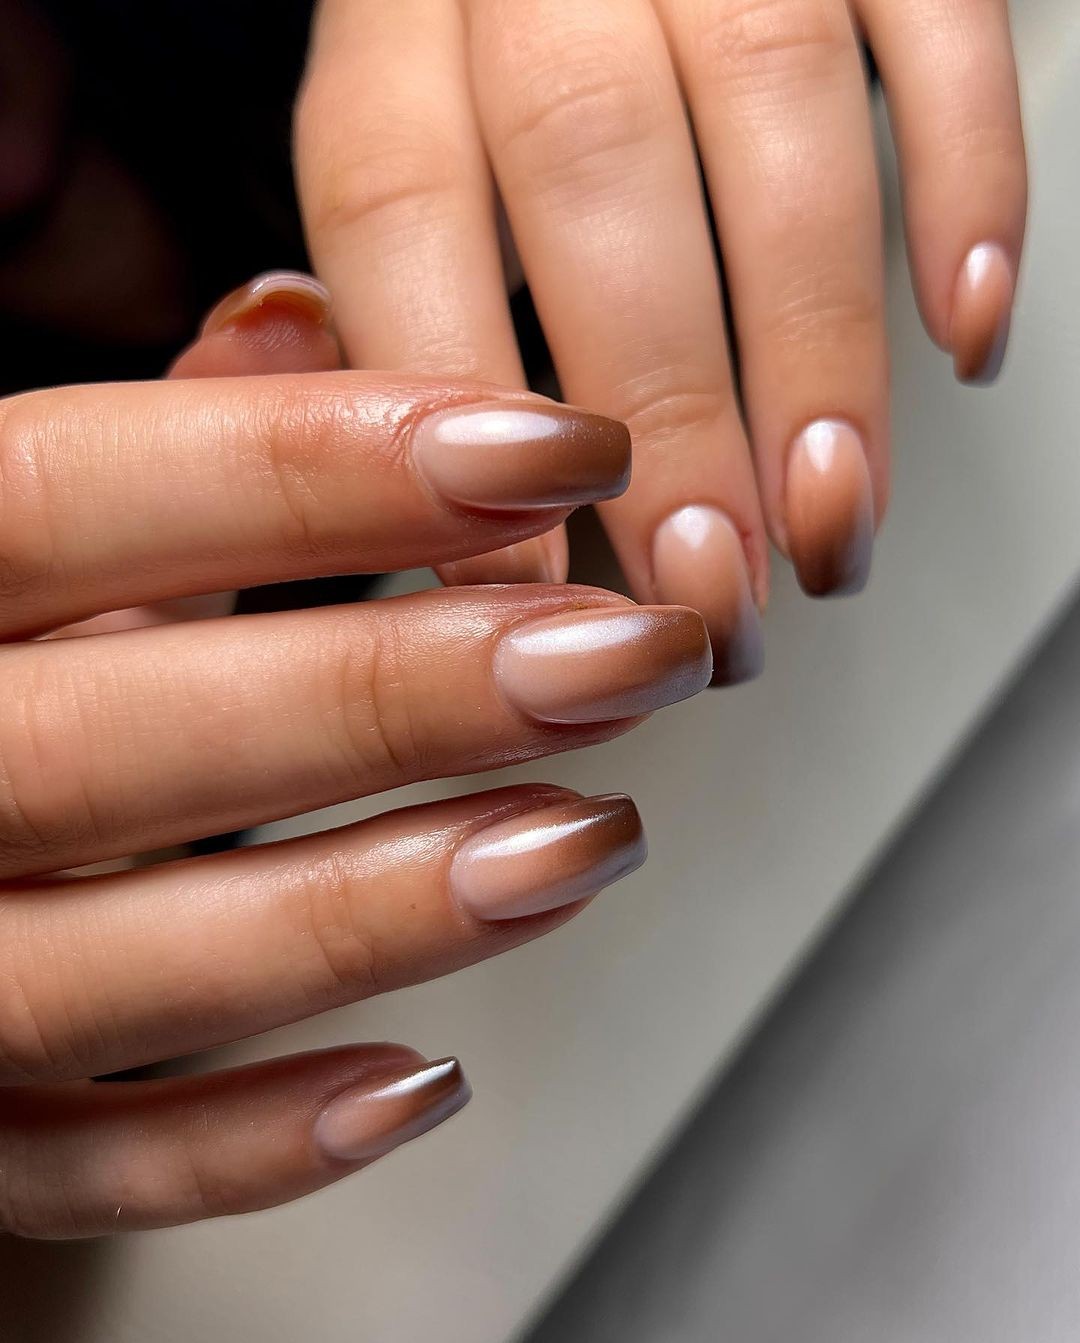
Ombre Noir: Black Fade Elegance
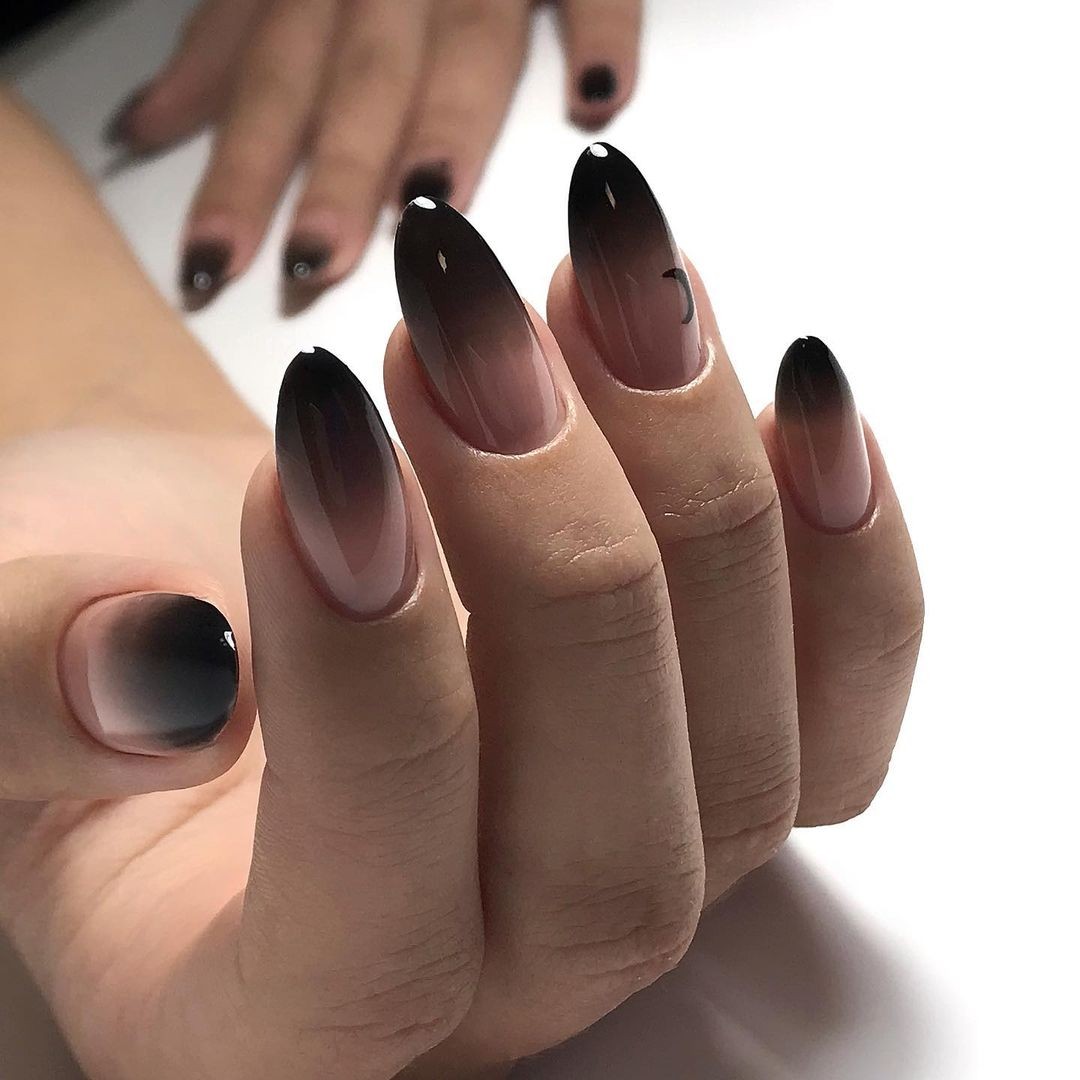
These enigmatic nails boast an ombre effect with dark tips graduating to transparent, exuding mystery and sophistication while still being edgy enough to make a statement. The perfect fusion of modernity and classic elegance. To recreate this look at home, start by applying Seche Clear Crystal Clear Base Coat to prime your nails. Then, apply a thin layer of Gelish ‘Black Shadow’ gel polish to the nail base, using a brush to gently pull the color down for a seamless fade.
Build up with clear builder gel if necessary, cure under a UV lamp, and finish off with Seche Vite Dry Fast Top Coat for a glossy finish. For those looking to stay on top of summer nail trends, popular shapes include almond, oval, and coffin styles that can be paired with bold colors or intricate art. If you’re feeling adventurous, you can even give yourself a professional-looking manicure at home by investing in good quality polishes and base/top coats, and watching tutorials.
To ensure your summer polish lasts longer, begin with a clean nail surface, use a high-quality base coat, apply thin coats of polish, and finish with a strong topcoat. Avoid using your nails as tools, as this can prevent chipping. For those seeking inspiration, brights like aqua blue, neon pink, and sunny yellow are hot summer trends, while pastels and glitter accents also make the cut.
If you find yourself dealing with a chipped nail, smooth out the chip with a file, then apply another layer of the same color or clear topcoat. For gel nails, it’s best to leave corrections to the pros. To safely remove gel polish at home, buff off any shine, soak cotton pads in acetone solution, and sit them over your nails before wrapping in foil for about 15 minutes. Gently push the gel away, and voila! Your nails will be free of polish.
In terms of eco-friendliness, yes – you can definitely rock nail art that’s good for the planet! Look out for non-toxic biodegradable polishes like soy-based lacquers, and opt for brands that tout ‘5-free’ or higher credentials. And don’t worry if your workplace has a strict dress code policy – many modern offices allow employees to express themselves through their nail colors. Just be sure to double-check the rules before getting too creative.