As you gaze upon the ocean’s mesmerizing waves, its captivating beauty draws you in, inspiring a desire to infuse your personal style with its essence. Whether planning a seaside escape or simply seeking a creative boost, ocean-themed nails offer a unique blend of whimsy and sophistication. So, what are the key elements that elevate this nail art trend? How can you seamlessly merge the soothing ambiance of the sea with vibrant blue hues into your design?
Let’s dive into some breathtaking examples of how to capture the ocean’s spirit on your nails, and explore the simple steps to recreate these stunning designs at home.
Exploring Oceanic Elegance: A Dive into Deep Blue
Envision your nails as an immersive underwater experience, transporting you to the serenity of the ocean’s depths. This design masterfully captures the essence of this tranquil atmosphere by blending shades of blue in a gradient effect, evoking the ever-changing hues of the sea. The subtle addition of sparkles and beach waves patterns simulates the gentle lapping of waves against the shore.
As a professional manicurist, I have found that combining deep blues with artful techniques creates an unparalleled sensory experience, effectively conjuring the calming ambiance of oceanic depths.
Photo credit: @nailsbyemmsuu
To achieve this breathtaking design, start with a clear base coat to safeguard your nails. Layer blue shades in a gradient effect, transitioning from the darkest at the cuticle to the lightest at the tips. Employ a sponge to merge the colors seamlessly.
Once the gradient is established, employ a thin brush to delicately paint waves in white. Amplify these undulating patterns with a glitter top coat for a dazzling finish, reminiscent of sunlight dancing across the ocean’s surface, and conclude with a long-lasting top coat.
Capturing the Vibrancy of Coral Reefs
A visually stunning design that captures the essence of vibrant coral reefs is achieved through a harmonious blend of colors and textures. The base color features a radiant coral tone against a clear background, allowing the lively hues of underwater flora and fauna to take center stage. To further elevate this underwater world, 3D elements are incorporated, not only enhancing visual appeal but also providing a tactile experience that simulates the texture of real coral.
This thoughtful design cleverly utilizes color contrasts and textures to portray the diverse and thriving life beneath the sea’s surface. The precise execution and high-quality products employed in this design are crucial for achieving the detailed and lively appearance characteristic of coral-inspired nail art. To replicate this look, begin by preparing your nails with a base coat followed by a layer of vibrant coral polish.
Then, mix acrylic powder with a monomer to create a pliable mixture, which can be pressed into a silicone mold to form 3D coral shapes. Once hardened, attach these pieces to your nails using nail glue. Finally, seal everything in place with a robust top coat.
Oceanic Tranquility
The ocean-inspired nail art features a medley of styles on each nail, paying homage to the sea’s multifaceted nature. The design seamlessly transitions from the crystal-clear waters to the textured waves, showcasing the artistic prowess and versatility of this underwater world. A testament to the beauty of the ocean, this masterpiece is sure to captivate those with a deep appreciation for its natural wonders.
To achieve this stunning look, a solid foundation is built with a base coat, followed by a vibrant teal polish to serve as the ocean’s backdrop. White accents are then added to mimic the frothy waves, while sponging and fine brushwork combine to create textured, dimensional details that bring the design to life. A glossy top coat seals the deal, amplifying the colors and adding a radiant sheen.
Palm Silhouettes Against Sunset Skies
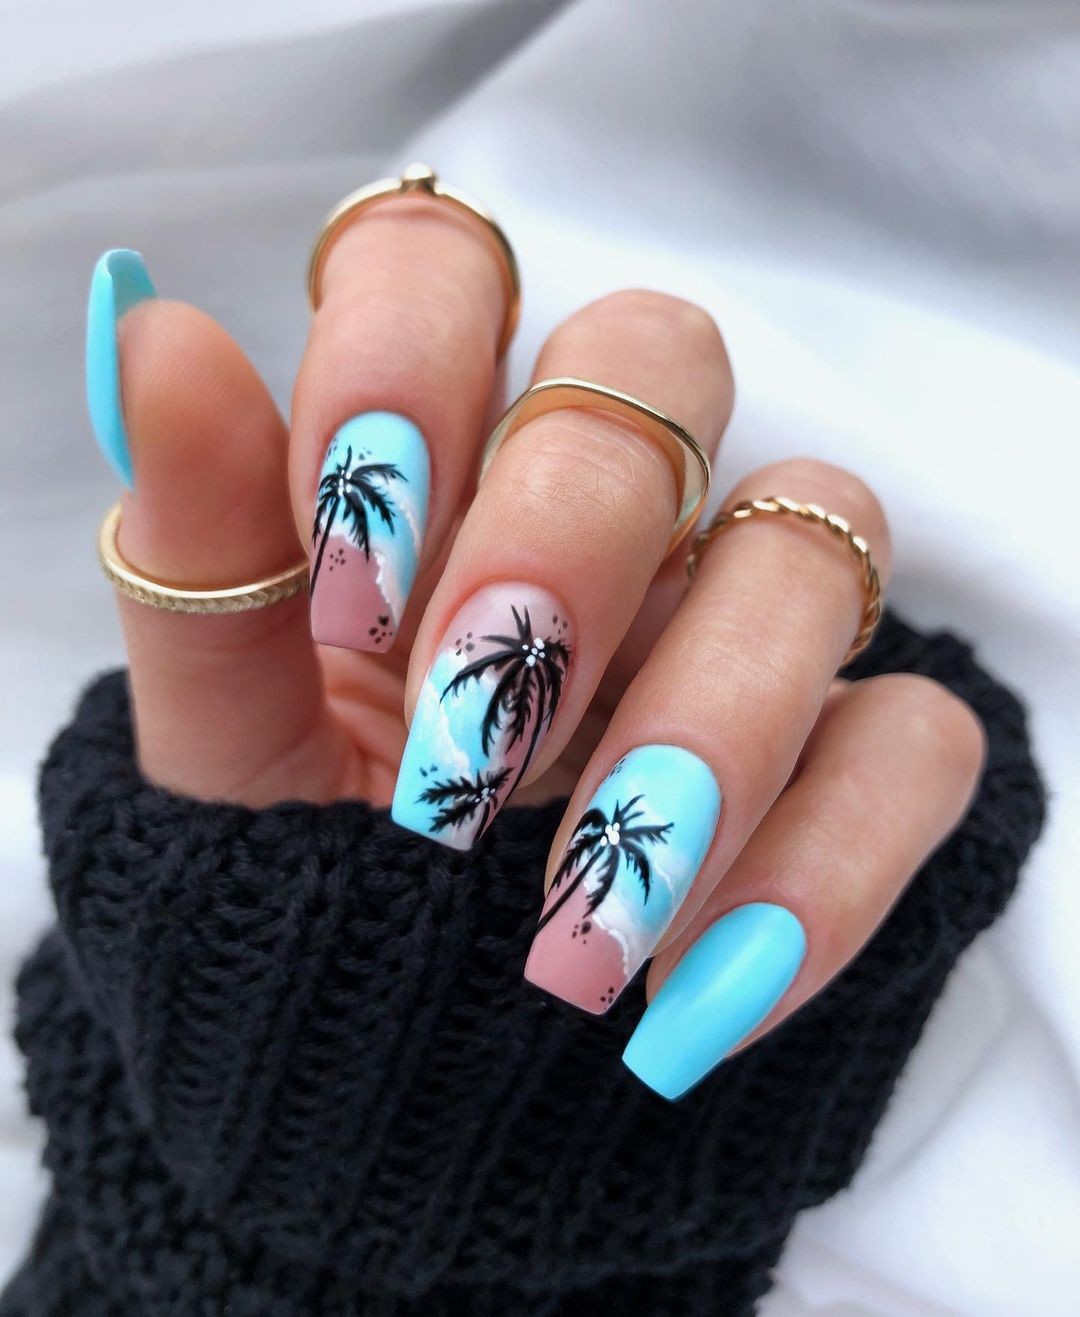
The beach-inspired design features a serene sunset landscape, with gentle transitions from sky blue to pink hues accompanied by delicate black palm silhouettes that evoke the tranquility of an evening by the ocean. The combination of colors masterfully captures the essence of summer and the peaceful atmosphere of a beach at sunset. To achieve this unique look, start by applying a protective base coat to safeguard your nails. Next, apply the sky blue polish as a base layer.
While it’s still wet, use a gentle sponging motion to blend the pink polish towards the tips, creating a seamless gradient that mirrors the colors of a sunset. Once dry, use a fine detailing brush dipped in black acrylic paint to delicately draw palm silhouettes, mimicking the fronds’ slender shape. Each stroke should be thin and precise to emphasize the design’s intricate details. Finally, seal your art with a fast-drying top coat to enhance the overall shine.
Sea Waves in Acrylic
The nail art design masterfully captures the soft lapping of waves against a sandy shore using translucent acrylic techniques that create a three-dimensional illusion. Shades of blue are carefully blended to convey the depth and movement of sea waves, with white accents mimicking the foamy crests. This design is perfect for those who adore the beach and want to bring a piece of its dynamic nature to their fingertips.
Photography courtesy of @nailsbymayely.
To recreate this ocean-inspired masterpiece, combine clear acrylic powder with blue tinted acrylic powder mixed with monomer. Start by applying a clear base coat to your nails, then sculpt the mixture into wavy shapes using a mold or hand-sculpting tools. Ensure each wave crest and trough is distinct before allowing the acrylic to set completely.
Finish the look with a glossy top coat for a wet, fresh-from-the-ocean appearance.
The key to achieving this layered, lifelike effect lies in the harmonious blend of clear and blue acrylics.
Deep Ocean Currents
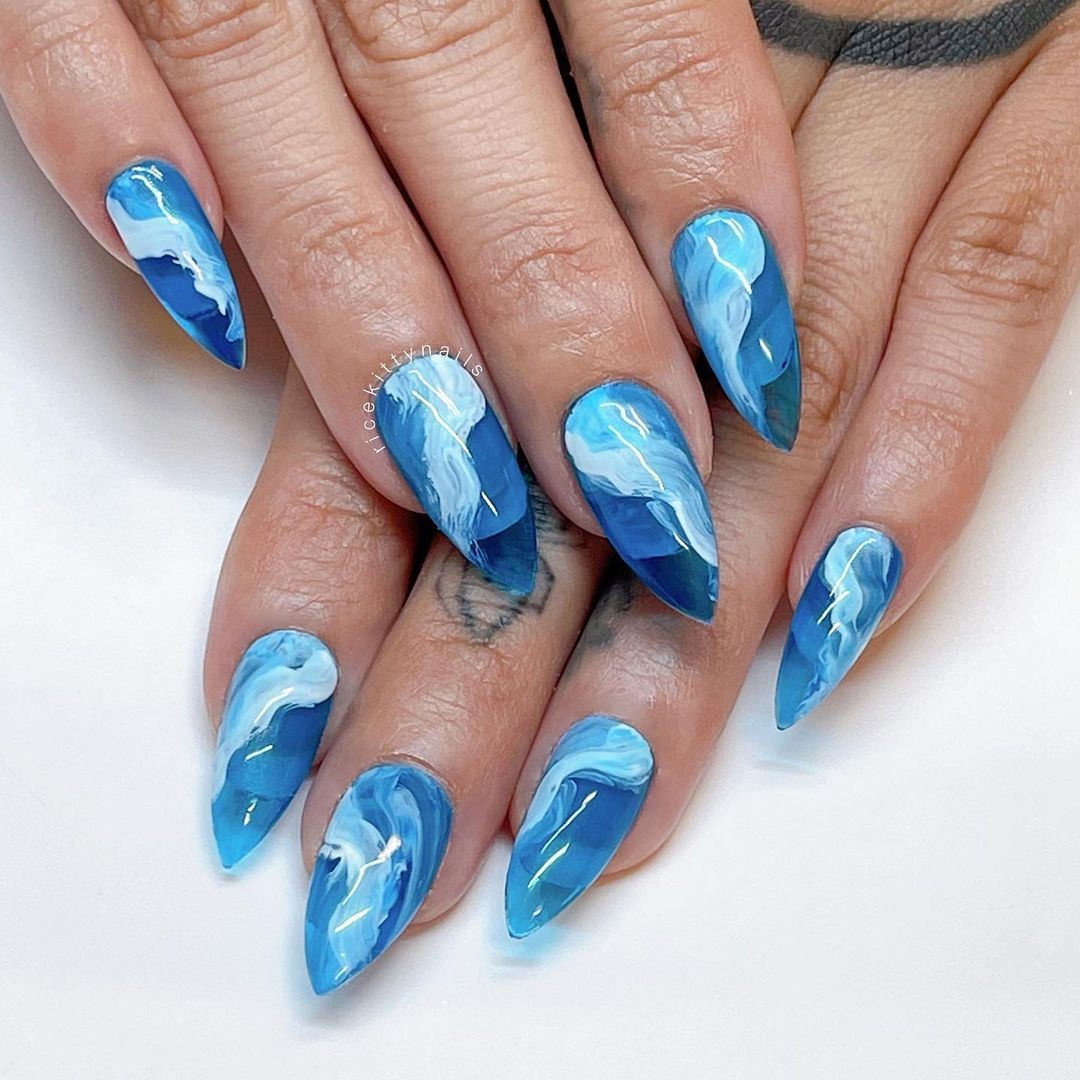
In this captivating nail art design, swirling blues evoke the mystery of deep ocean currents. A masterful combination of marble and acrylic techniques creates a fluid, dynamic look that’s both bold and alluring. The design’s depth and movement offer a modern take on ocean-inspired nails, perfect for making a statement. Photo credit by: @ricekittynailsTo achieve this effect, start with a base coat to protect your nails and ensure a long-lasting finish.
Apply the dark blue polish, then add drops of light blue polish while it’s still wet. Use a marbling tool or toothpick to swirl the colors together, creating organic patterns that mimic ocean currents. Work quickly to blend the polishes smoothly before they dry. Finally, seal your design with a high-quality top coat to maintain its depth and dynamic appearance. The layering of dark and light blues, combined with skilled marbling, successfully captures the essence of ocean currents.
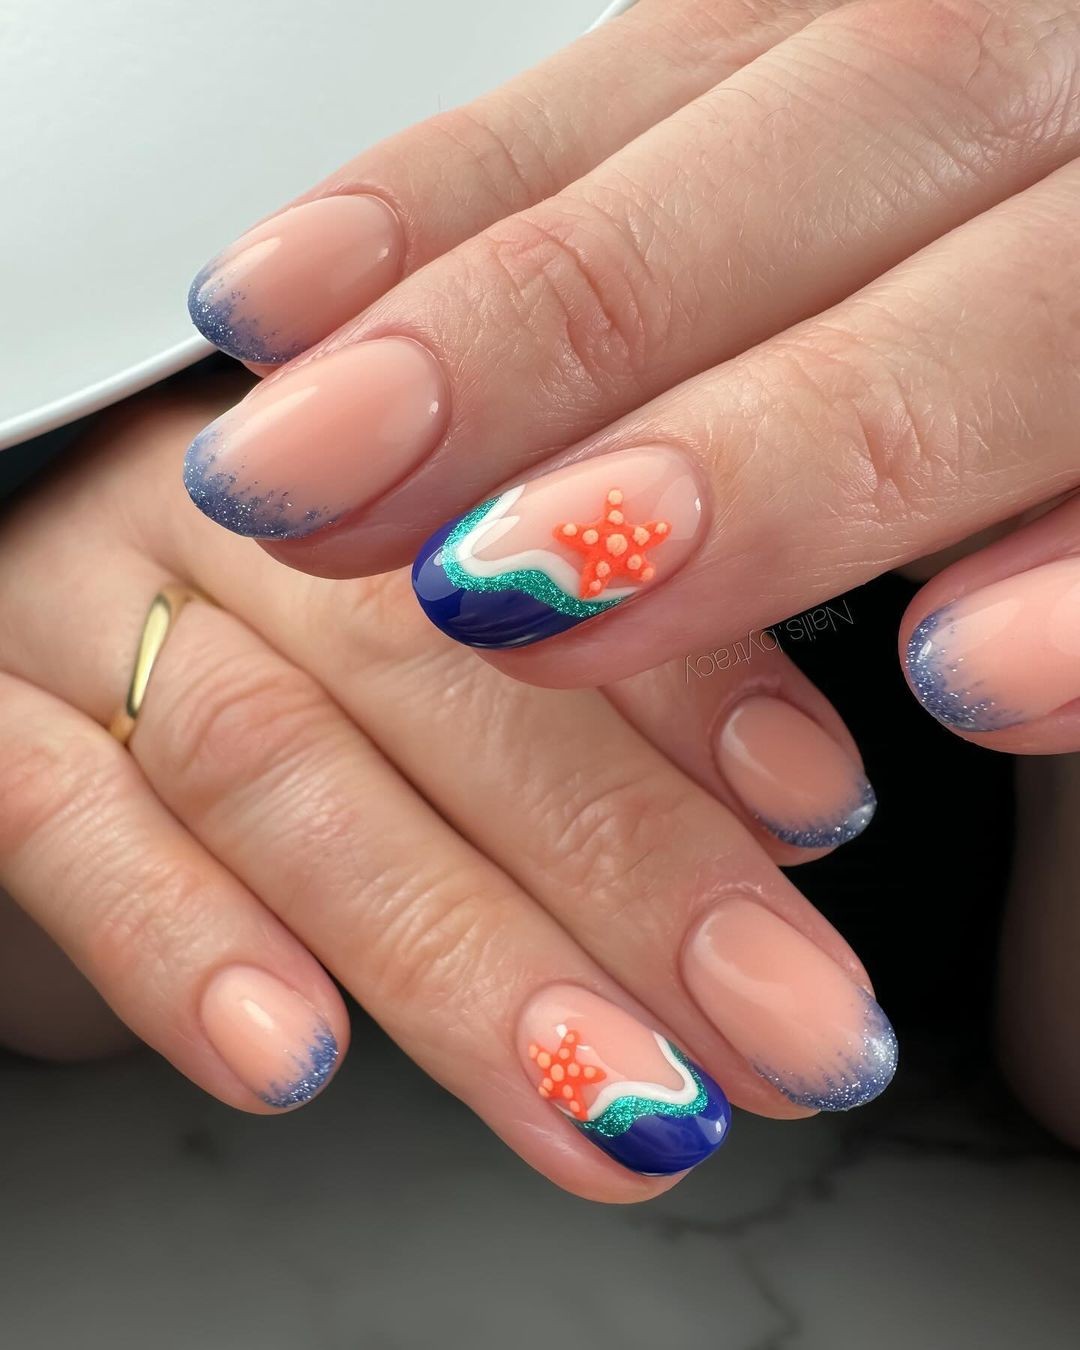
Starfish Whimsy and Ocean Blues
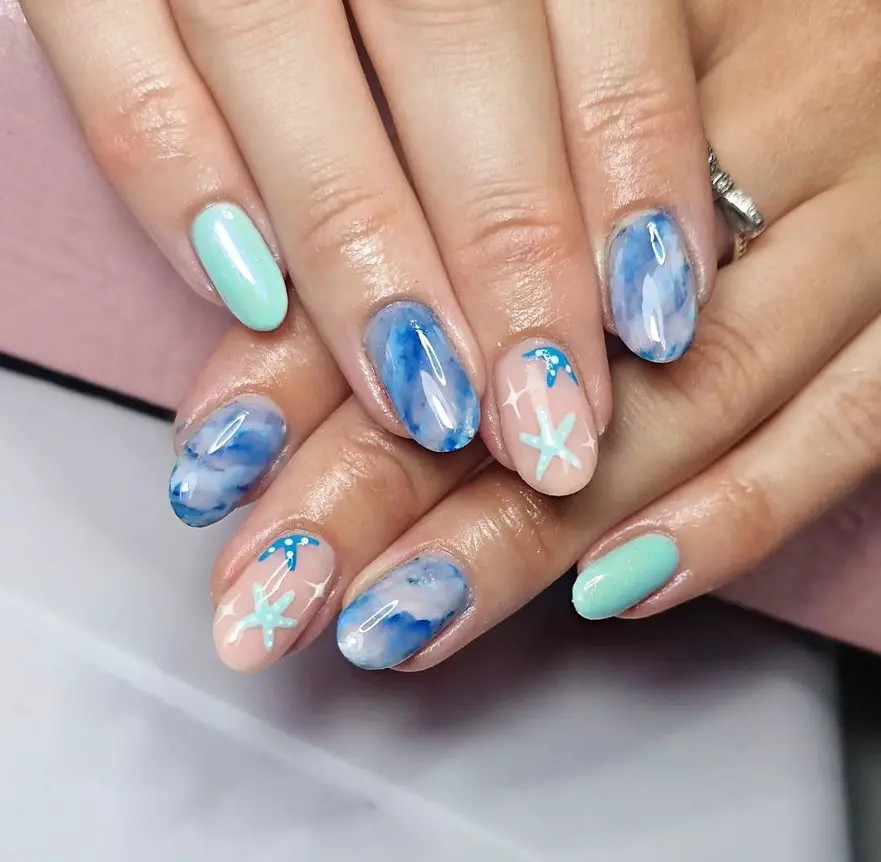
This captivating nail design combines soft pastel hues with ocean blue marbling, adorned with delicate white starfish motifs that evoke the carefree spirit of a beach day. The clever blending of sea-inspired shades creates a charmingly sophisticated look that’s perfect for those seeking a subtle nod to oceanic life without excessive complexity.
The featured nail design owes its allure to the harmonious pairing of @nails_by_chelseax, who shares her expertise and creative vision with fellow beauty enthusiasts.
To achieve this mesmerizing look, start by applying Essie’s First Base as a base coat to ensure your nails are well-protected. Next, alternate strokes of Sally Hansen’s ‘Babe Blue’ and OPI’s ‘Pink Softly’ on the nail, then use a marbling tool to gently swirl these colors together, creating a mesmerizing oceanic effect.
Once dry, employ a fine brush to hand-paint white starfish motifs on select nails. Finally, top it all off with Revlon’s Extra Life No Chip Top Coat for a glossy finish that enhances the colors and guarantees your manicure endures as long as your summer escapades.
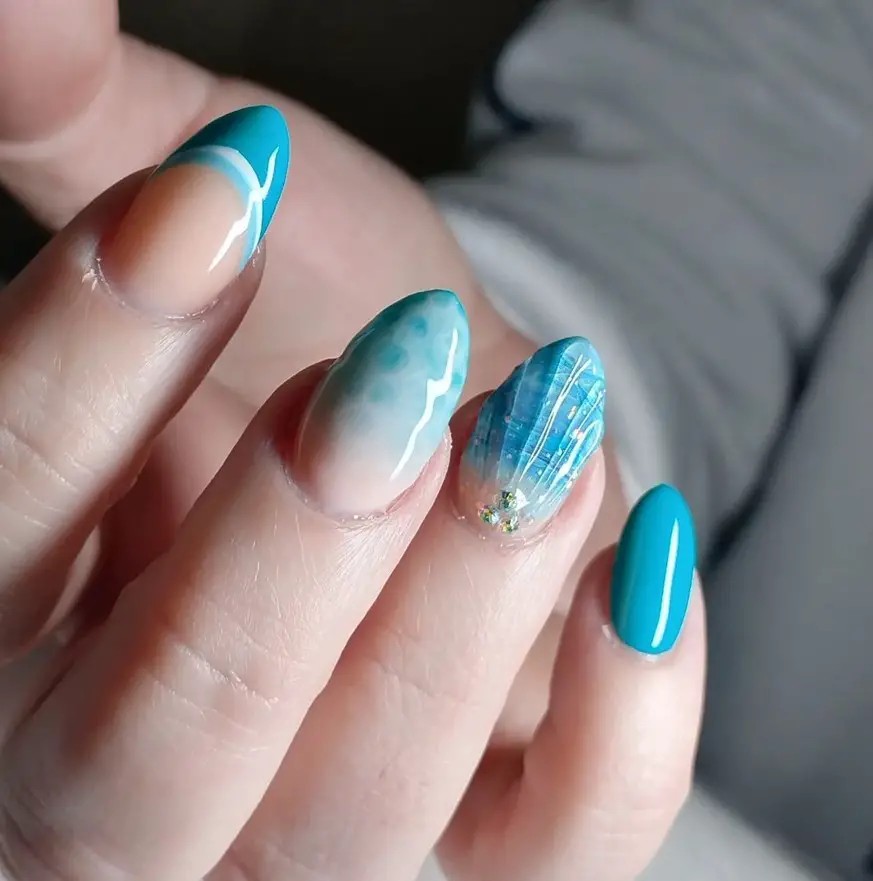
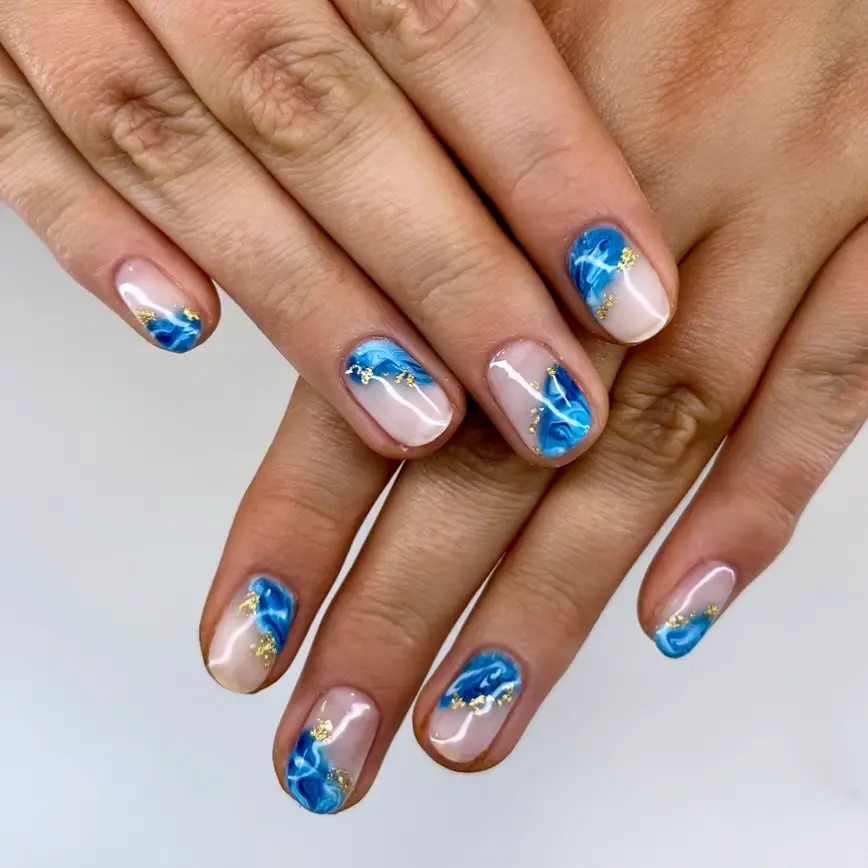
Coastal Waves and Golden Sands
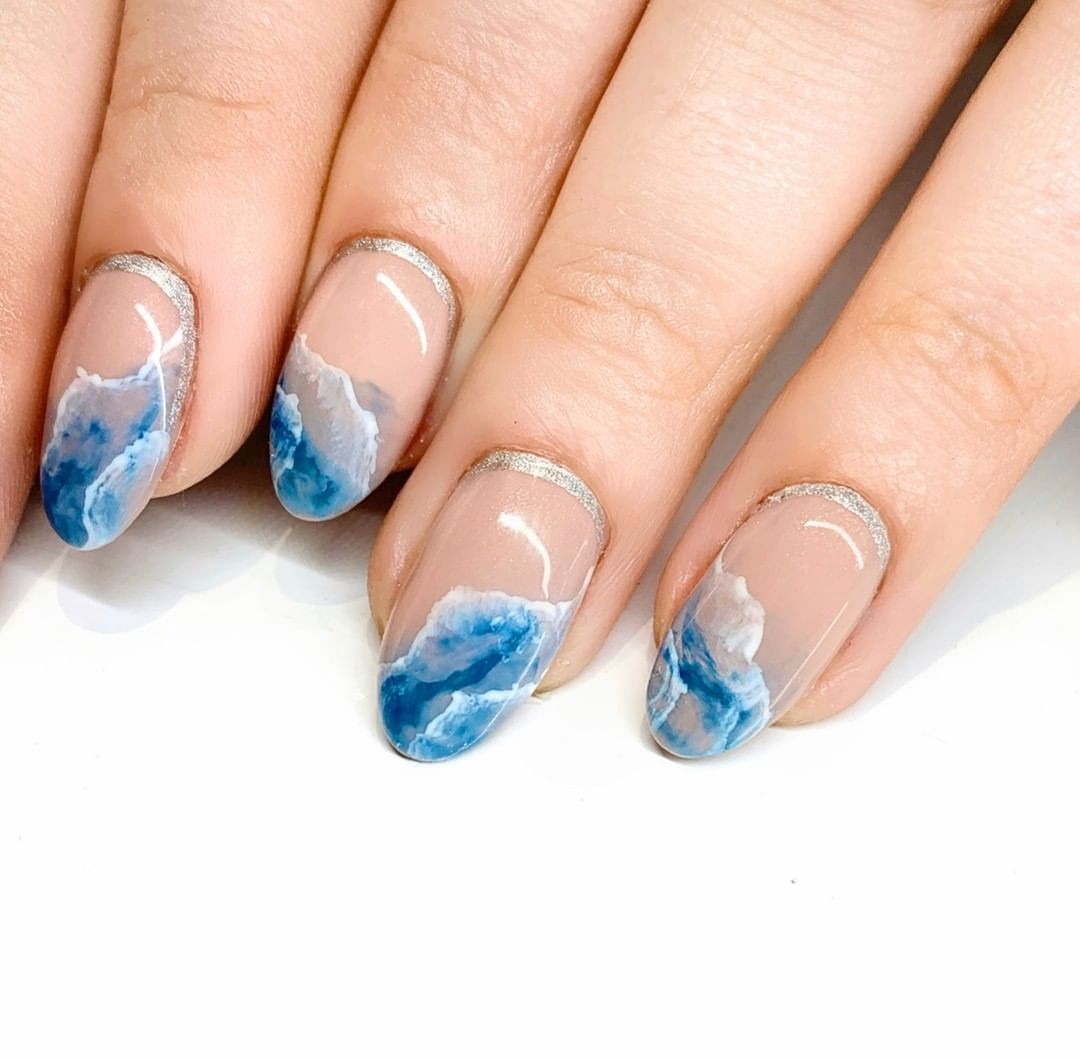
The nail art design effortlessly captures the essence of a serene beachside scene. A transparent base is infused with delicate blue watercolor effects that evoke the gentle lapping of waves against the shore, while a golden glitter line adds a touch of luxury, reminiscent of the sun-kissed sand. This elegant design makes it perfect for anyone who appreciates the beauty of beaches with an air of sophistication. To recreate this look, start by applying a clear base coat to prepare the nails.
Next, use a watercolor technique to create a soft, flowing blue wash that resembles the movement of the ocean’s waves. Allow the paint to dry before adding a precise line of gold glitter at the tip of each nail using a fine liner brush, evoking the shimmering sand. Finally, seal your artwork with a glossy top coat for a smooth finish and long-lasting wear.
Underwater Coral Adventure
The nail art in this design takes you on an underwater journey, transporting you to the vibrant world of coral reefs. Using clear polish as the foundation, each nail features intricately crafted elements of the reef, such as coral formations and seabed textures, recreated with bright colors and precise detailing. The resulting design is a miniature aquarium that brings the ocean’s wonders to your fingertips.
For this piece, we used Butter London Nail Foundation as the base coat, providing a smooth canvas for the artistry to unfold. A variety of colored acrylics were employed to create the coral formations, with detailing brushes bringing the textures and shapes to life. Glitter accents were added to mimic the reflective quality of water, giving the design an extra layer of depth.
To complete the look, we applied a high-quality top coat from Chanel Le Gel Coat, ensuring a glossy finish that enhances the multidimensional nature of the nail art.
Frothy Waves and Golden Shores
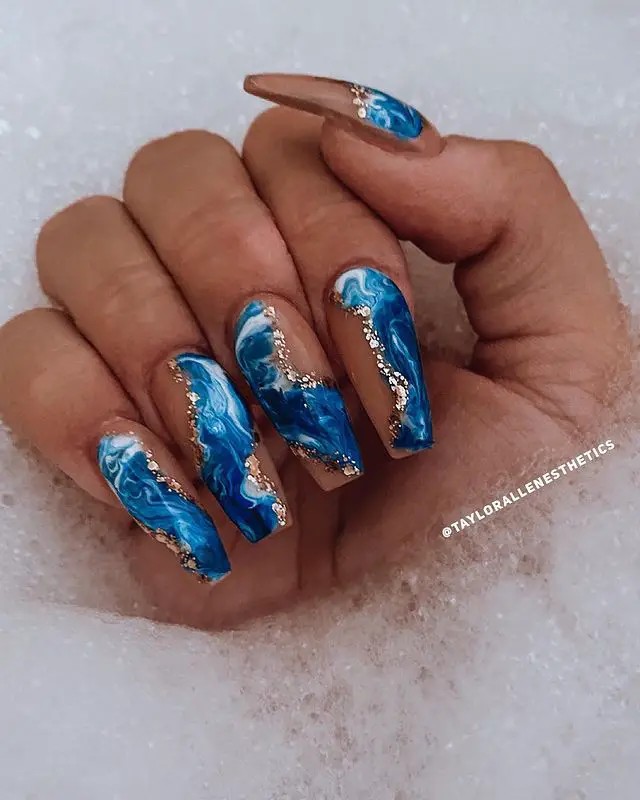
A stunning ocean-inspired nail art design is brought to life through a harmonious blend of blues, whites, and golden accents. The swirling patterns evoke the dynamic movements of the sea, while the strategic use of gold evokes the sparkling sands that meet the eye. This captivating look is perfect for those who adore designs that capture the essence of summer and the ocean. The design begins with a solid base coat to protect the nails, followed by a light blue polish base.
While still tacky, darker blue and white polishes are streaked across the nail, creating a wavy pattern. A toothpick or fine brush is used to gently swirl these colors together, mimicking the ocean’s waves. Small pieces of gold leaf or glitter are then added along the swirling patterns to represent the sandy shores catching the sunlight. Finally, a glossy top coat is applied to ensure the design shines and remains durable throughout daily activities.
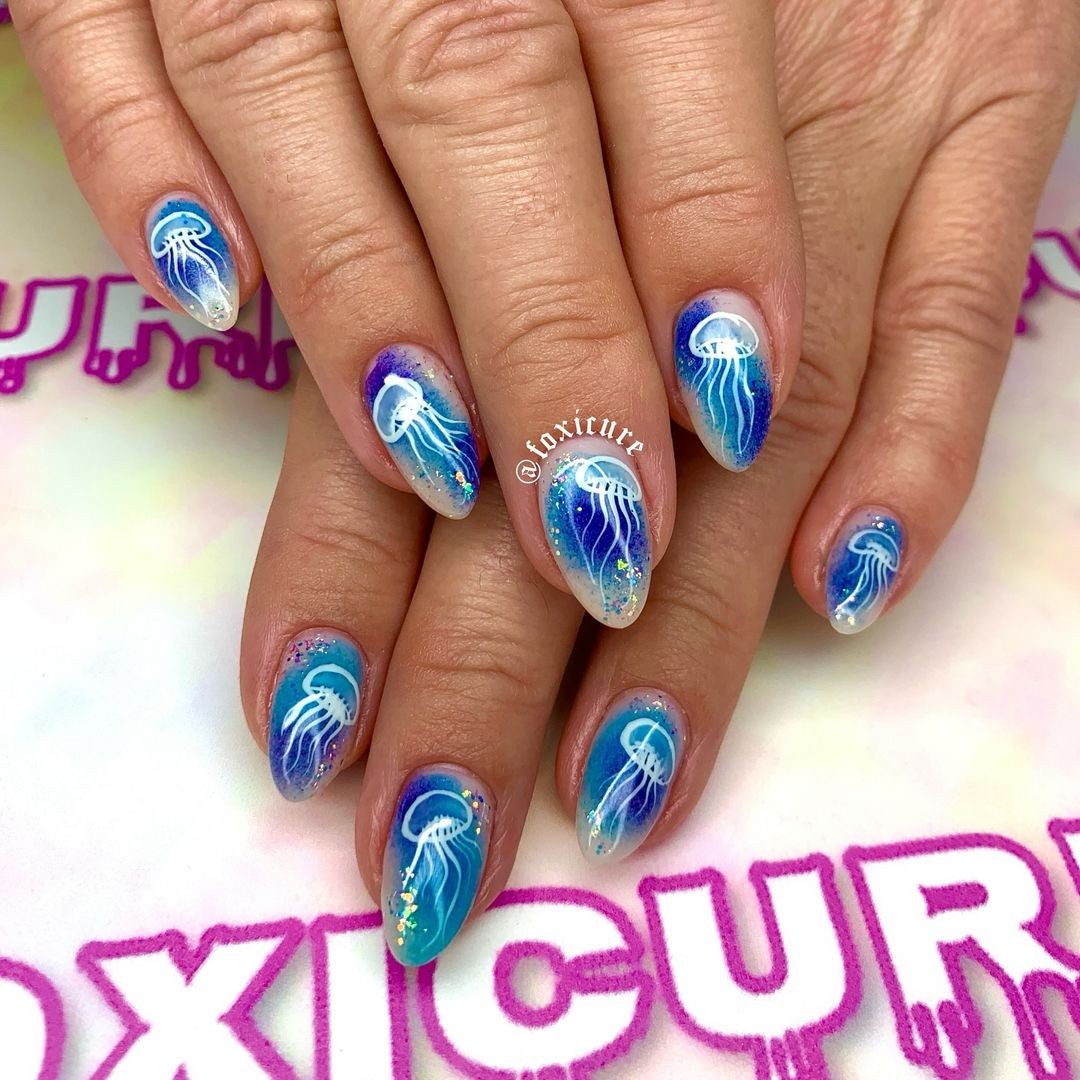
Underwater Seascapes with Marine Life
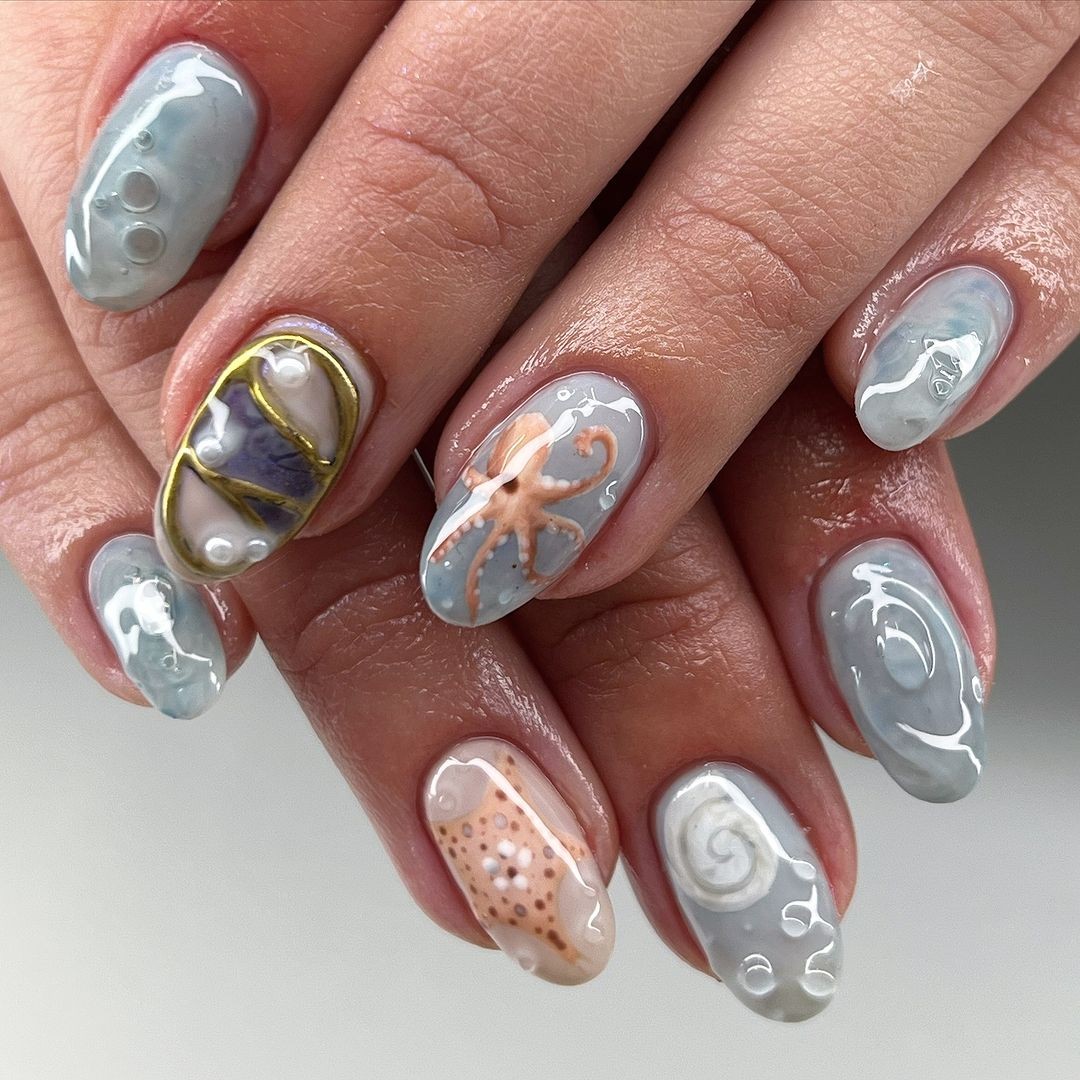
This aquatic-inspired nail art takes its cue from the ocean’s wonders, transforming individual nails into miniature masterpieces of marine life and textures found beneath the waves. Soft grays and blues serve as the primary color palette, punctuated by pops of orange for coral formations, creating a captivating underwater scene. For those enamored with aquariums or sea-inspired aesthetics, this design offers a delicate yet striking tribute to oceanic diversity.
The artistic process begins with a base coat, upon which a light gray foundation is established. With meticulous precision, fine brushes are used to paint intricate marine life motifs, including octopi, seashells, and undulating water currents. Accents of blue evoke the ocean’s depths, while orange hues bring forth vibrant coral formations or starfish.
The key to this design lies in its meticulous execution, requiring patience and attention to detail as each element is carefully placed and painted. To complete the look, a matte top coat is applied, reducing shine and allowing the colors and designs to take center stage with a natural, understated finish.
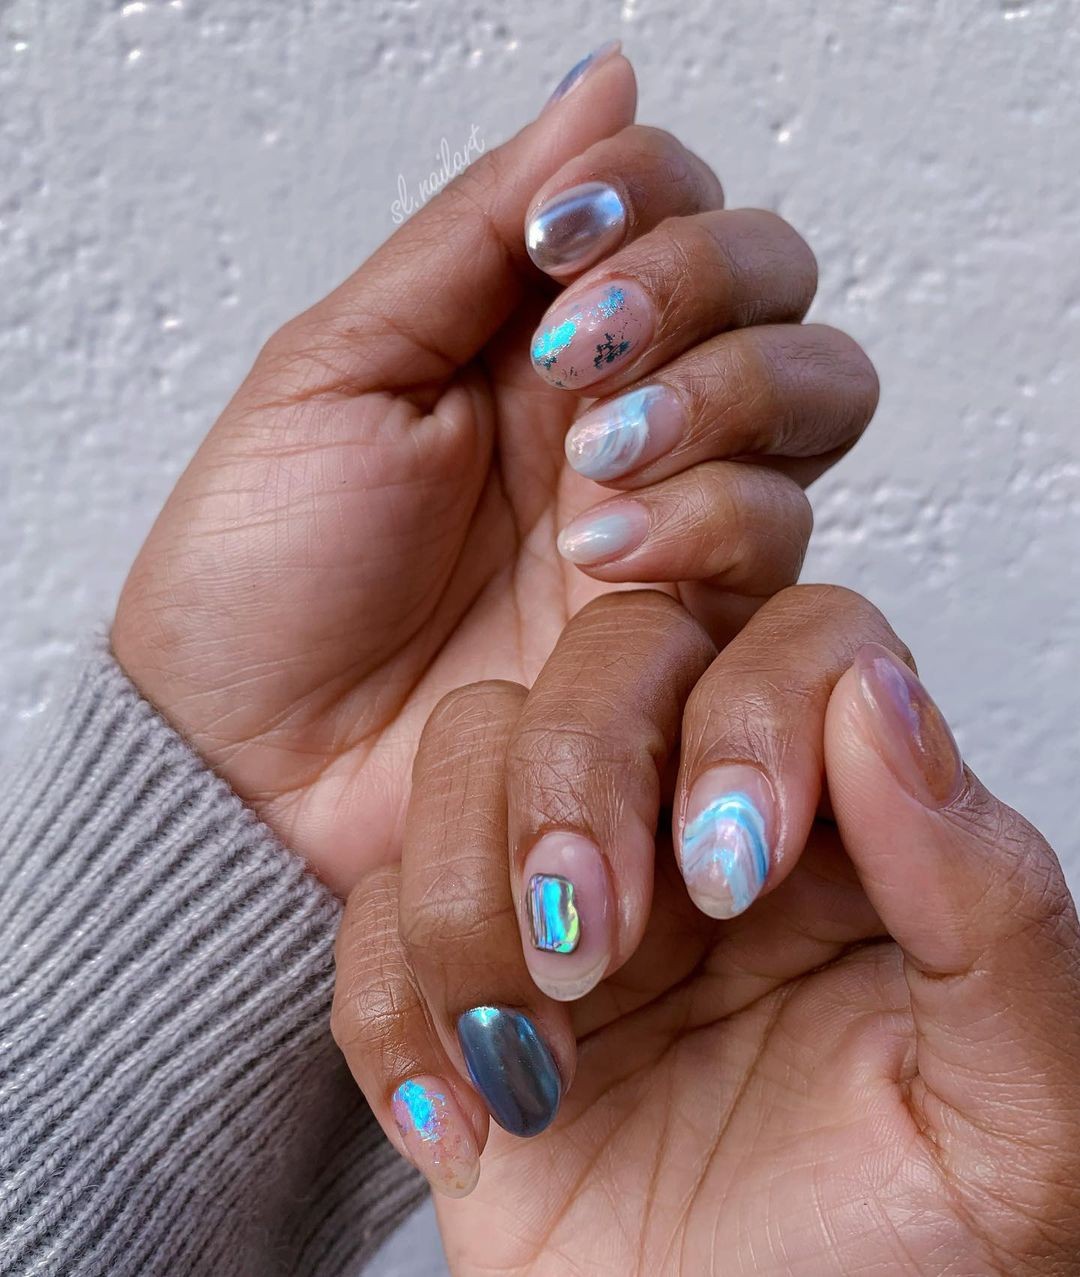
Miniature Ocean Views in Nail Art
The ocean-inspired nail design is a masterpiece of minimalist chic, where delicate blue hues and golden accents evoke the tranquility of sea and shore. The strategic use of clear space amidst vibrant blue and gold shades creates a captivating glassy effect, reminiscent of gazing through a miniature window into the ocean’s depths. This stunning design is perfect for those who appreciate understated elegance combined with artistic flair.
Photo credit: @merakiclinicandspaTo achieve this breathtaking look, start by applying a protective base coat, followed by a blue gel paint to represent the ocean’s waves. Use gold foil to add subtle accents, mimicking the shimmer of sunlight on sandy shores. Thoughtfully position these elements to leave clear spaces, allowing for a ‘window’ effect that adds depth and visual interest.
The key to this design’s success lies in the glass effect top coat, which seals the miniature scenes and enhances their vibrancy against the natural nail base. By carefully applying each layer, you can create unique pieces of oceanic art on each nail.
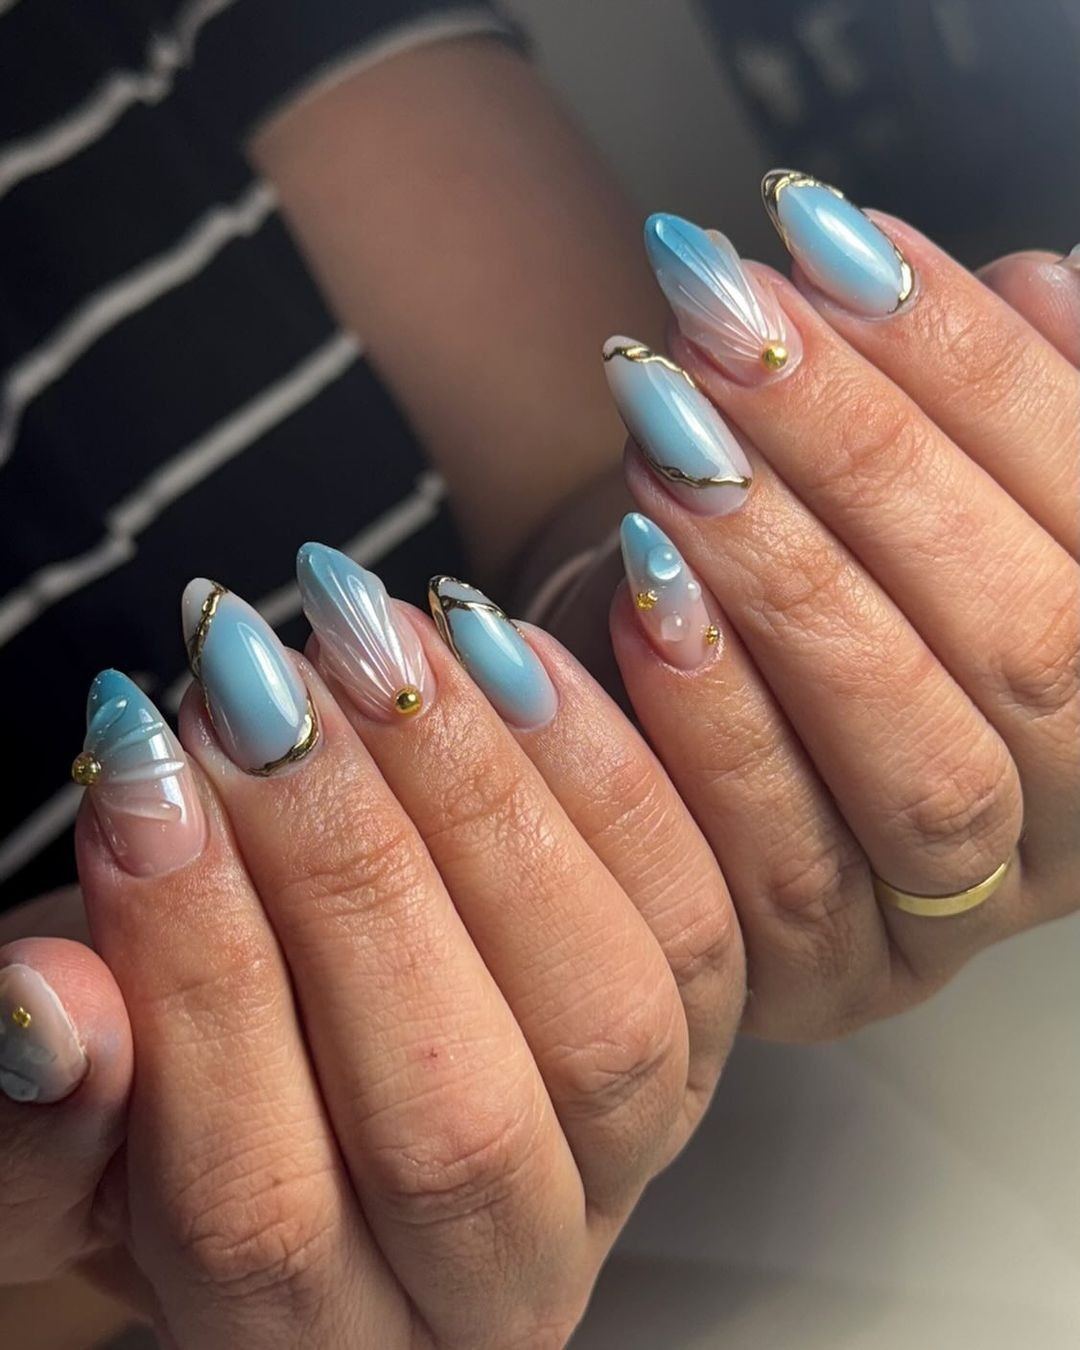
Extravagant Underwater Jewels
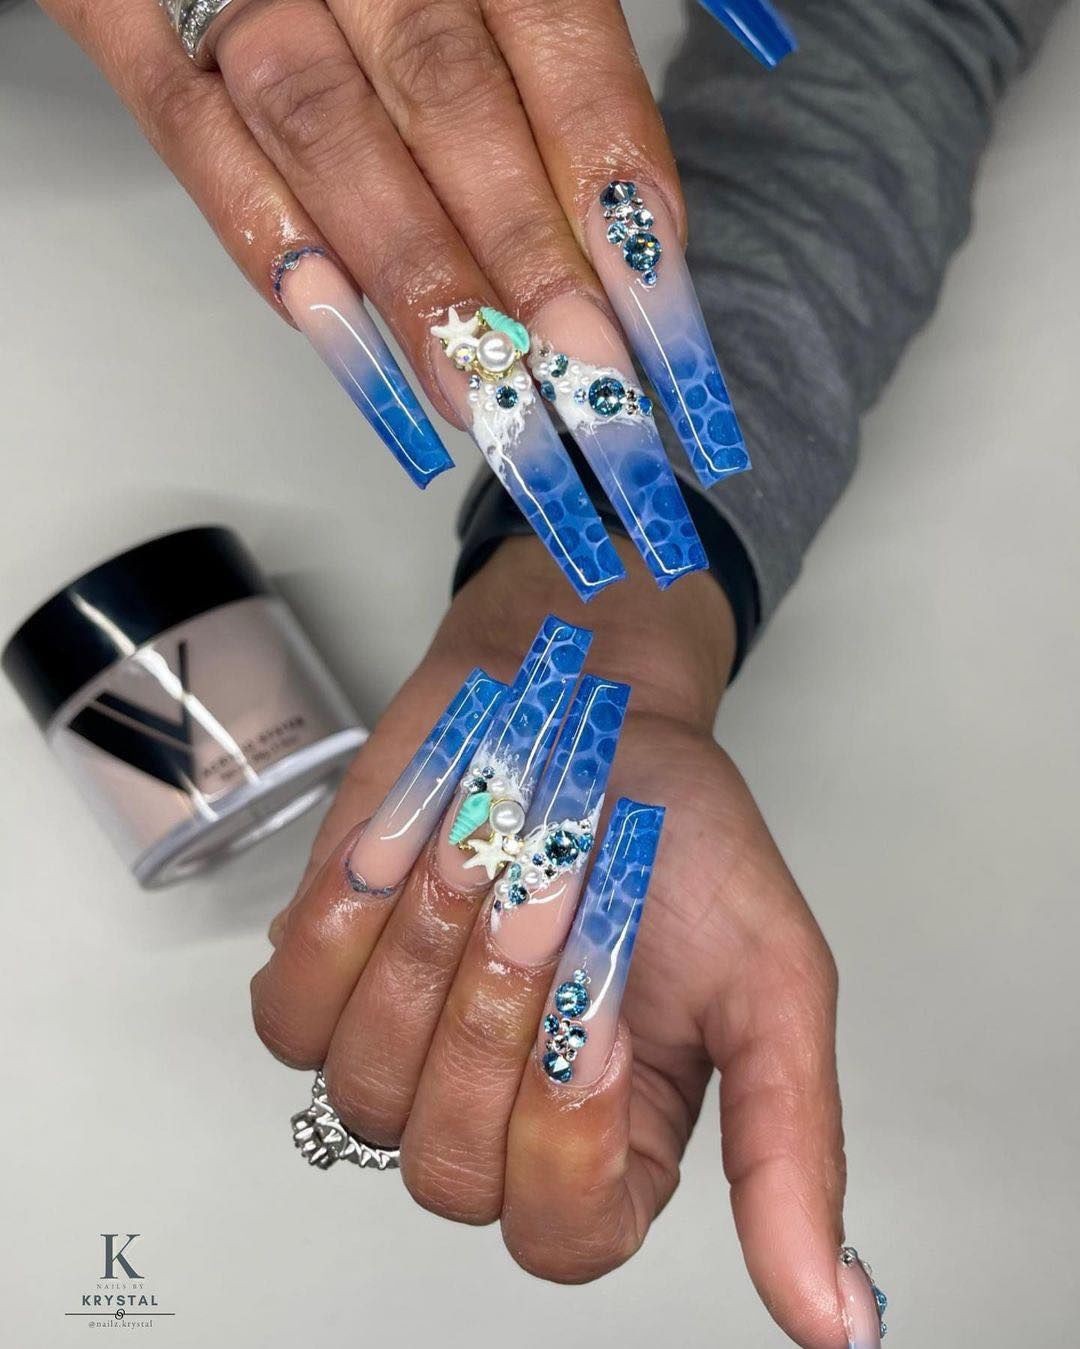
Imagine adorning your nails with an underwater treasure trove of colors, textures, and jewels. This stunning nail art combines transparent acrylic with intricate embellishments that evoke the mystery and luxury of the ocean’s depths. Pearls and rhinestones shimmer like precious sea gems against a soft blue and white backdrop, creating a sense of depth and opulence. This design is perfect for those who crave bling and oceanic inspirations, infusing a touch of luxury into their nail art.
To recreate this look, start by applying clear acrylic nails as your base. Use blue and white acrylic paint to create a subtle, water-like background. While the paint is still slightly tacky, carefully arrange various beads, pearls, and rhinestones on the nails. Secure the embellishments with a strong adhesive, then seal everything with a high-gloss top coat for a durable, shiny finish.
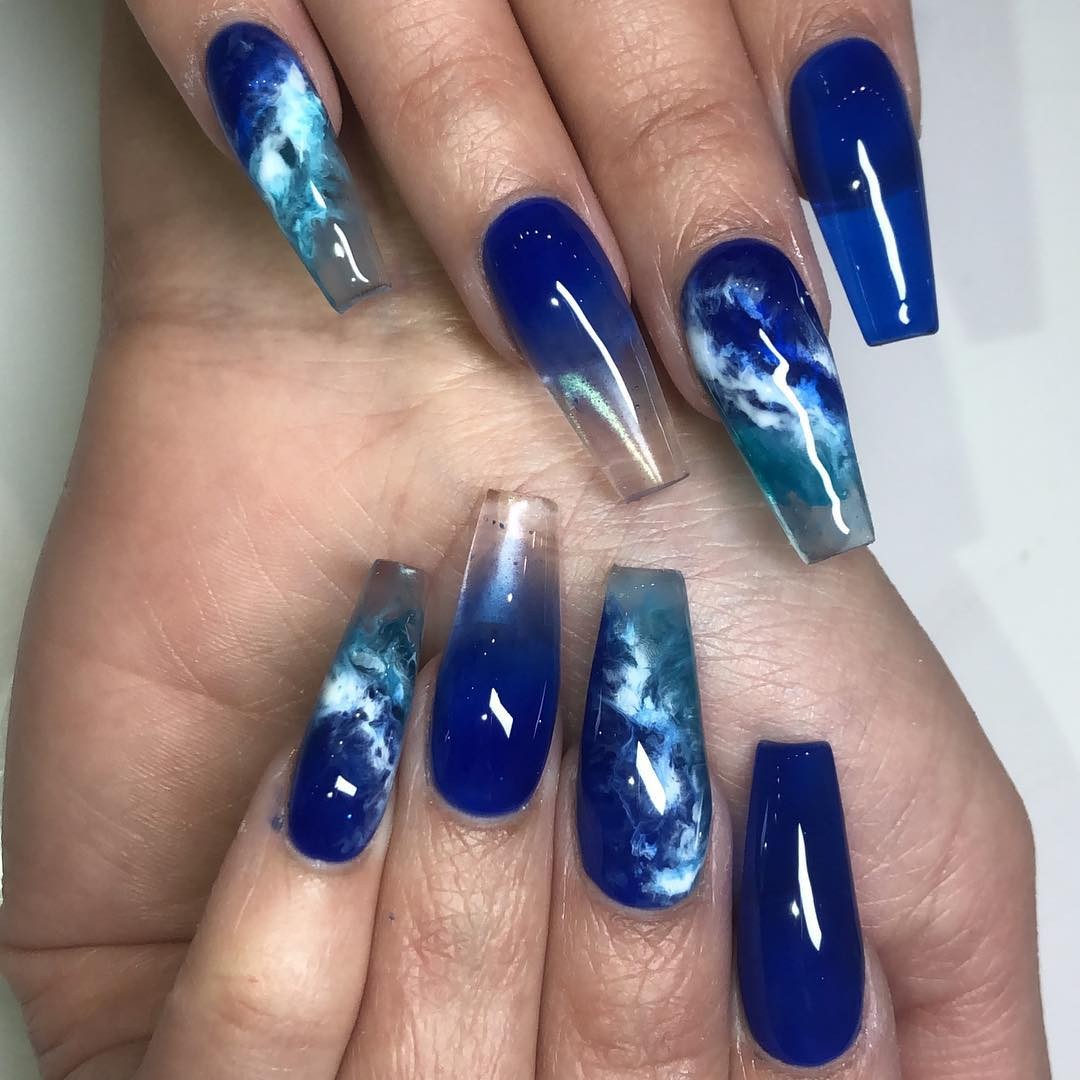
Deep Sea Mystery

This nail design transports the viewer into the depths of the ocean with its striking blue hue. The gradient effect, achieved by blending dark blue polish at the tip of the nail with lighter blue towards the cuticle, mimics the natural transition from surface to depth in the ocean. A base coat provides protection for the nails, while a glossy top coat enhances the color and gives a wet-look finish reminiscent of the sea’s sheen.
This dramatic design is perfect for those who love the ocean’s mysteries and are looking to make a statement with their nail art. The look can be recreated using Essie’s ‘After School Boy Blazer’ dark blue polish, blended with ‘Bikini So Teeny’ light blue polish and finished off with a glossy top coat. The sponge is key in achieving the gradient effect, allowing for a smooth transition between colors.
Serene Ocean Swirls
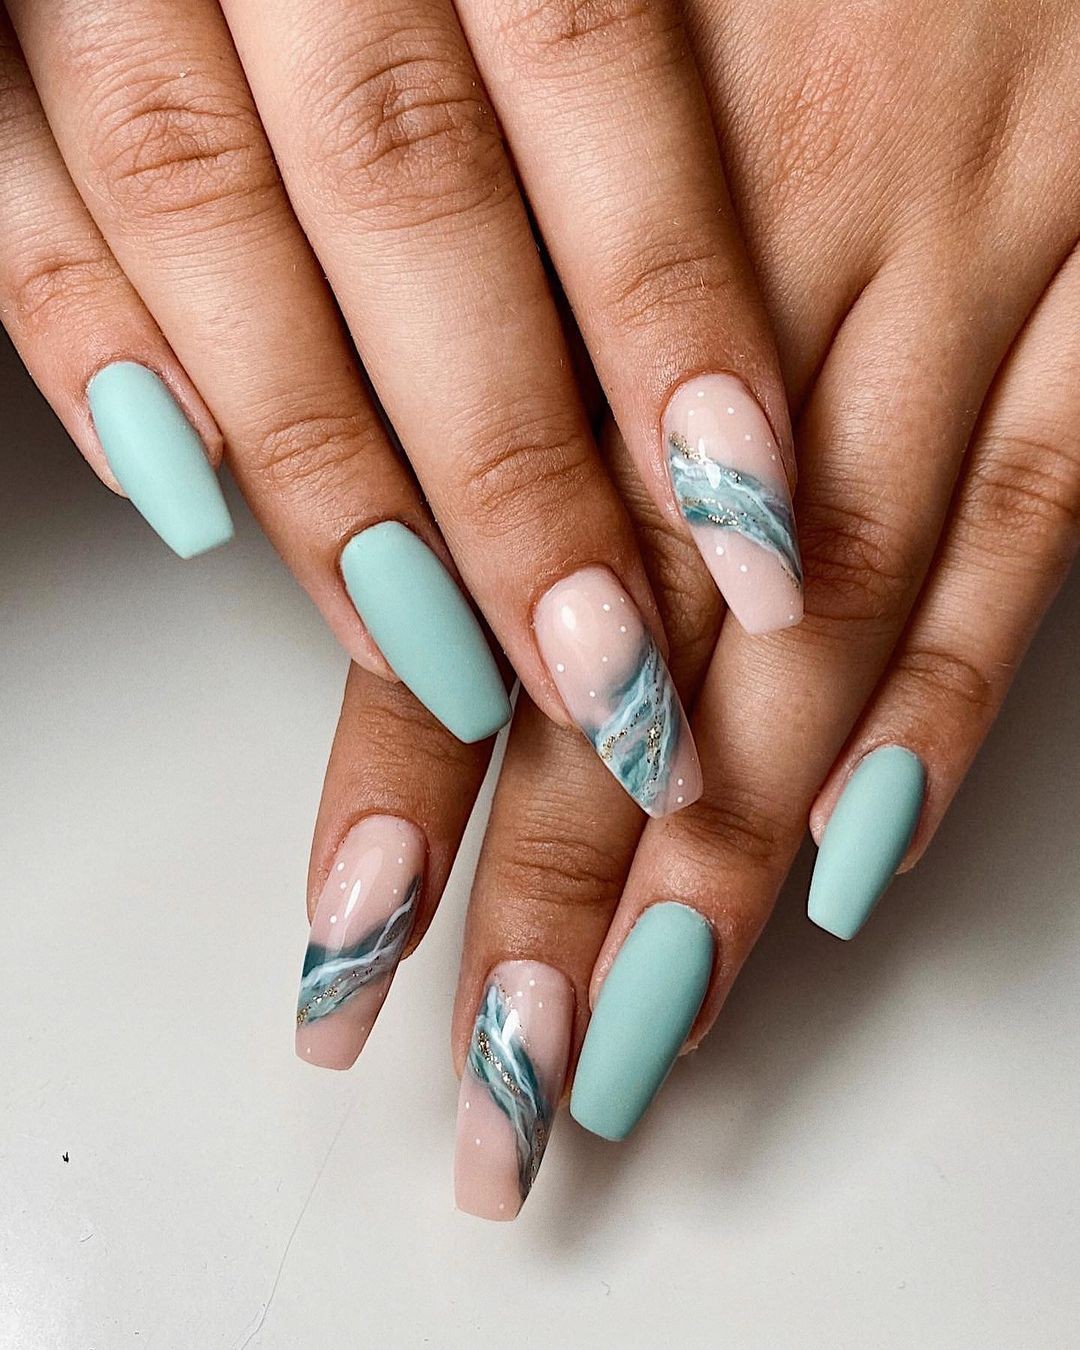
This ocean-inspired nail design combines soft pastel blues with delicate white swirls, evoking the soothing essence of gentle sea currents. The understated color palette and flowing pattern create a serene atmosphere, making it an ideal choice for everyday wear. This style is particularly well-suited for those seeking a calming and peaceful nail look. To achieve this look, start by applying a base coat followed by a layer of pastel blue polish.
Once the base color is dry, use a fine detail brush to apply white polish in subtle swirling patterns, mimicking the gentle lapping of waves against the shore. The key here is to maintain a light and airy quality to the swirls, ensuring the design remains calming and peaceful. Finally, finish with a matte top coat to add a modern touch and soften the sheen, resulting in a chic and wearable nail look that exudes serenity.
Deep Ocean Currents
Imagine being transported to the depths of the ocean, where turbulent currents churn and swirl in a mesmerizing dance. This nail art design embodies that essence, with white and dark blue hues blending together like the unpredictable tides. Each nail is a unique snapshot of the sea’s dynamic movement, as if frozen in time. It’s perfect for those who are captivated by the ocean’s raw power and beauty.
The credit for this stunning design goes to @majadoesnails.
To recreate this look, start with a base coat to protect your natural nails. Then, apply a dark blue polish – Sally Hansen’s ‘Navy Fleet’ is an excellent choice. While the polish is still tacky, use a sponge to dab on white polish – Sally Hansen’s ‘White On’ is the perfect shade. Gently blend the white into the blue to create natural-looking swirls that evoke the ocean’s chaotic yet beautiful currents.
Finish the look with a top coat for a glossy finish that mimics the sheen of water.
As you blend, remember that the key to achieving this authentic looking interaction between colors is all about the subtle blending effect achieved with the sponge.
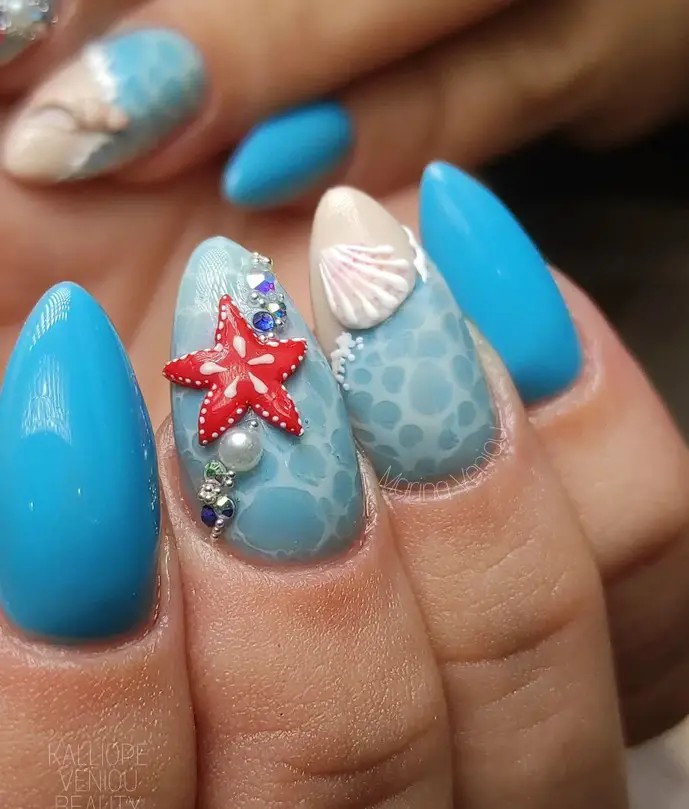
Marine Elegance
The ‘Oceanic Oasis’ design features a captivating blend of blue hues and sea-inspired elements. The use of clear and blue acrylic powders creates a dimensional, wave-like effect, reminiscent of the ocean’s surface. Adding to this aquatic allure are charms featuring starfish, shells, and pearls, which evoke the wonders of marine life.
To recreate this luxurious look, begin by mixing blue and clear acrylic powders to achieve a sea-like transparency on your nails.
Before the acrylic sets, carefully place the charms into their desired positions. Secure everything in place with an embedding gel, ensuring the charms remain firmly anchored. Finally, seal your design with a high-shine top coat for added longevity and depth, amplifying the underwater effect.
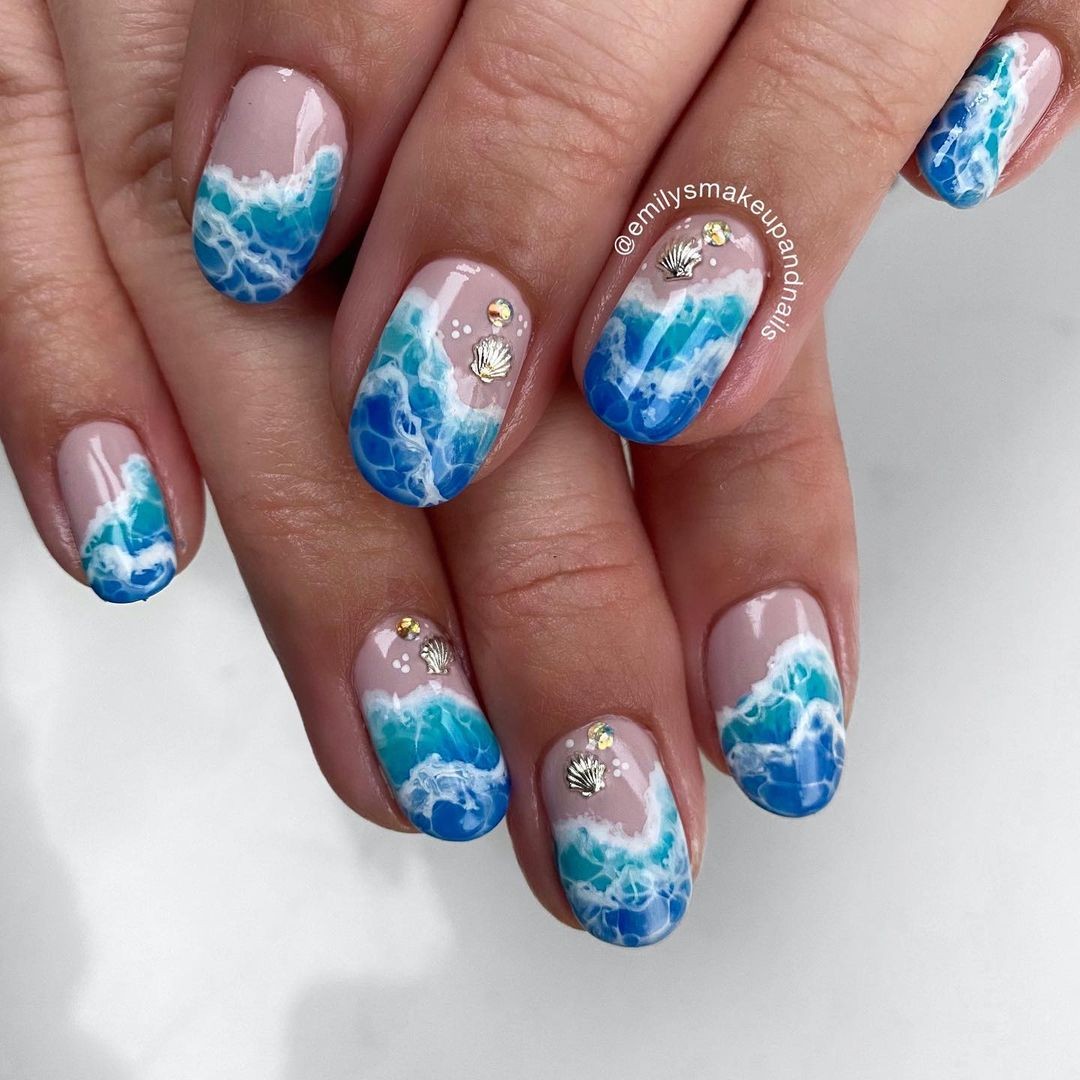
Tranquil Beachfront
Imagine stepping onto the shore and feeling the warmth of the sun on your skin as you gaze out at the endless blue horizon. This nail art design brings that serene beachfront experience to your fingertips. A delicate blend of sky blue and sea blue creates a gradient effect, reminiscent of the gentle transition from sandy dunes to crystal-clear waters. The addition of starfish and shell embellishments adds a touch of whimsy, as if you’ve stumbled upon a hidden treasure on the shore.
To complete the look, apply a matte top coat to soften the overall appearance, much like the way the beach’s soothing atmosphere can calm the mind. This design is perfect for anyone seeking a peaceful escape from the hustle and bustle of everyday life.
Cosmic Ocean Vibe
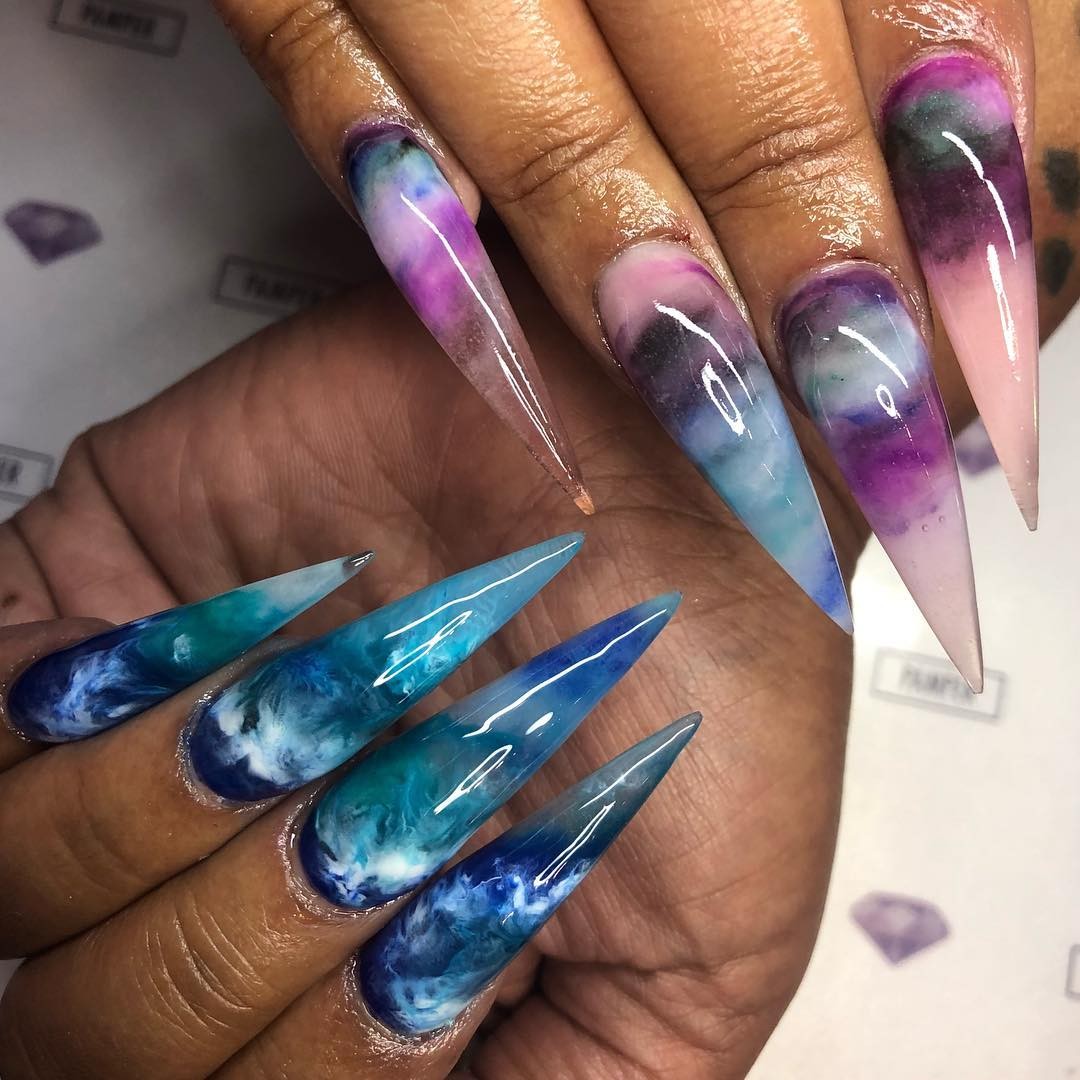
In this enigmatic nail design, the boundaries between oceanic and cosmic hues blur, yielding a mesmerizing blend of blues, purples, teals, and pinks. Each nail becomes a distinct celestial body, capturing the essence of both the mysterious deeps of the ocean and the starry night sky. Perfect for those enthralled by mystical, fantasy-inspired aesthetics.
[Photo credit: @majadoesnails]
To achieve this cosmic effect, start with a base coat to safeguard your nails.
Next, apply a dark blue foundation, then swiftly add purple, teal, and pink hues while the base coat is still wet. Using a fine brush or sponge, gently blend these colors to create a nebula-like, interstellar appearance. Finally, seal the look with a high-gloss top coat, allowing the deep colors to shine like the surface of a distant planet as it catches the light.
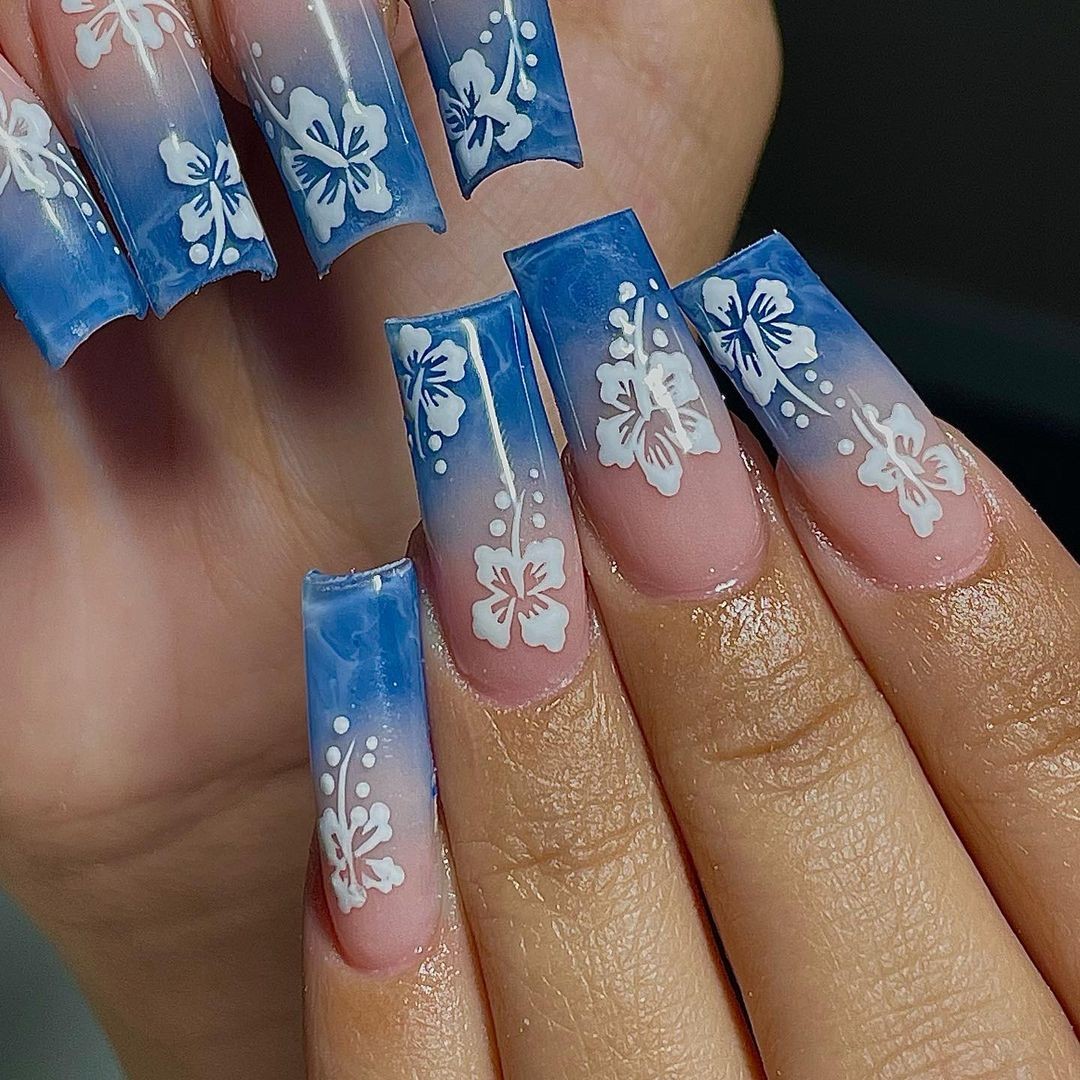
Tranquil Sea Florals
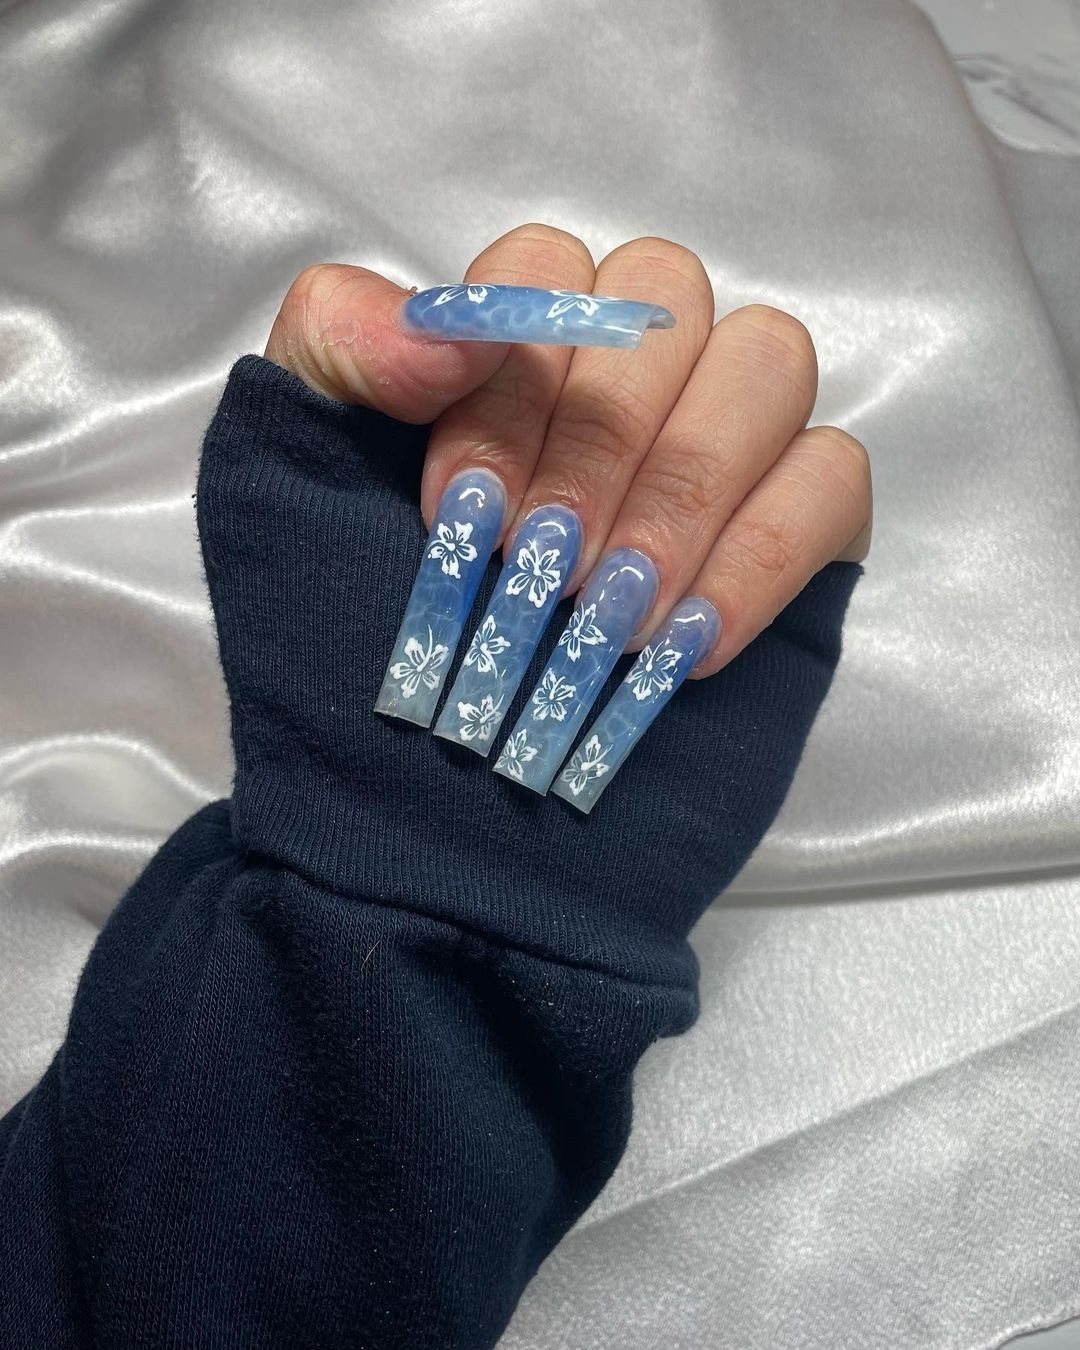
Imagine a tranquil ocean scene where serene blue hues gently lap against the shore, serving as the perfect canvas for delicate white floral patterns that whisper romance. The translucent blue base sets the tone, with its soft, water-colored quality allowing the intricate white flowers to take center stage. This ethereal design is brought to life through the artful application of a detailing brush, carefully crafting subtle patterns that evoke the soothing calm of a gentle sea breeze.
To achieve this captivating look, start by applying a base coat to protect your natural nail. Next, apply a light layer of translucent blue polish, allowing it to dry before using a detailing brush to paint delicate white florals. Focus on creating soft, understated patterns that exude the carefree spirit of a summer day.
Finish the design with a matte top coat, which expertly reduces shine and enhances the overall softness of the look, making it perfect for a casual beach outing or everyday wear. The combination of base coat, translucent blue polish, white polish, detailing brush, and matte top coat comes together to create a peaceful, refreshing design that’s sure to turn heads.
Ocean’s Edge Miniature Waves
In this captivating nail art design, tiny waves made from clear and blue acrylic blend seamlessly together, creating a realistic beach-inspired look at the tips of the nails. To add an extra touch of coastal charm, delicate seashells and starfish are carefully placed along the wave crests. This design is perfect for anyone who wants to bring a piece of the ocean’s beauty to their fingertips.
To achieve this stunning look, start by applying a clear base coat.
Then, use blue acrylic or gel to create undulating waves at the tips of the nails, building up slightly to give the illusion of depth. While the design is still tacky, add miniature seashells and starfish along the wave crests for added texture and visual interest. Finally, seal the design with a top coat to ensure it remains vibrant and long-lasting.
Ethereal Ocean Depths
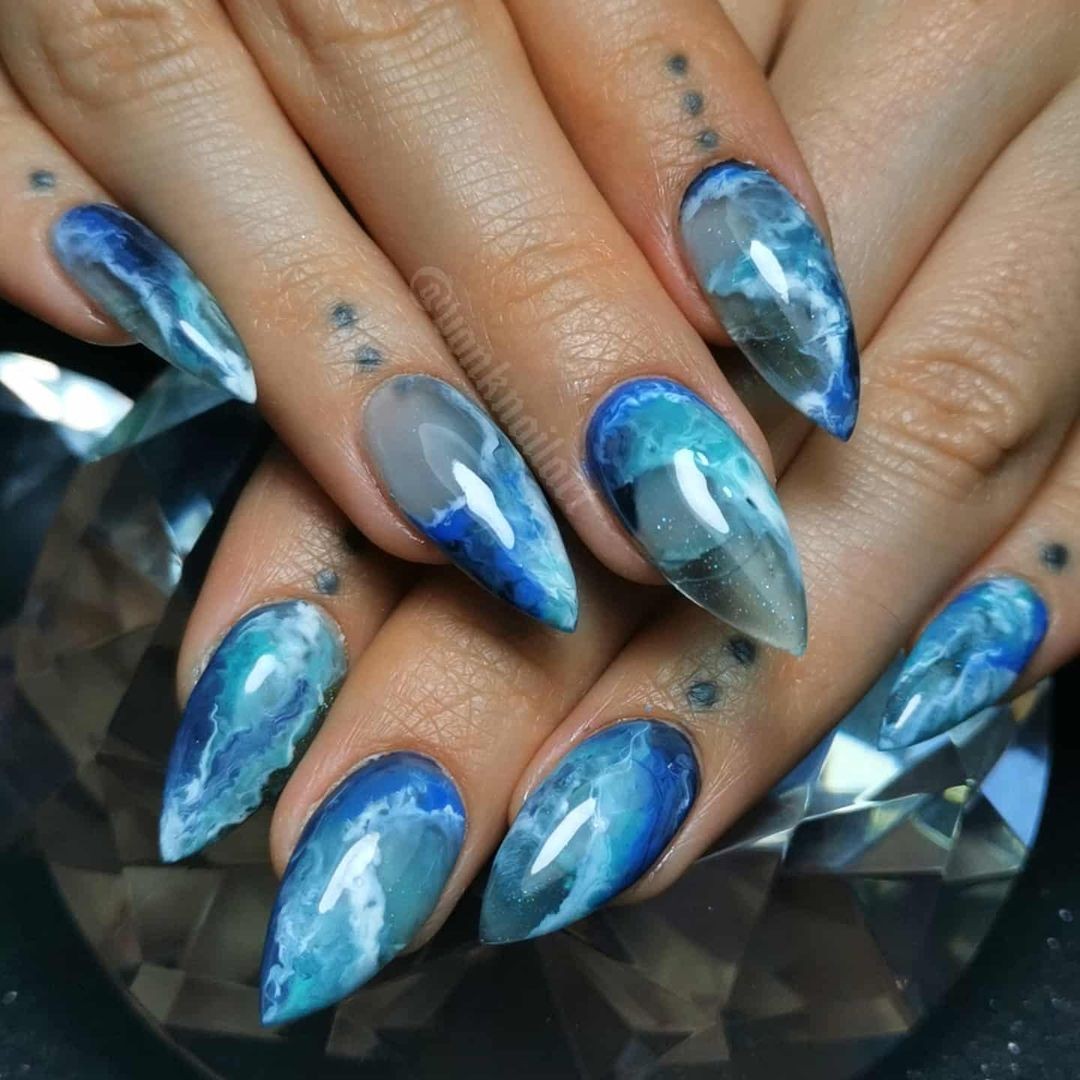
The ‘Under the Sea’ design is a masterclass in subtle complexity, as it masterfully blends blue and gray hues to evoke the mystery and serenity of the ocean’s depths. The interplay of colors, paired with a high-gloss finish, imbues each nail with an otherworldly allure, as if reflecting the light from beneath the waves. For anyone seeking a nuanced blend of elegance and mystique, this design is sure to delight.
To achieve this enchanting look, one need only employ a few simple yet effective techniques. Begin by applying a protective base coat to safeguard your nails. Next, layer on a dark blue polish as the foundation, followed by delicate touches of gray while the first coat is still wet. Using either a swirling tool or a fine brush, gently blend the colors together to create a fluid, dynamic pattern reminiscent of ocean currents.
Finally, seal the look with a high-gloss top coat to amplify the depth and give each nail an irresistible sheen.
Vivid Blue Waves

The ocean-inspired nail art features undulating waves that seem to come alive on the nails. By blending vibrant blues and whites, each nail is transformed into a dynamic representation of the sea’s powerful motion. The textured, layered design perfectly captures the wild, untamed essence of the ocean’s waves. For this look, a base coat provides longevity, while the vibrant blue polish serves as the main color theme.
White polish adds a pop of contrast to create the cresting waves, and a texture medium adds depth and dimensionality. Finally, a glossy top coat seals and protects the design, giving it a shiny, wet finish. To recreate this look, start by applying a base coat to protect your nails. Then, paint a vibrant blue base coat and let it dry before using white polish to dab on the crests of the waves.
Next, add a texture medium over the white to enhance the three-dimensional effect, and finally, top it all off with a glossy top coat to seal in the design.
Tranquil Seafoam
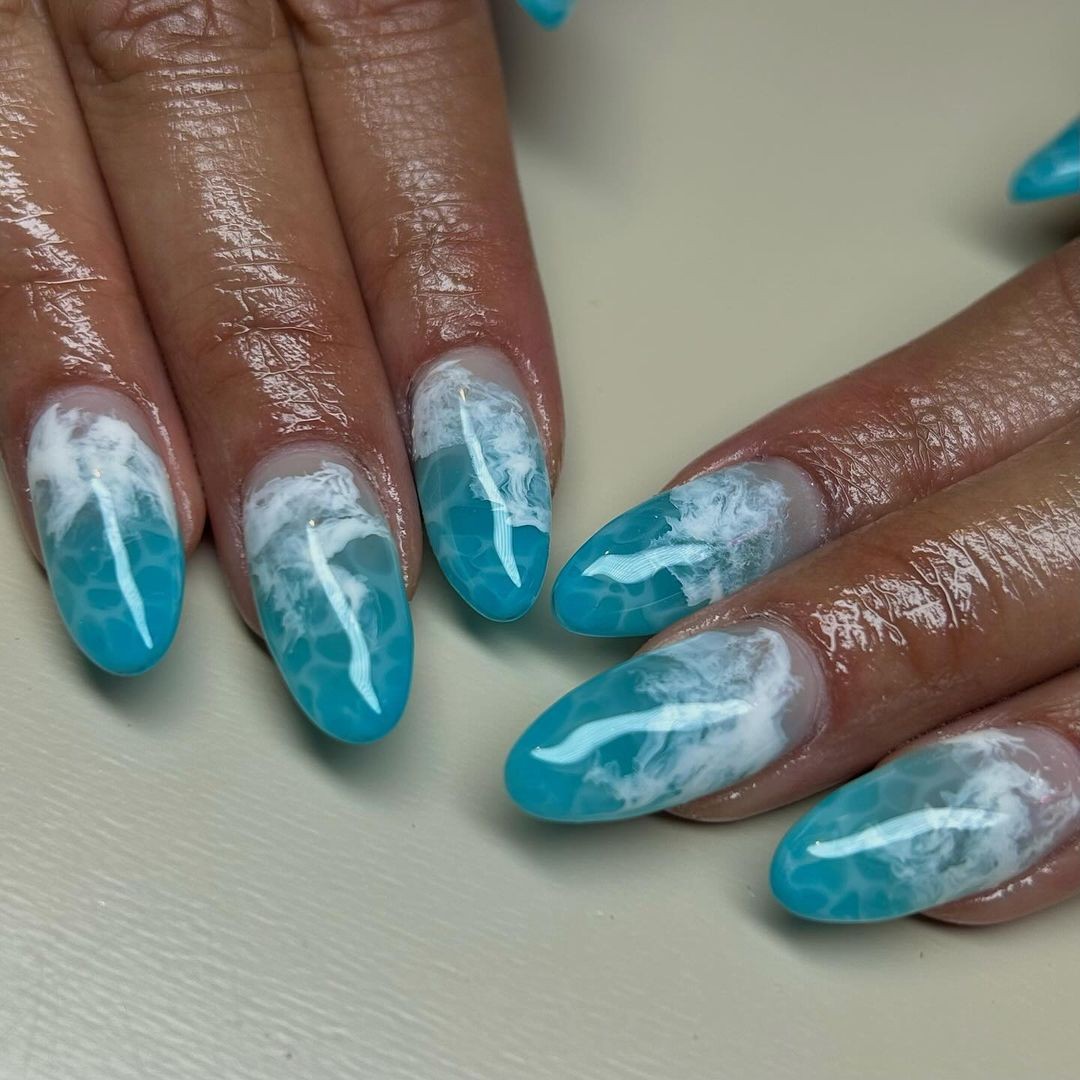
The ‘Seafoam’ design takes a serene approach to ocean-inspired nail art, pairing soft blue hues with white accents to evoke the gentle lapping of waves against the shore. For those who prefer understated elegance, this look is an excellent choice. To achieve this design, begin by applying a base coat for added durability. Next, apply a light layer of translucent blue polish as the foundation.
Using either a sponge or detailing brush, gently dab white polish at the tips to create a soft, foamy texture. For a sophisticated finish, seal the look with a matte top coat, allowing it to subtly reduce the shine and enhance the overall beachy vibe. The combination of these colors and techniques allows for an understated yet visually appealing design that’s sure to impress.
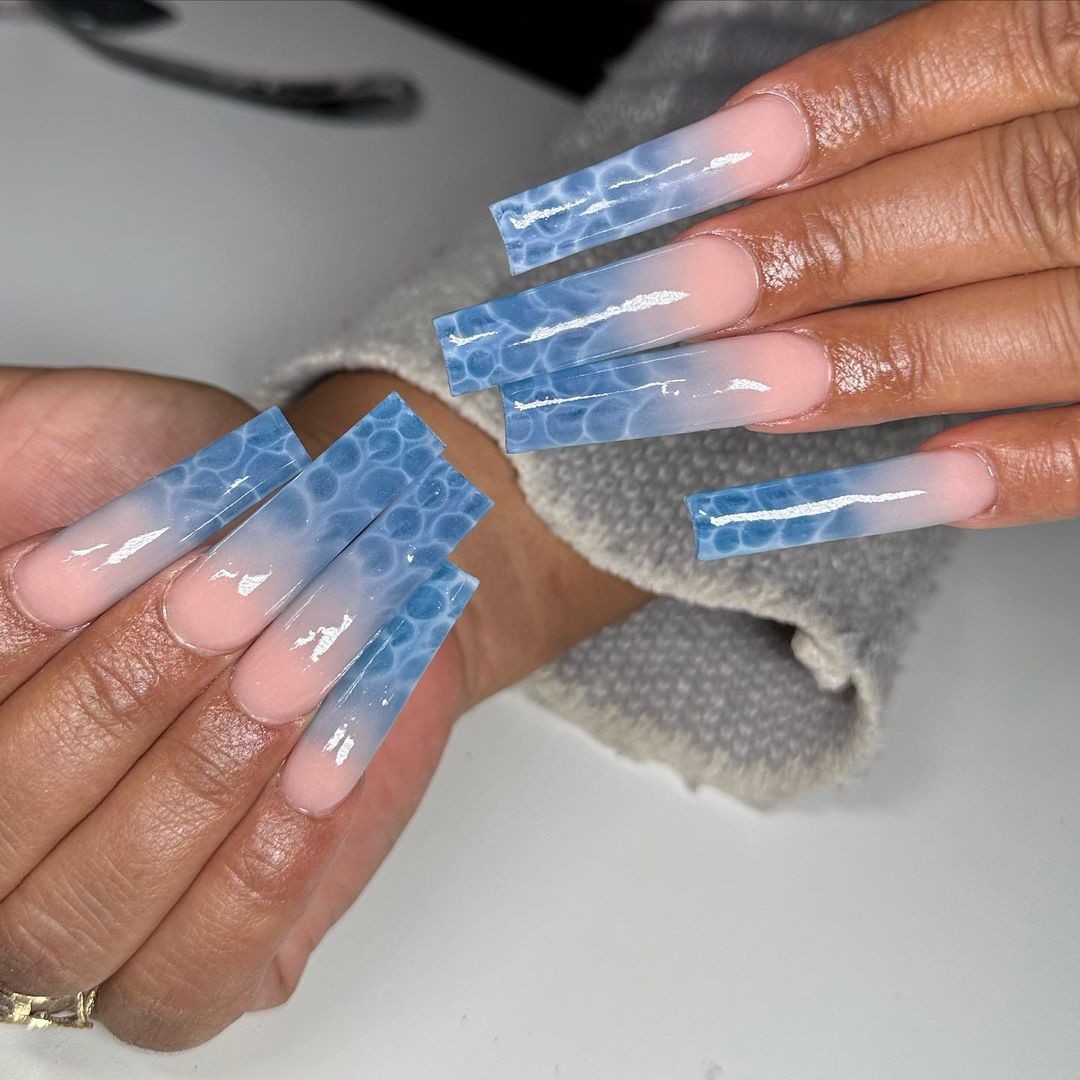
Deep Blue Cell Patterns
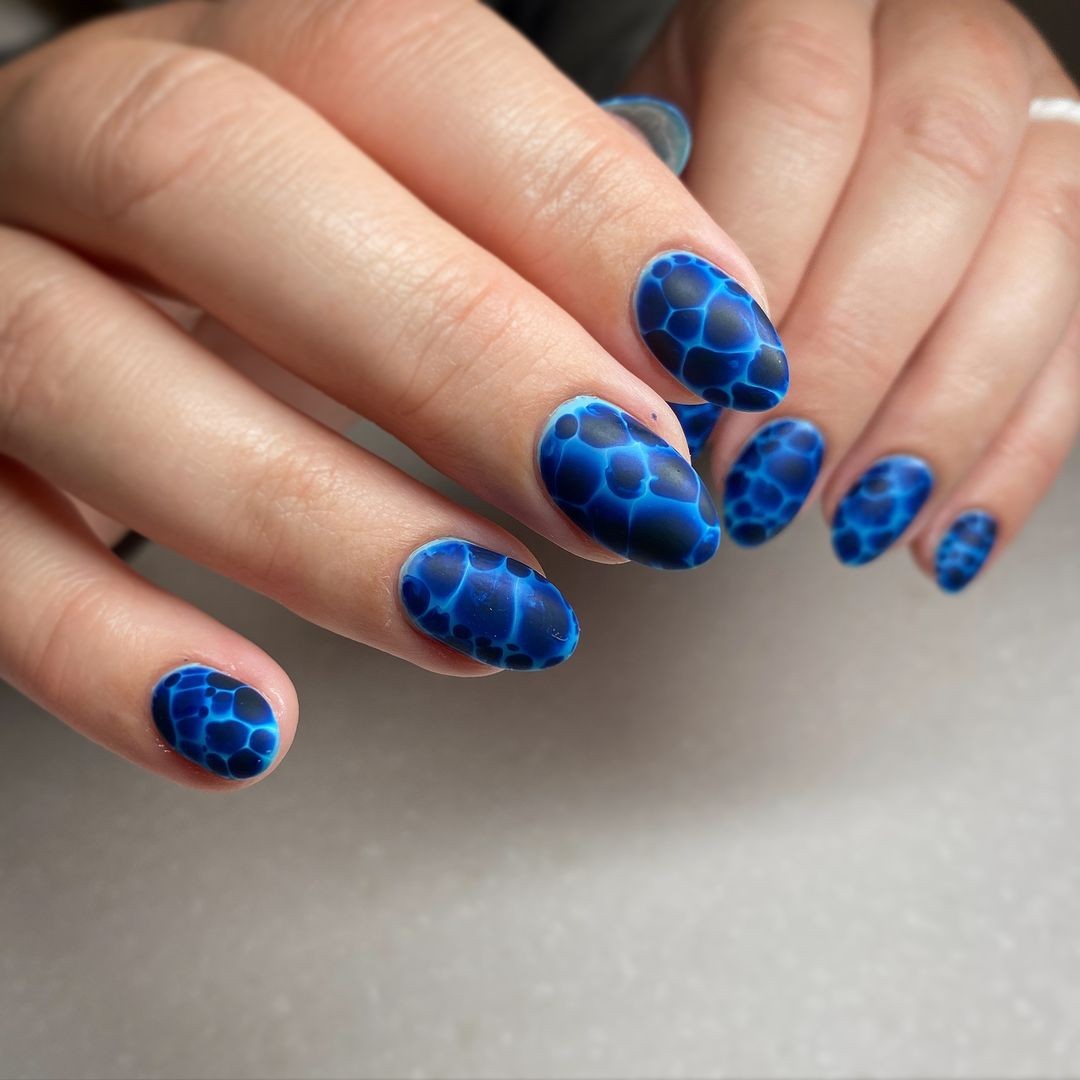
To evoke the intricate beauty of marine biology, this nail art design employs a range of deep blues that evoke the mysteries of the ocean’s depths. The varying shades of blue create a sense of depth and visual interest, making it perfect for those captivated by the scientific wonders of the sea.
The palette is comprised of base colors and details in Deep Blue and Light Blue Polishes, with a Dotting Tool or Small Brush used to craft cell patterns that mimic the organic forms found in marine biology. A protective Base Coat serves as the foundation, while a High-Gloss Top Coat adds a luminous sheen, further enhancing the design’s oceanic allure.
The technique involves applying a deep blue base coat, followed by a layer of lighter blue polish used with a dotting tool or fine brush to create delicate cell patterns. This process requires finesse to maintain the appearance of natural, organic shapes. The finished look is then sealed with a high-gloss top coat, amplifying the design’s sense of depth and water-like effect.
Holographic Ocean Waves
The ocean-inspired nail art design combines cutting-edge technology with timeless elegance. The holographic polish creates a mesmerizing shimmering effect that seems to dance across the nail as you move your hand, while subtle blue accents evoke the gentle lapping of waves against the shore. This unique fusion of modern and classic styles is perfect for anyone seeking a bold yet sophisticated look.
The key components of this design include:* Base Coat: A essential layer for maintaining healthy nails* Holographic Polish: The star of the show, providing the dazzling reflective effect* Blue Accents: Strategically placed to enhance the oceanic theme and add depth* Top Coat: Seals in the design and ensures the longevity of your nail artTo achieve this stunning look, follow these simple steps:Start by applying a base coat to prepare your nails.
Once dry, apply a layer of holographic polish for the main event. If you want to take it to the next level, add thin streaks of blue polish before the holographic layer dries to mimic the subtle ripples on the water’s surface. Allow it to set briefly before sealing everything in with a top coat, which will also help maximize the reflective properties of the holographic polish.
Floral Ocean Breeze
Imagine a tranquil ocean scene come to life on your nails with this elegant design. The serene combination of clear blue and white is reminiscent of a gentle sea breeze filled with the sweet scent of blooming flowers. This versatile nail art look is perfect for both casual and formal occasions, exuding a fresh and clean vibe.
To achieve this stunning design, begin by applying a base coat to protect your nails.
Then, paint a light blue polish as the foundation, followed by meticulous hand-painting of white floral details using a detailing brush dipped in white polish. Focus on creating delicate, airy patterns that harmonize with the soft blue background. Finally, seal the look with a matte top coat for a modern and understated finish.
Serene Starfish Elegance
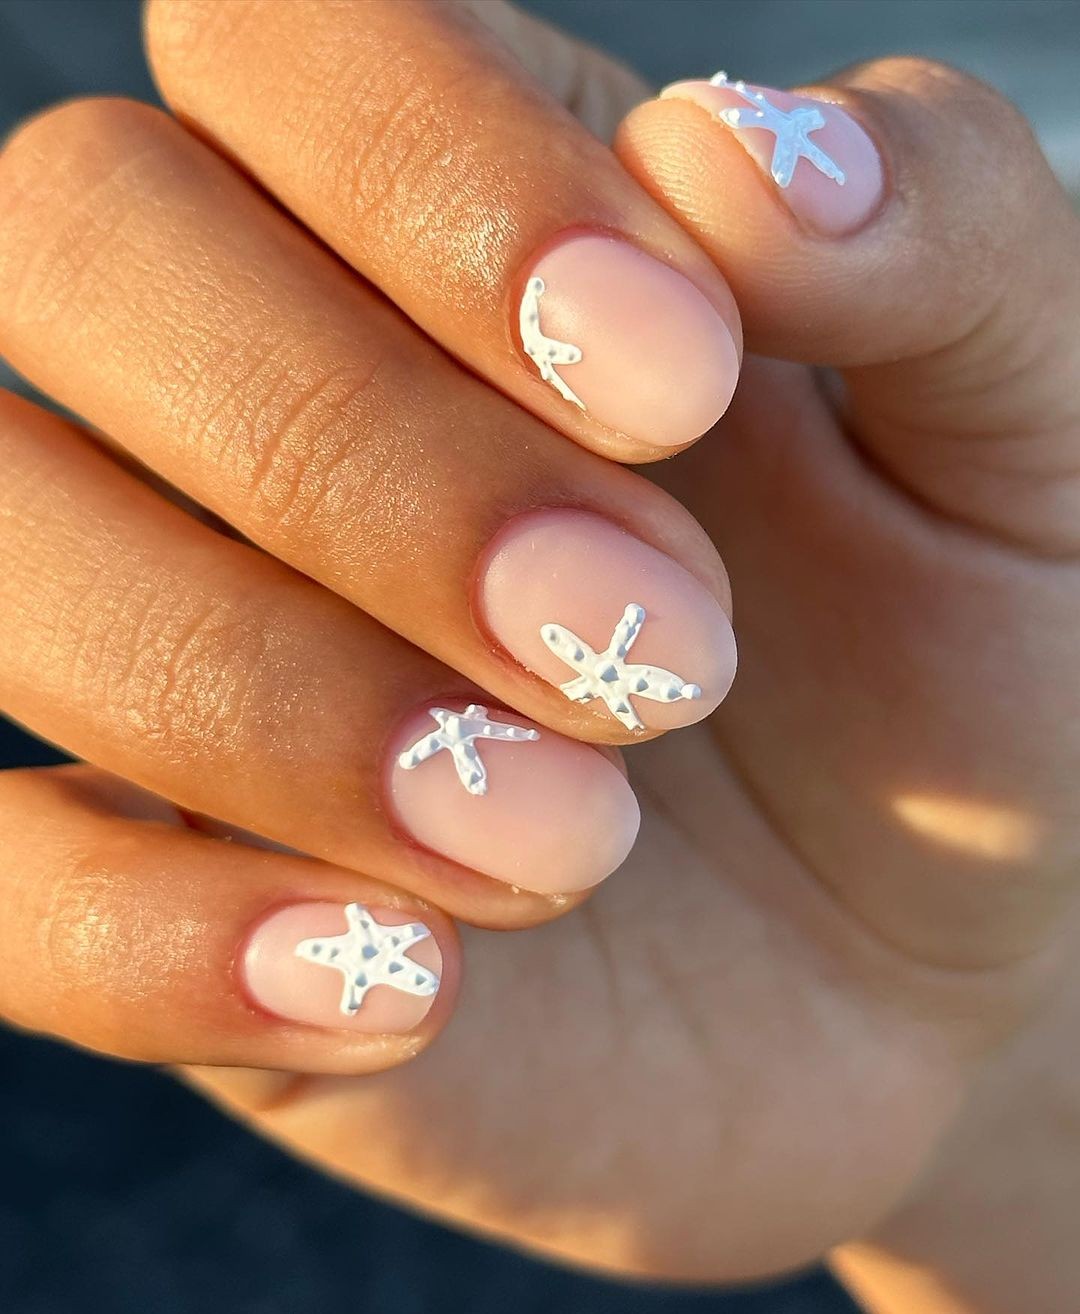
With its understated charm, this nail art design perfectly captures the essence of starfish-inspired motifs on a soft pink background. The simplicity of the white-accented design allows the delicate beauty of the starfish forms to take center stage. This look is ideal for those who appreciate subtle elegance with a nod to oceanic themes.
The use of a clear base coat, followed by a soft pink polish and crisp white details, results in a fresh and clean aesthetic that maintains focus on the intricate design. To achieve this look, start by applying a base coat for nail protection and longevity. Then, paint a soft pink background and allow it to dry completely before using a fine detailing brush dipped in white polish to carefully create starfish shapes on each nail.
The key is to maintain precise lines and thin strokes to emphasize the natural elegance of the starfish forms. Finally, seal the design with a clear top coat for added durability and shine.
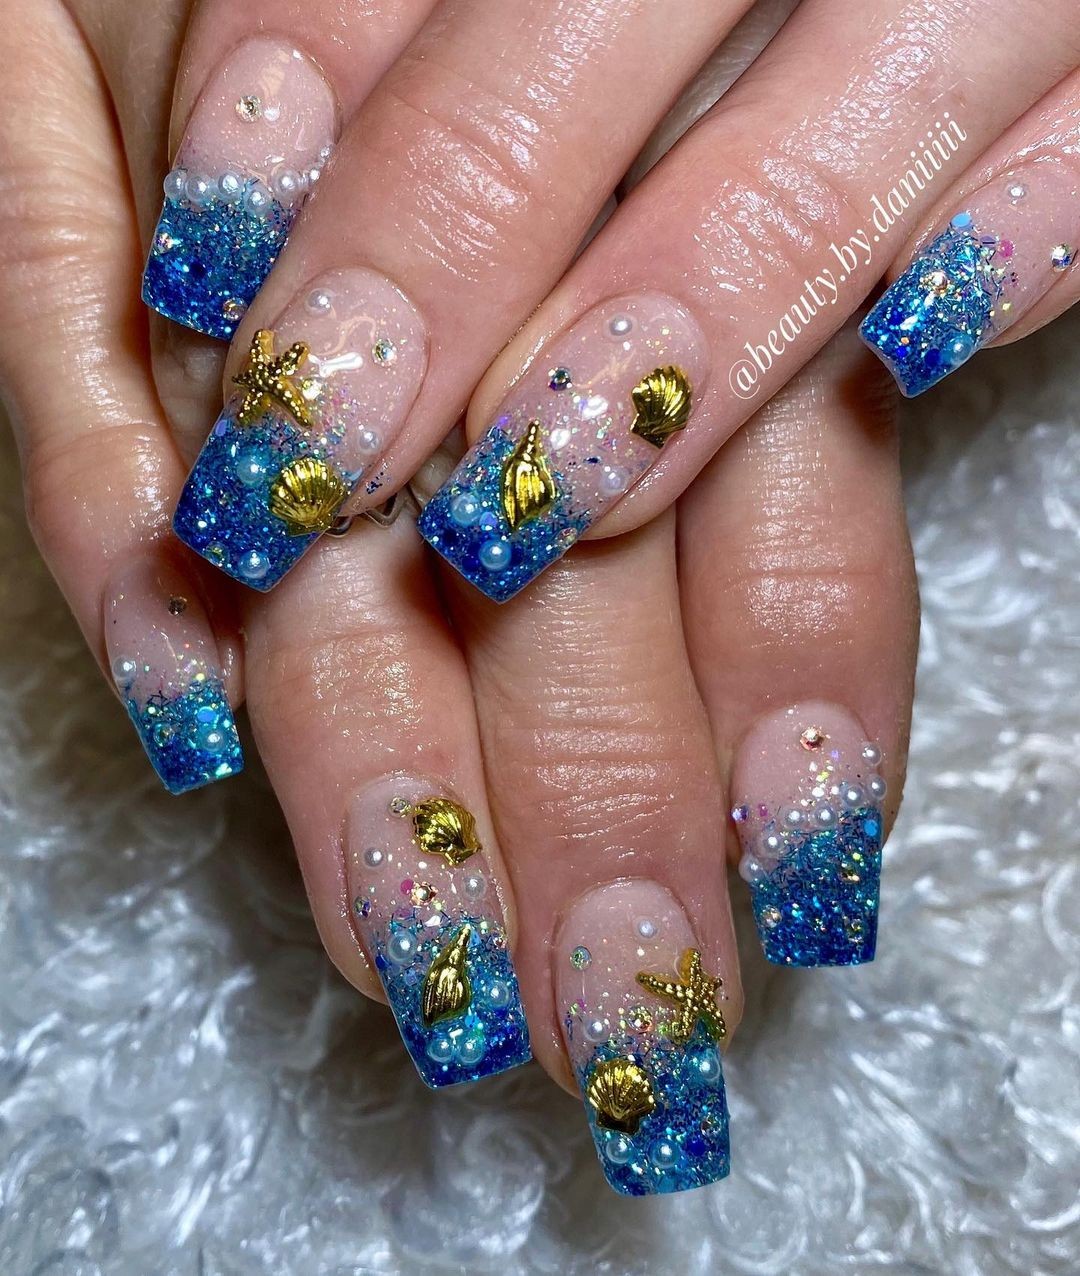
Luxurious Sea Treasure Art
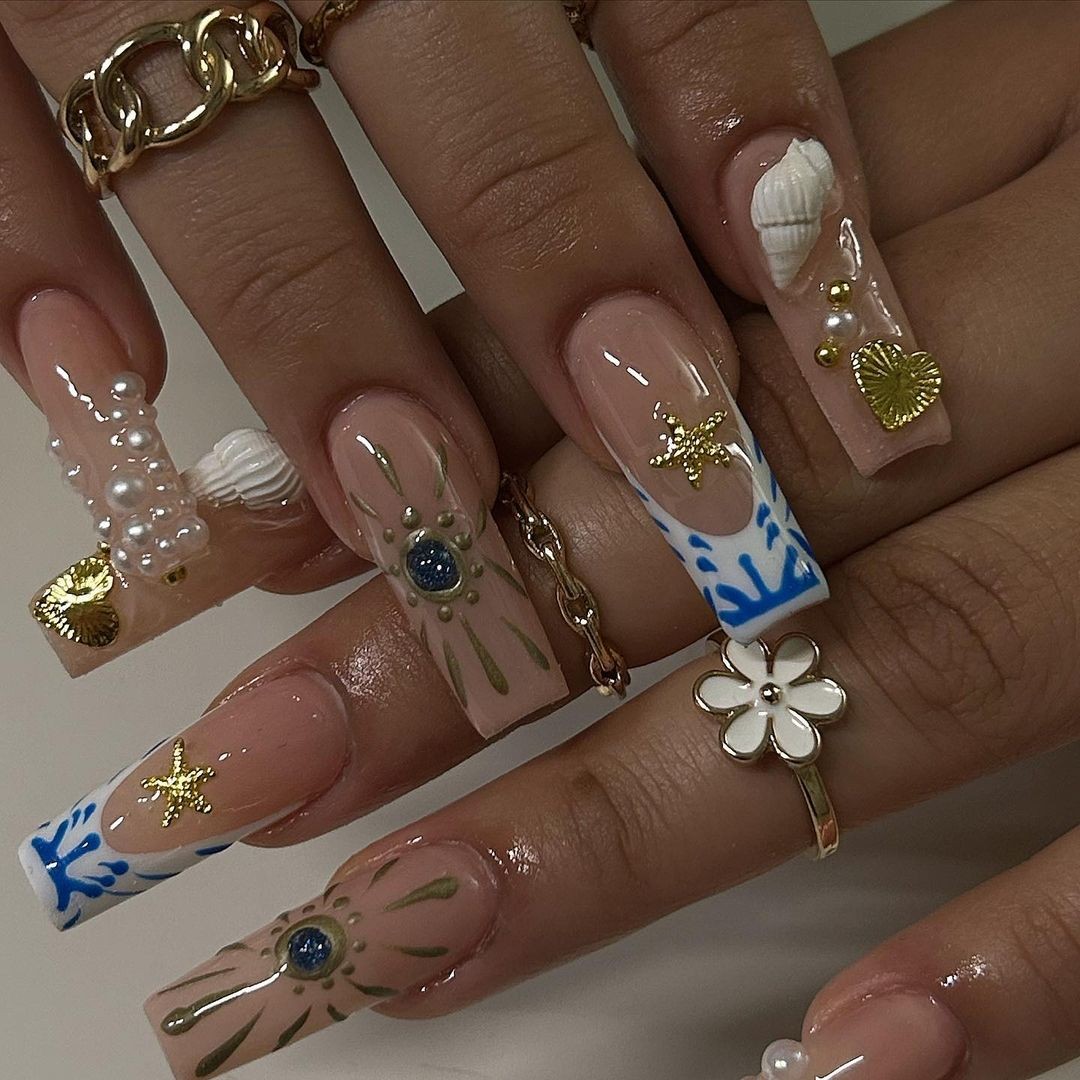
Transform your nails into an underwater oasis with this elaborate design featuring pearls, gold flakes, and miniature seashells. Each nail tells a story of the ocean’s vastness, from deep blues to sandy textures, making it perfect for those who crave ornate and intricate styles. This design requires precision in placing each embellishment to create a balanced yet lavish look that captures the essence of underwater treasures.
To achieve this look, start with a base coat to protect your nails.
Apply a nude polish as the base color. Once dry, plan the placement of your pearls, gold flakes, and seashells. Using a jewelry adhesive, carefully place each embellishment on the nails, creating a harmonious design that resembles a treasure trove found beneath the ocean waves. Finish with a high-gloss top coat to secure the embellishments and give your nails a polished, refined look.
Ocean-inspired nail art encapsulates the serene beauty and mesmerizing depths of the sea, offering a canvas for endless creativity and inspiration. Whether you opt for tranquil blue hues, intricate seashell designs, or vibrant coral accents, ocean-inspired nails transport you to a world of aquatic wonder. Embrace the allure of the ocean with these stunning nail art ideas, and let your fingertips become a captivating reflection of the sea’s boundless charm.